- HTML Form ASP.NET
- Tạo HTML Form đơn giản
- Đọc thông tin gửi đến từ Form
- Validation - kiểm tra dữ liệu gửi đến
- Tự tạo Validation riêng
- Tự tạo ModelBinder riêng
HTML Form cơ bản trong ASP.NET Core
HTML FORM là phần tử quan trong của trang HTML, nó có chức năng nhận dữ liệu của người dùng
sau đó dữ liệu được gửi tới ứng dụng (máy chủ web), trong Form có các phần tử HTML
như <input>, <button>, <select> ...
Kiến thức về Form HTML xem tại:
Thẻ HTML Form
và
Form với HTML5, dùng CSS Bootstrap
để trình bày form xem tại
Bootstrap Form
Trong phần hướng dẫn này sẽ tạo và sử dụng Form trong ASP.NET từ cơ bản đến phức tạp, từ mã HTML thuần túy
đến sử dụng các TagHelper của ASP.NET ... Hãy nhanh chóng tạo ra một dự án ASP.NET Razor Pages để
thực hành, tạo thư mục razor06.form và gõ lệnh:
dotnet new webapp
Tạo HTML Form đơn giản
Tạo ra file Pages/Form.cshtml với nội dung:
@page
@{
ViewData["Title"] = "Thêm khách hàng";
}
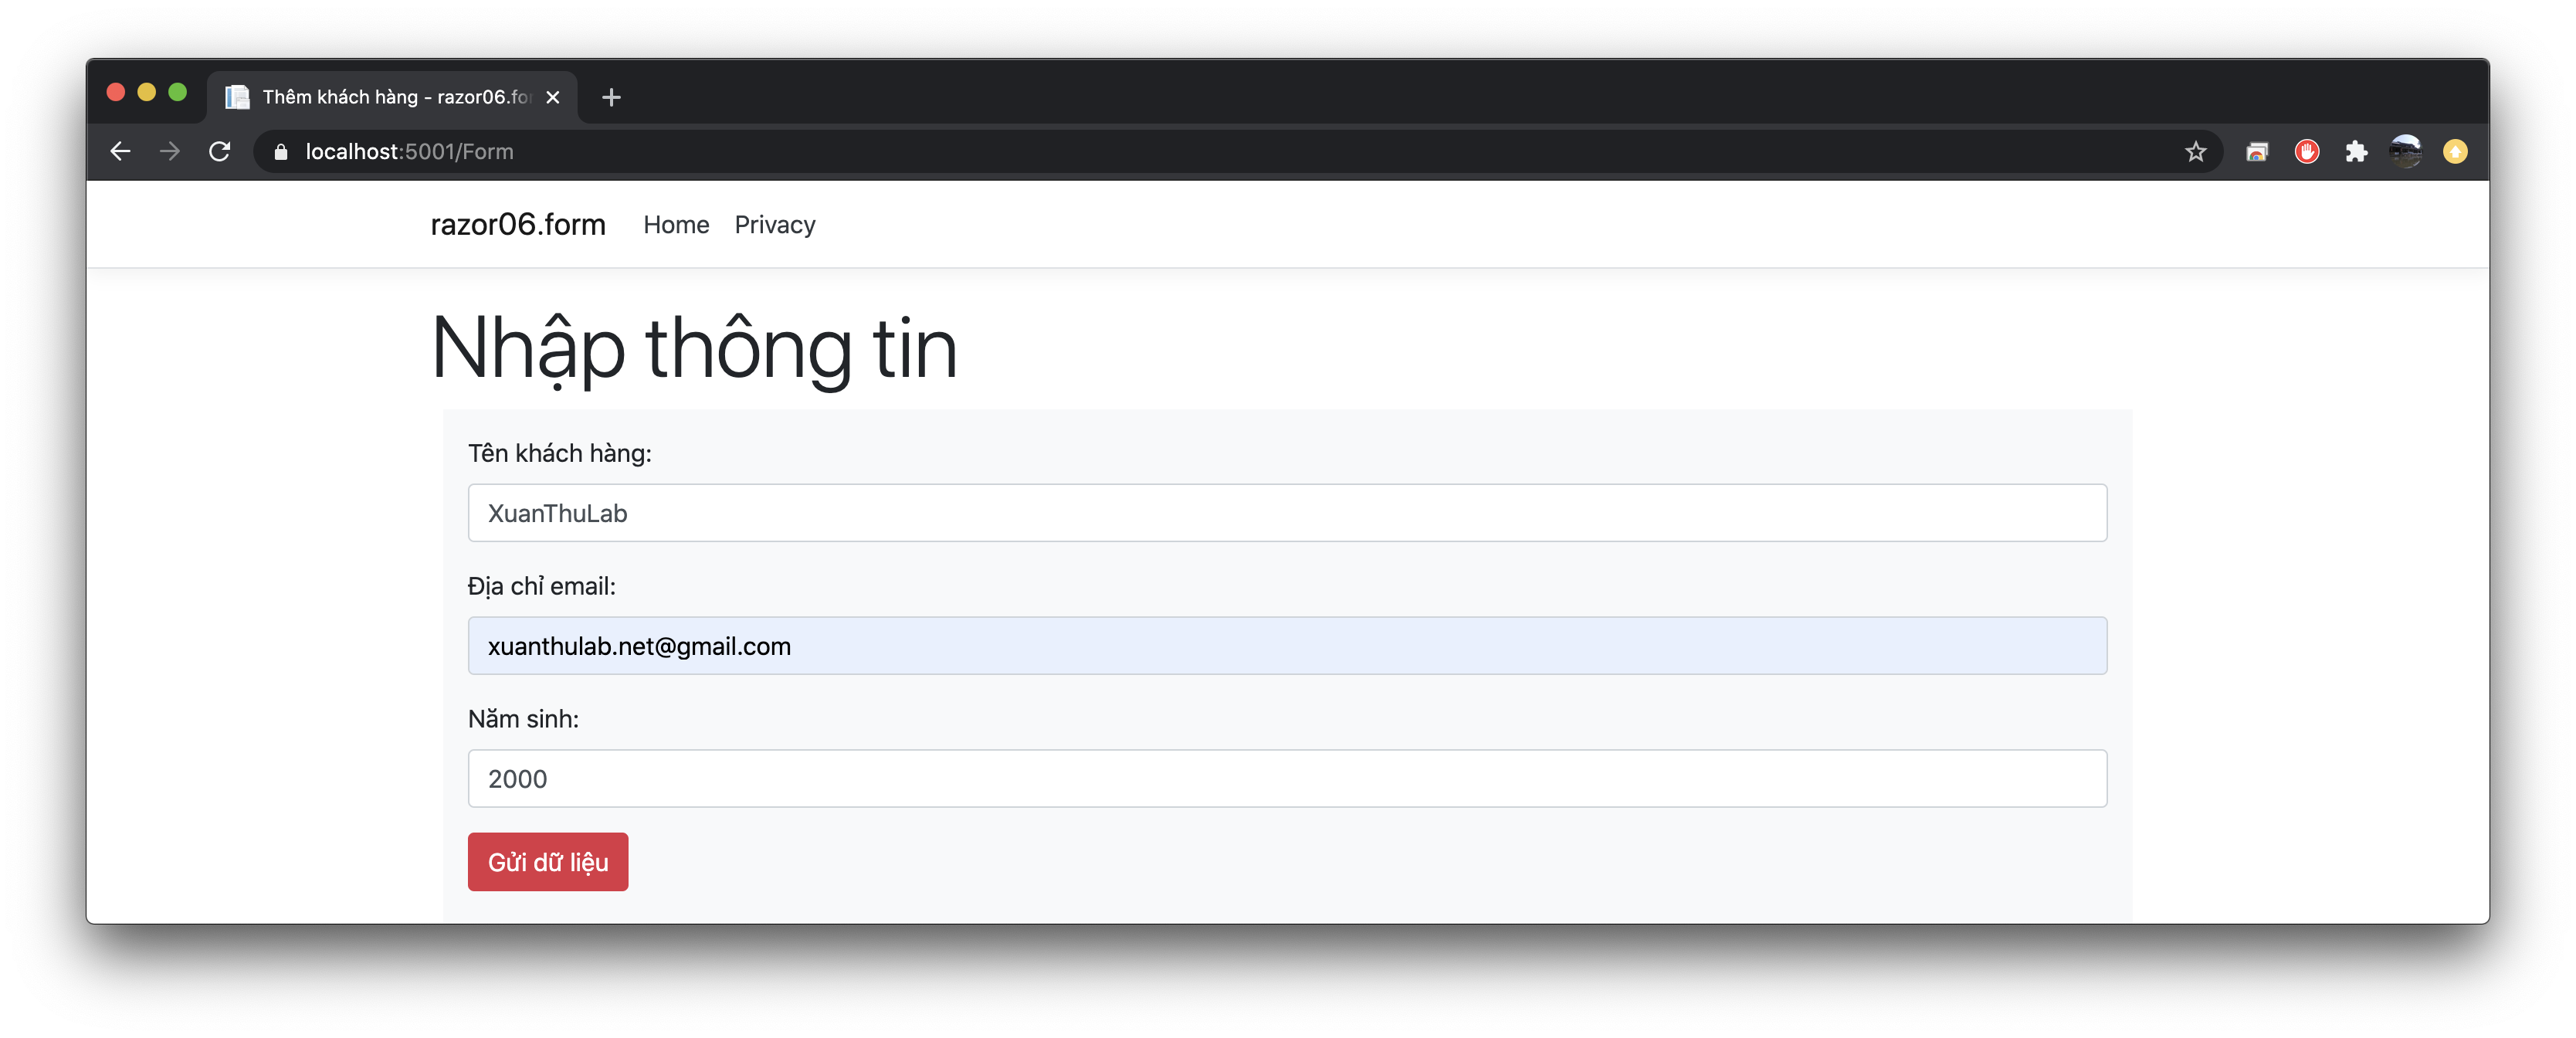
<h2 class="display-4">Nhập thông tin</h2>
<form method="post" class="m-2 p-3 bg-light">
<div class="form-group">
<label for="customername">Tên khách hàng:</label>
<input class="form-control" type="text" name="customername" value="" />
</div>
<div class="form-group">
<label for="email">Địa chỉ email:</label>
<input class="form-control" type="email" name="email" value="" />
</div>
<div class="form-group">
<label for="yearofbirth">Năm sinh:</label>
<input class="form-control" type="text" name="yearofbirth" value="" />
</div>
<div class="form-group">
<input class="btn btn-danger" type="submit" value="Gửi dữ liệu" />
</div>
</form>
Chạy thử (dotnet run) và truy cập địa chỉ: https://localhost:5001/Form
Đọc thông tin gửi đến từ Form
ASP.NET Core chứa các thông tin gửi đến trong một đối tượng HTTP Request. Đối tượng này có được bằng truy cập
thuộc tính của Request của Controller, của PageModel (lớp sinh ra bởi Razor). Có thể nhúng code C# ngay
trong .cshtml như sau (xem thêm
chỉ thị trong Razor
):
Pages/Form.cshtml
@page
@using System;
@{
ViewData["Title"] = "Thêm khách hàng";
@functions {
dynamic customerinfo {set; get;}
public void OnPost() {
string customername = Request.Form["customername"];
string email = Request.Form["email"];
int yearofbirth = Convert.ToInt32(Request.Form["yearofbirth"]);
customerinfo =
new {
customername = customername,
email = email,
yearofbirth = yearofbirth
};
}
}
}
@{
if (customerinfo != null)
{
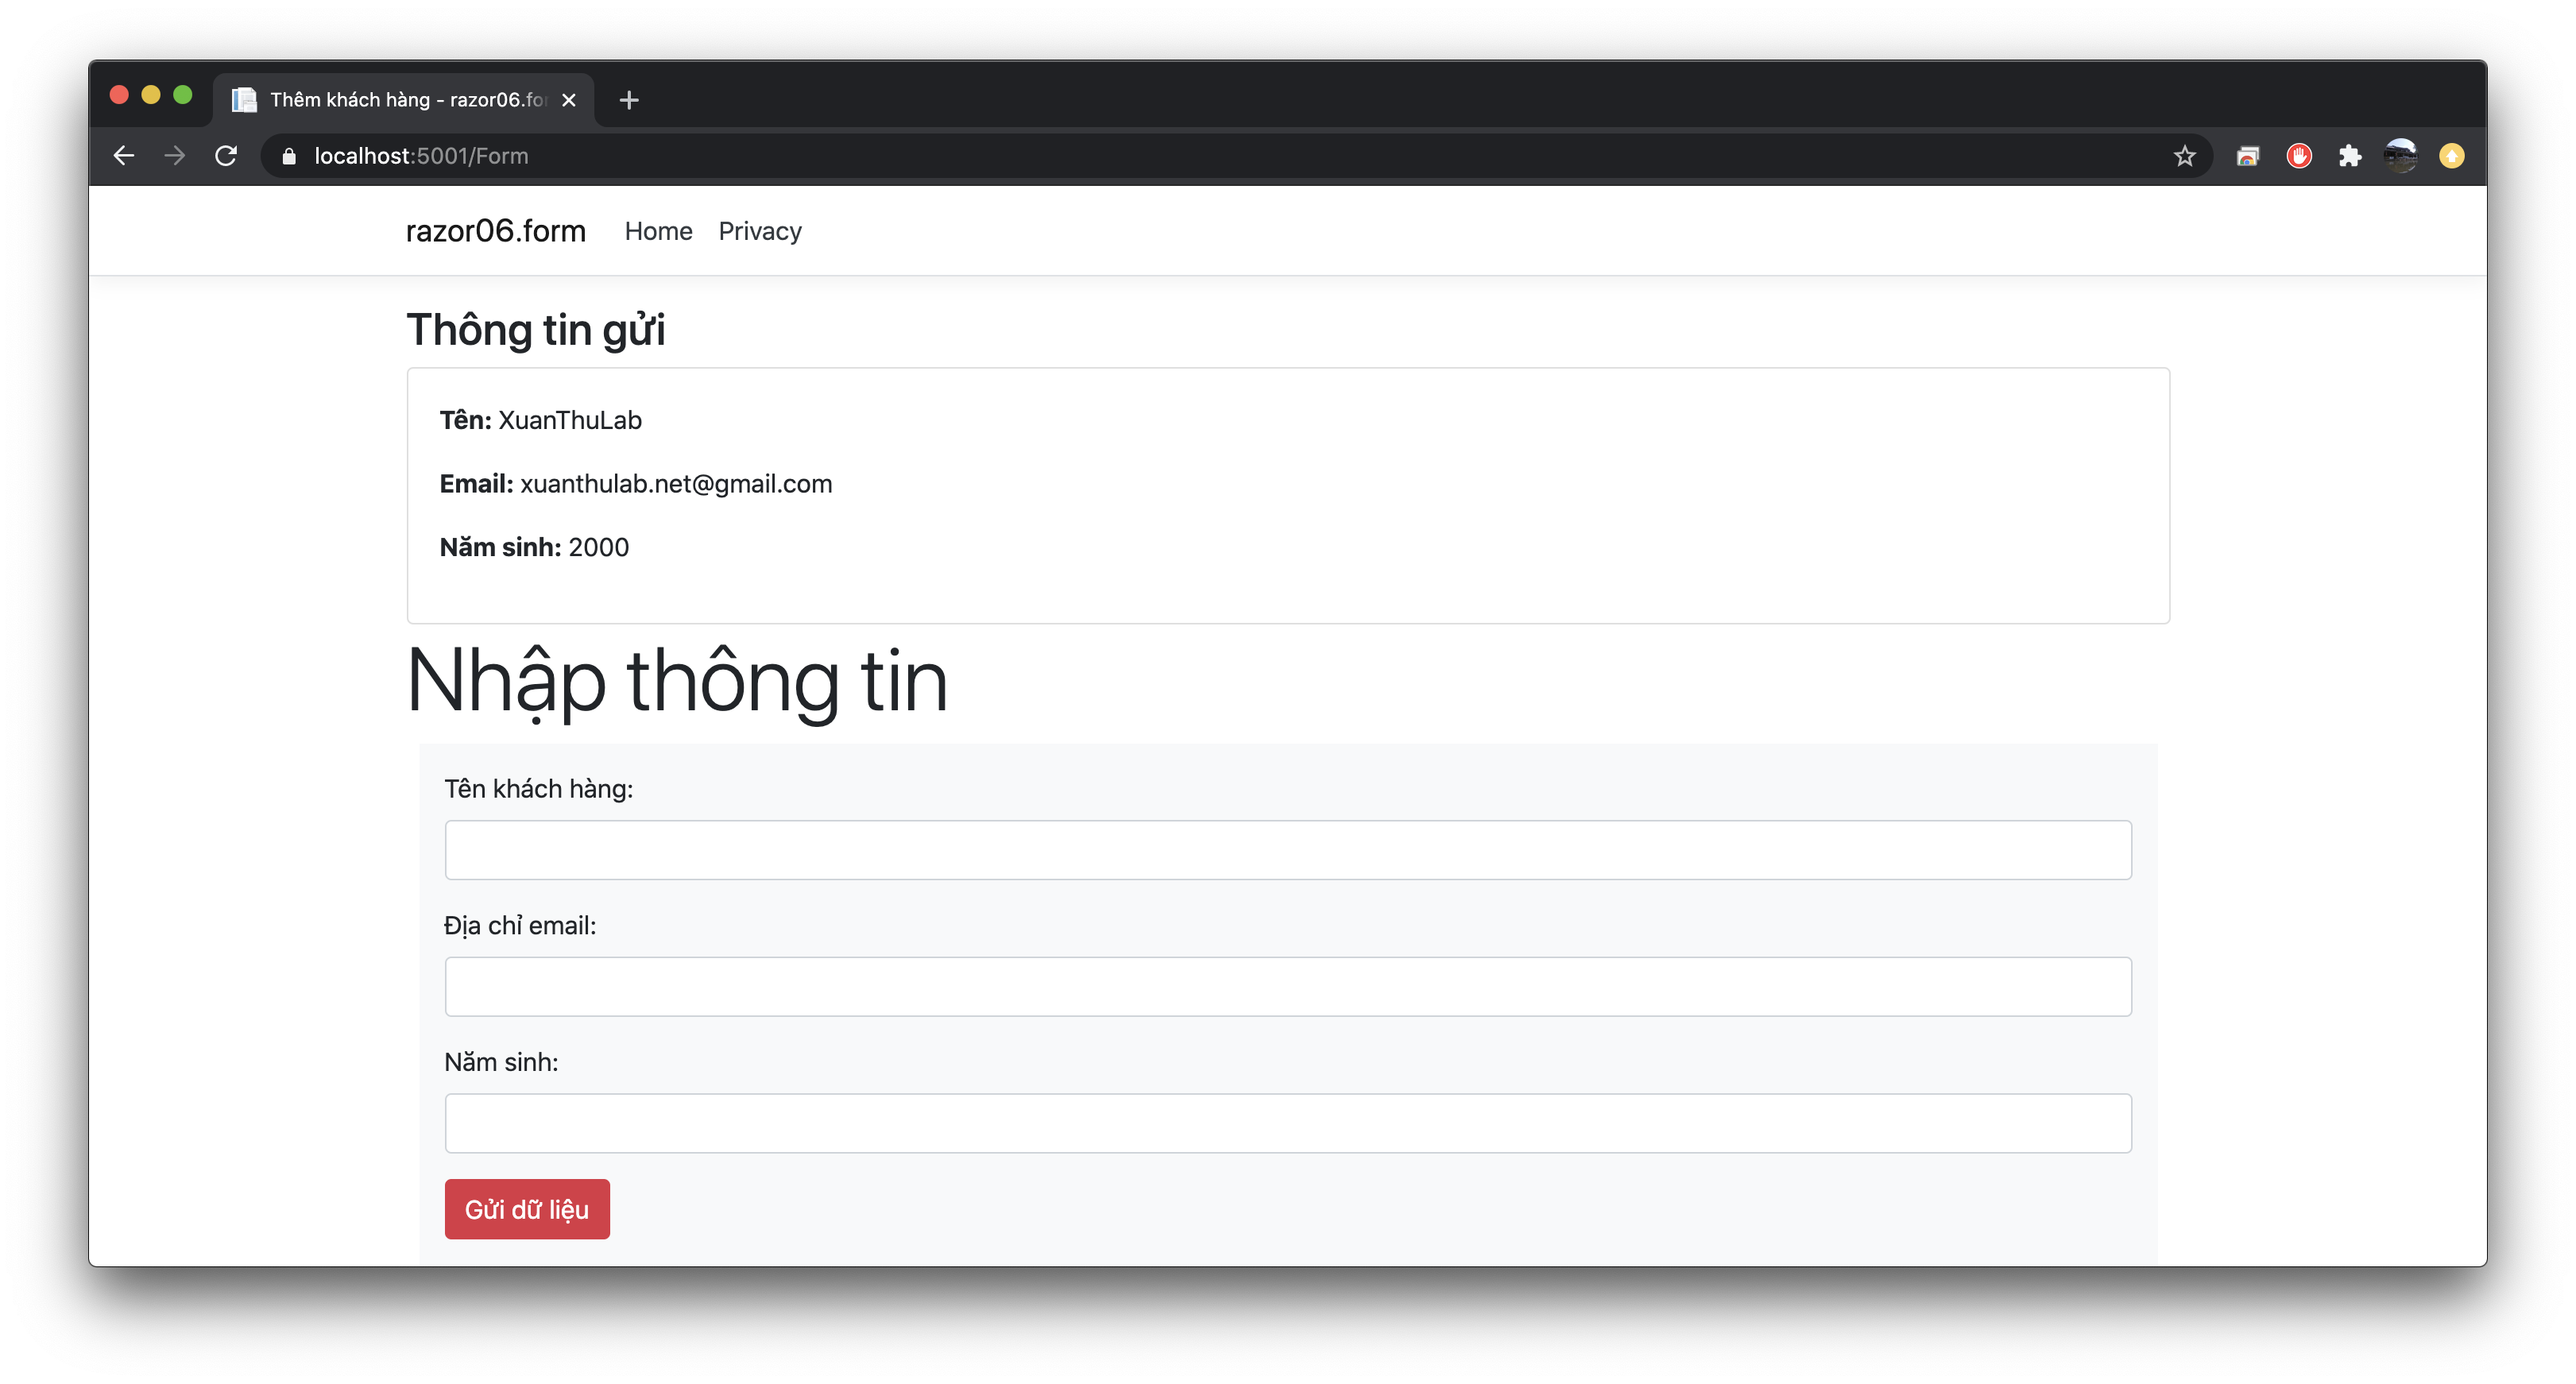
<h3>Thông tin gửi</h3>
<div class="card">
<div class="card-body">
<p><strong>Tên: </strong> @customerinfo.customername</p>
<p><strong>Email: </strong> @customerinfo.email</p>
<p><strong>Năm sinh: </strong> @customerinfo.yearofbirth</p>
</div>
</div>
}
}
<h2 class="display-4">Nhập thông tin</h2>
<form method="post" class="m-2 p-3 bg-light">
<div class="form-group">
<label for="customername">Tên khách hàng:</label>
<input class="form-control" type="text" name="customername" value="" />
</div>
<div class="form-group">
<label for="email">Địa chỉ email:</label>
<input class="form-control" type="email" name="email" value="" />
</div>
<div class="form-group">
<label for="yearofbirth">Năm sinh:</label>
<input class="form-control" type="text" name="yearofbirth" value="" />
</div>
<div class="form-group">
<input class="btn btn-danger" type="submit" value="Gửi dữ liệu" />
</div>
</form>
Kết quả đọc được dữ liệu Post đến từ Form
Validation kiểm tra dữ liệu gửi đến
Để đảm bảo dữ liệu chính xác, cần kiểm tra nó trước khi các xử lý tiếp theo. Để kiểm tra dữ liệu, ASP.NET Core hỗ trợ với khi sử dụng DataAnnotation Attribute với mô hình Model Binding ở bài trước. Các thuộc tính của các đối tượng Model có thể khai báo sử dụng các DataAnnotation Attribute như:
| Attribute | Sử dụng |
|---|---|
| Required | Thuộc tính cần phải có giá trị |
| StringLength | Chiều dài chuỗi (tối thiểu, tối đa) |
| Range | Số nằm trong một khoảng nào đó |
| RegularExpression | Giá trị phù hợp với biểu thức chính quy |
| CustomValidation | Thuộc tính sử dụng Validation tự tạo |
| EmailAddress | Là địa chỉ email |
| FileExtension | Những phần mở rộng file phù hợp |
| MaxLength | Dài tối đa của phần tử mảng, chuỗi |
| MinLength | Dài tối thiểu |
| Phone | Là số điện thoại |
Áp dụng Validation dữ liệu gửi đến, ta sẽ dùng kỹ thuật Model Binding (xem bài trước Model Binding , xây dựng một lớp biểu diễn thông tin khách hàng gửi đến )
using System.ComponentModel;
using System.ComponentModel.DataAnnotations;
public class CustomerInfo {
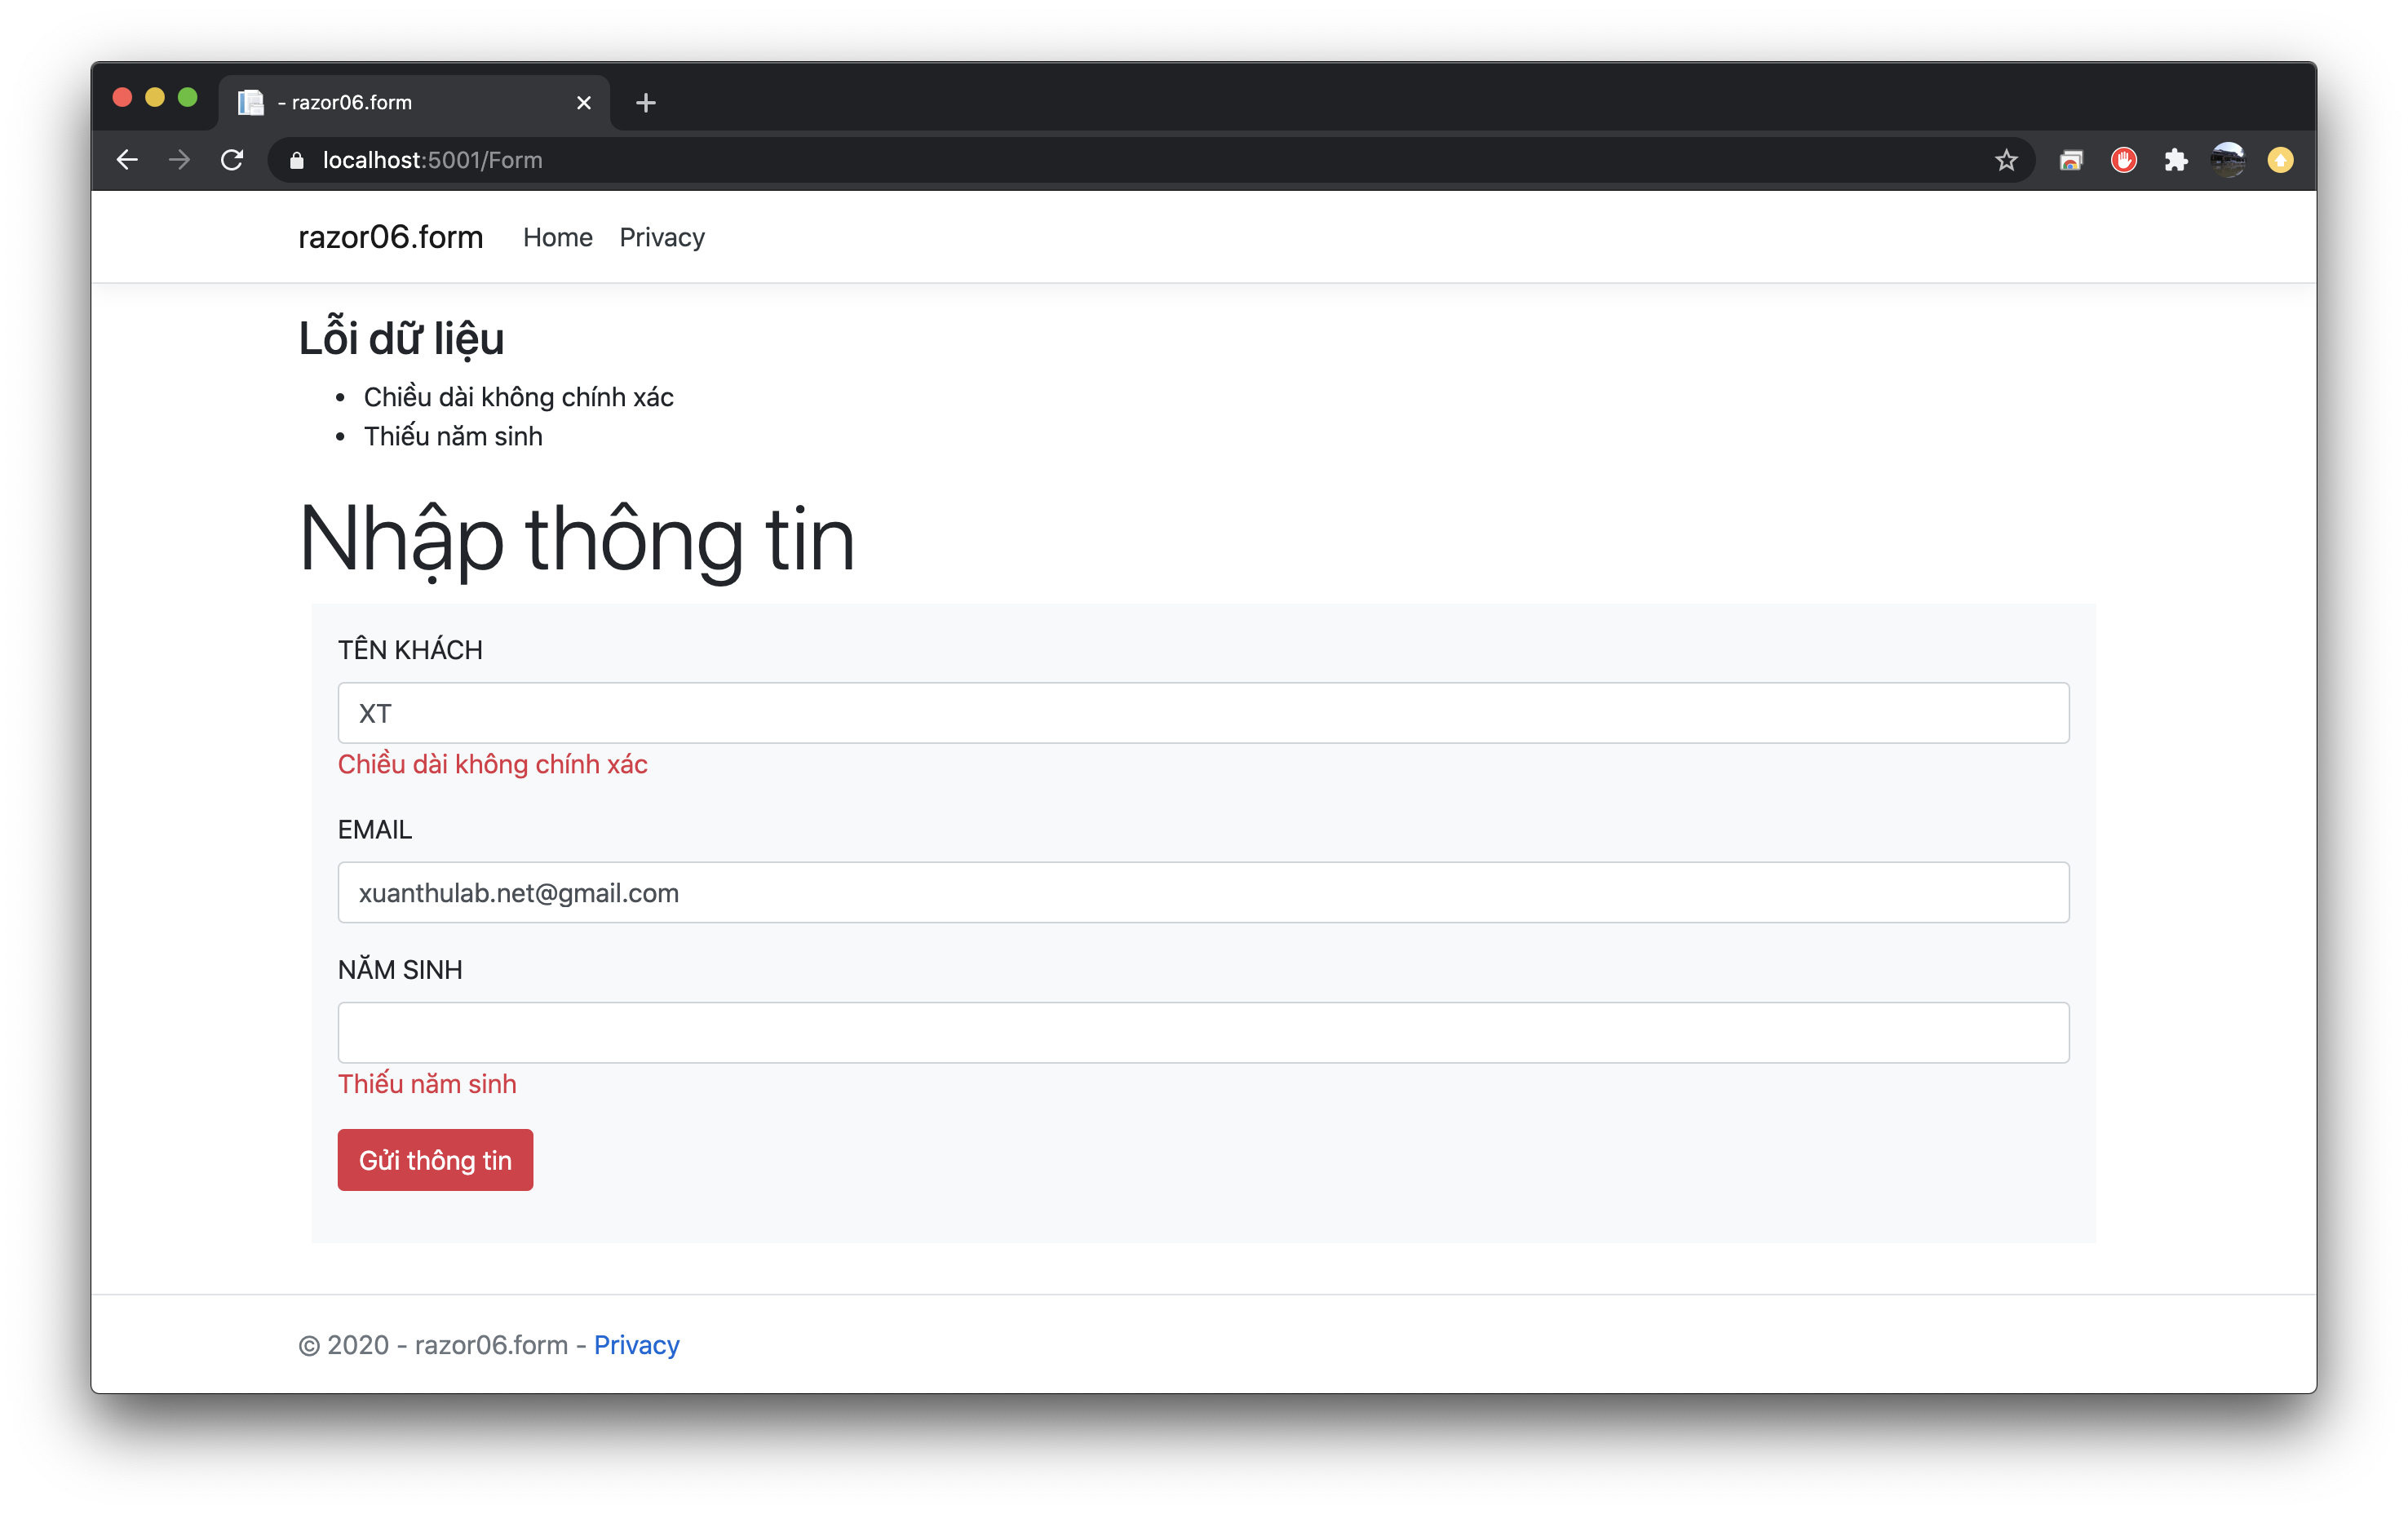
[Required(ErrorMessage="Phải có tên")]
[StringLength(20, MinimumLength = 3, ErrorMessage="Chiều dài không chính xác")]
[Display(Name = "TÊN KHÁCH")] // Label hiện thị
public string Customername {set; get;}
[Required]
[EmailAddress]
[Display(Name = "EMAIL")]
public string Email {set; get;}
[Required(ErrorMessage="Thiếu năm sinh")]
[Display(Name ="NĂM SINH")]
[Range(1970, 2000, ErrorMessage = "Khoảng năm sinh sai")]
public int? YearOfBirth {set; get;}
}
Xây dựng lớp FormModel, tạo file Pages/Form.cshtml.cs với nội dung
using Microsoft.AspNetCore.Mvc;
using Microsoft.AspNetCore.Mvc.RazorPages;

namespace razor06.form.Pages
{
    public class FormModel : PageModel
    {
        public string Mesage {set; get;}
        [BindProperty]
        public CustomerInfo customerInfo {set; get;}

        public void OnPost() {
            if (ModelState.IsValid) {
                Mesage = "Dữ liệu Post chính xác";
                // Xử lý, chuyển hướng ...
            }
            else {
                Mesage = "Lỗi dữ liệu";
            }
        }
    }
}
Khi dữ liệu gửi lên được Binding, nó được tự động kiểm tra phù hợp với khai báo DataAnnotation Attribute,
kiểm tra bằng ModelState.IsValid
Trog file Form.cshtml sử lại, trong đó các thành phần của Form có sử dụng TagHelper
  @page
  @model FormModel
   @{
     var customerinfo = Model.customerInfo;

     if (customerinfo != null)
     {

        <h3>@Model.Mesage</h3>
        <div asp-validation-summary="All"></div>
        if (ModelState.IsValid) {
            <div class="card">
                <div class="card-body">
                    <p><strong>Tên: </strong> @customerinfo.Customername</p>
                    <p><strong>Email: </strong> @customerinfo.Email</p>
                    <p><strong>Năm sinh: </strong> @customerinfo.YearOfBirth</p>
                </div>
            </div>
        }

     }
 }


  <h2 class="display-4">Nhập thông tin</h2>
  <form method="post" class="m-2 p-3 bg-light">
      <div class="form-group">
          <label asp-for="@customerinfo.Customername"></label>
          <input class="form-control" asp-for="@customerinfo.Customername" />
          <span asp-validation-for="@customerinfo.Customername" class="text-danger"></span>
      </div>
      <div class="form-group">
          <label asp-for="@customerinfo.Email"></label>
          <input class="form-control" asp-for="@customerinfo.Email" />
          <span asp-validation-for="@customerinfo.Email" class="text-danger"></span>
      </div>
      <div class="form-group">
          <label asp-for="@customerinfo.YearOfBirth"></label>
          <input class="form-control" asp-for="@customerinfo.YearOfBirth" />
          <span asp-validation-for="@customerinfo.YearOfBirth" class="text-danger"></span>
      </div>
      <div class="form-group">
          <button class="btn btn-danger" asp-page="Form">Gửi thông tin</button>
      </div>
  </form>
Tạo Validation riêng
Việc tạo ra một thuộc tính có chức năng Validation khá đơn giản, chỉ việc kế thừa lớp
ValidationAttribute và nạp chồng phương thức IsValid. Ví dụ, tạo ra một Validation đặt tên
là MyValidation có chức năng kiểm tra số nhập vào phải là số chẵn
public class MyValidation: ValidationAttribute
{
    public MyValidation() {
        ErrorMessage = "Không phải số chẵn";
    }

    public override bool IsValid(object value) {
        if (value == null) return false;
        int number = Int32.Parse(value.ToString());
        bool chiahetcho2 = number % 2 == 0;
        return chiahetcho2;

    }
}
Nếu áp dụng vào thuộc tính YearOfBirth của model trên
public class CustomerInfo {

    //..

    [Required(ErrorMessage="Thiếu năm sinh")]
    [Display(Name ="NĂM SINH")]
    [Range(1970, 2000, ErrorMessage = "Khoảng năm sinh sai")]
    [MyValidation]
    public int? YearOfBirth {set; get;}
}
Khi chạy, nếu nhập năm sinh là số lẽ sẽ lỗi.
Tạo ModelBinder riêng
Trong phần Binding Model trong ASP.NET Core đã biết - có thể liên kết dữ liệu tự động từ gửi đến vào các thuộc tính của Model. Bạn hoàn toàn có thể xây dựng một cơ chế tùy biến quá trình binding, kiểm tra và filter dữ liệu (biến đổi dữ liệu) khi binding.
Để tạo da một cơ chế binding riêng, bạn cần tạo ra một lớp triển khai từ giao diện
IModelBinder sau đó sử dụng thuộc tính [ModelBinder] để chỉ ra sẽ áp dụng
cơ chế binding tùy chọn.
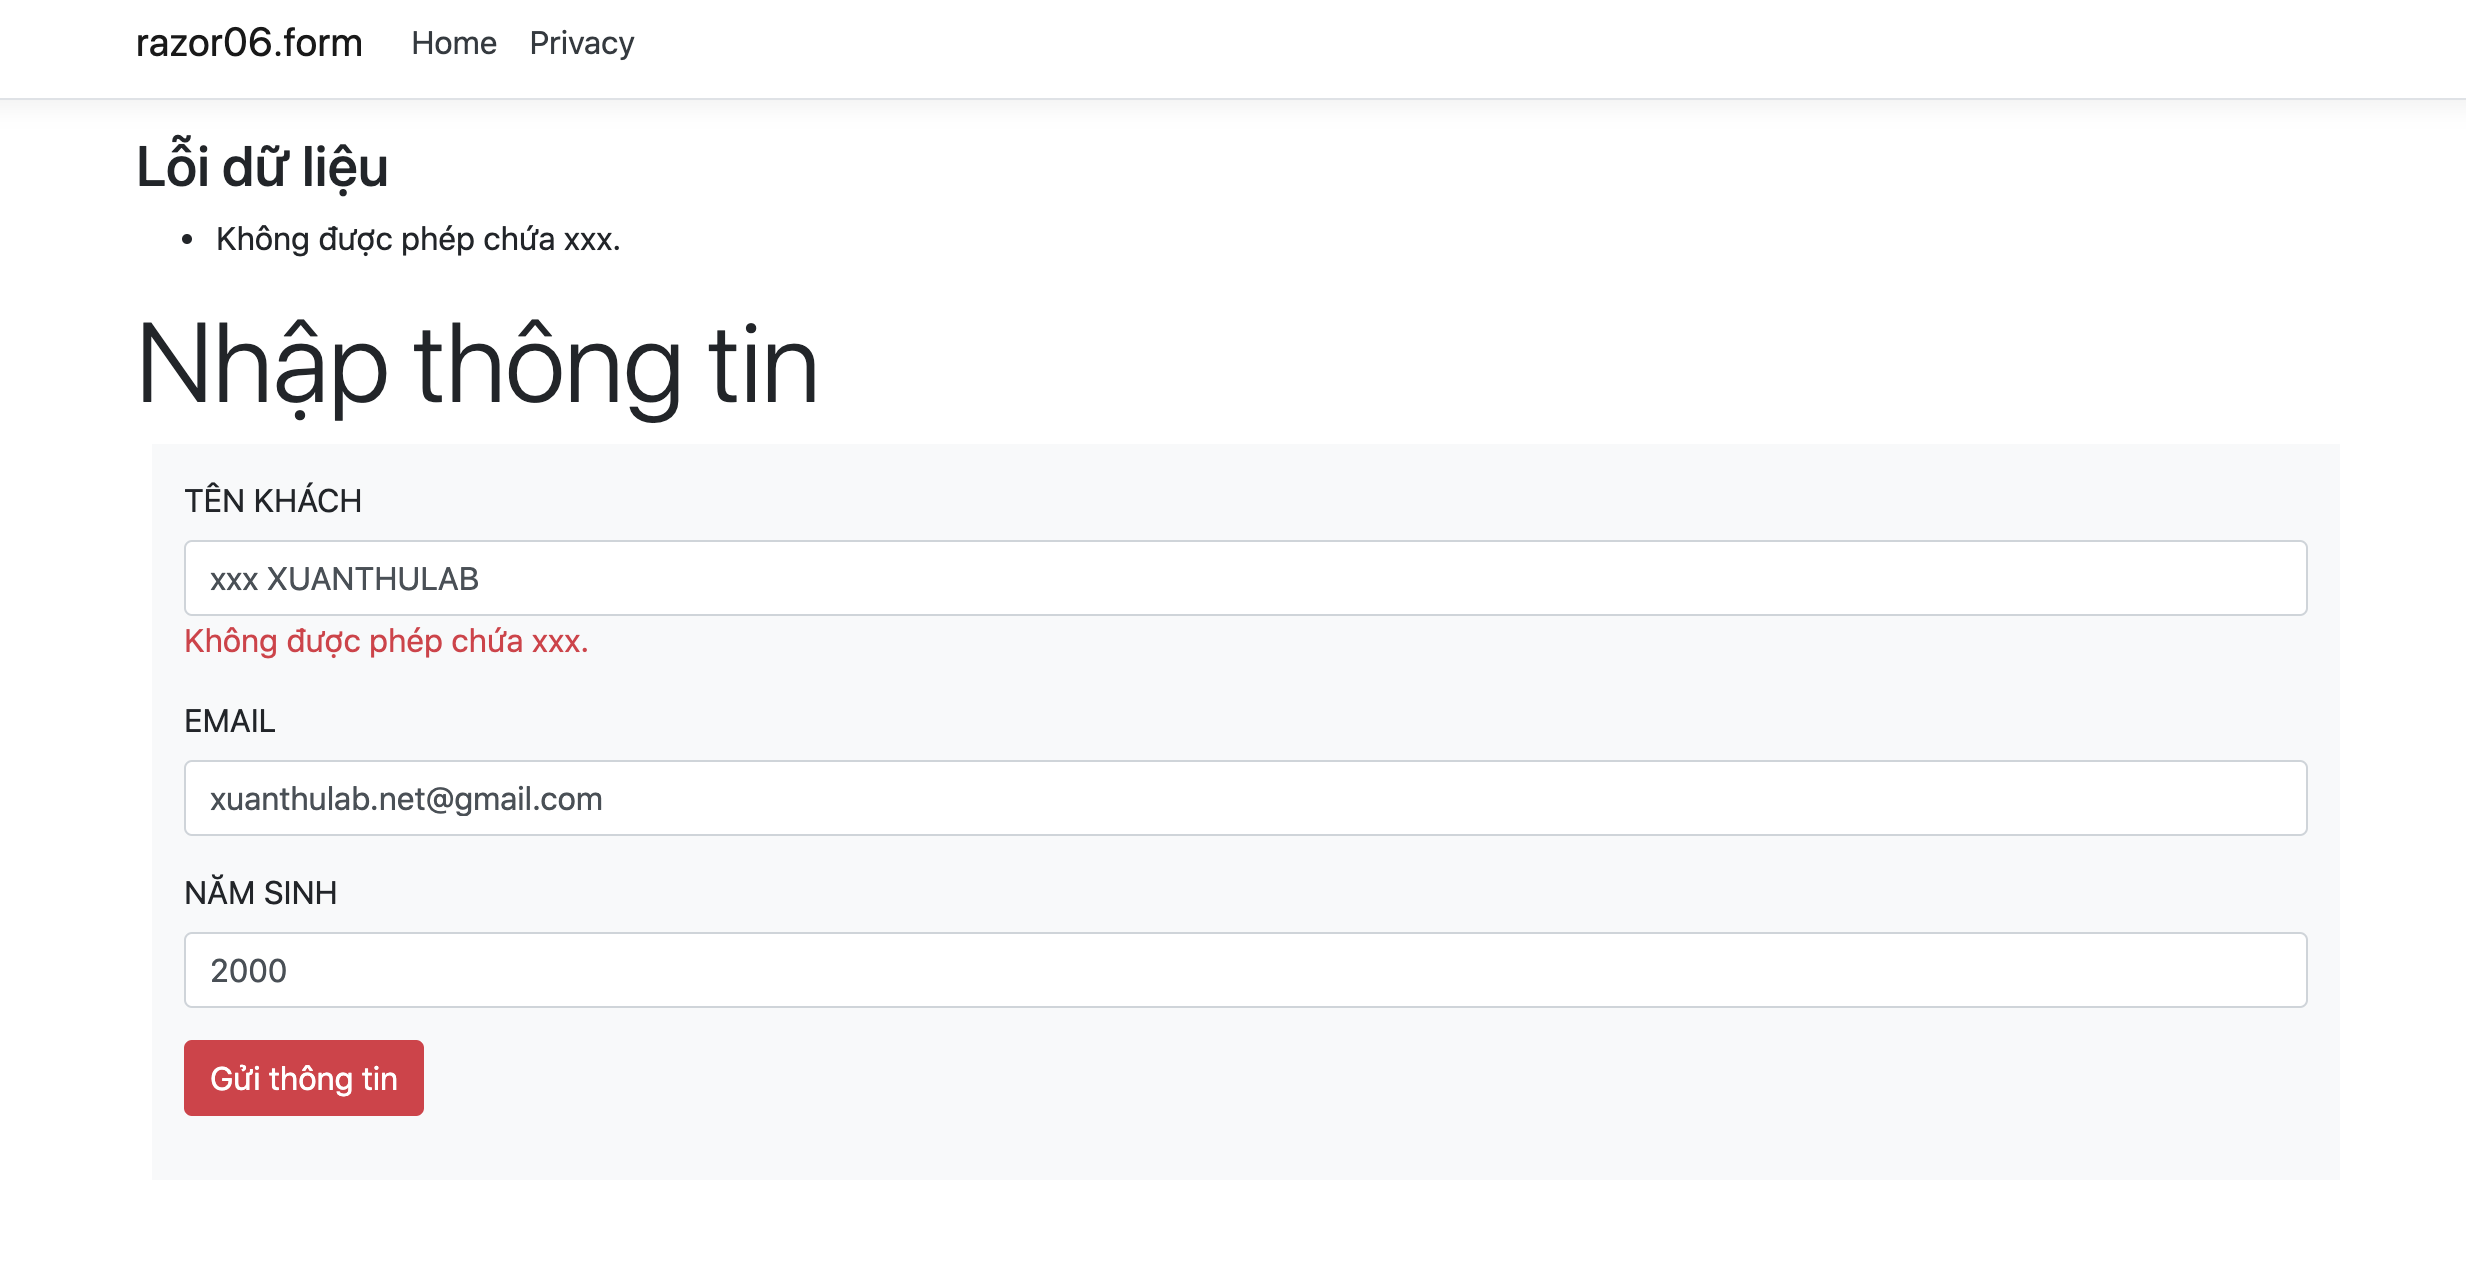
Ví dụ, tạo ra một lớp đặt tên MyCheckNameBinding, có chức năng binding dữ liệu chuỗi,
có kiểm tra chuỗi dữ liệu đầu vào không được có chuỗi "xxx", dữ liệu được cắt bỏ khoảng trắng, được
chuyển sang chữ in hoa khi gán vào thuộc tính. Lớp này xây dựng như sau:
using System;
using System.Threading.Tasks;
using Microsoft.AspNetCore.Mvc.ModelBinding;
using Microsoft.Extensions.Logging;

namespace razor06.form.Binding {

    // Liên kết dữ liệu (binding) - chuỗi dữ liệu gửi đến
    // phải không có chữ xxx - dữ liệu được filter thành chữ IN HOA
    public class MyCheckNameBinding : IModelBinder {
        private readonly ILogger<MyCheckNameBinding> _logger;

        // Inject các dịch vụ nếu muốn ở khởi tạo
        public MyCheckNameBinding (ILogger<MyCheckNameBinding> logger) {
            _logger = logger;
        }
        public Task BindModelAsync (ModelBindingContext bindingContext) {

            if (bindingContext == null) {
                throw new ArgumentNullException (nameof (bindingContext));
            }

            // Lấy ModelName - tên thuộc tính binding
            string modelName = bindingContext.ModelName;

            // Lấy giá trị gửi đến
            ValueProviderResult valueProviderResult = bindingContext.ValueProvider.GetValue (modelName);

            // Không có giá trị gửi đến (không thiết lập giá trị cho thuộc  tính)
            if (valueProviderResult == ValueProviderResult.None) {
                return Task.CompletedTask;
            }

            // Thiết lập cho ModelState giá trị bindinng
            bindingContext.ModelState.SetModelValue (modelName, valueProviderResult);

            // Đọc giá trị đầu tiên gửi đêns
            string value = valueProviderResult.FirstValue;

            // Xử lý nếu chuỗi giá trị gửi đến null
            if (string.IsNullOrEmpty (value)) {
                return Task.CompletedTask;
            }

            var s = value.ToUpper();

            if (s.Contains ("XXX")) {
                // chứa ký tự không được phép, thiết lập báo lỗi (không binding)
                bindingContext.ModelState.TryAddModelError (
                    modelName, "Không được phép chứa xxx.");
                return Task.CompletedTask;

            }

            // Gán giá trị vào thuộc tính (có loại bỏ khoảng trắng)
            bindingContext.Result = ModelBindingResult.Success(s.Trim());

            return Task.CompletedTask;

        }
    }
}
Để áp dụng MyCheckNameBinding thì sử dụng thuộc tính ModelBinder với cú pháp
như sau:
[ModelBinder(BinderType = typeof(MyCheckNameBinding))]
Ví dụ, áp dụng vào Customername của CustomerInfo
public class CustomerInfo {

    [Required(ErrorMessage="Phải có tên")]
    [StringLength(20, MinimumLength = 3, ErrorMessage="Chiều dài không chính xác")]
    [Display(Name = "TÊN KHÁCH")] // Label hiện thị
    [ModelBinder(BinderType = typeof(MyCheckNameBinding))]  // Khi binding dữ liệu sẽ chuyển in hoa, không chứa XXX
    public string Customername {set; get;}

    // ...
}
Mã nguồn: ASP_NET_CORE/razor06.form