- Giới thiệu về elFinder
- Tích hợp elFinder vào ASP.NET Core MVC
- Tạo trang quản lý file dùng elFinder
- Tích hợp elFinder vào Summmernote
Giới thiệu elFinder
elFinder (studio-42.github.io/elFinder/) là một tiện tích quản lý file có thể tích hợp vào các Website, nó giốn như CkFinder (CkFinder thời điểm này chưa hỗ trợ chạy với .NET Core). Đối với ASP.NET Core hiện giờ đang có thư viện giúp cho việc tích hợp elFinder, ngoài ra elFinder cũng dễ dàng được sử dụng bởi các trình soạn HTML WYSIWYG như CkEditor, Summernote, TinyMCE
Ta sẽ tích hợp elFinder vào ứng dụng ASP.NET Core MVC bằng cách sử dụng elFinder.NetCore (mã nguồn)s
Trong ứng dụng ASP.NET CORE MVC trước tiên tải các thư viện client-side gồm: jquery, jqueryui, elfinder - ta sẽ sử dụng LibMan trong .NET Core
Tạo file libman.json với nội dung:
{
  "version": "1.0",
  "defaultProvider": "cdnjs",
  "libraries": [
    {
      "library": "jquery@3.5.1",
      "destination": "wwwroot/lib/jquery"
    },
    {
      "library": "jqueryui@1.12.1",
      "destination": "wwwroot/lib/jqueryui"
    },
    {
      "library": "elfinder@2.1.57",
      "destination": "wwwroot/lib/elfinder"
    }
  ]
}
Sau đó thực hiện lệnh để tải về từ CDN
libman restore
Ngoài ra nếu bạn có thể tải về theme đẹp hơn thay cho theme mặc định, ví dụ sử dụng theme: elFinder-Material-Theme
Tải về bằng npm
npm install elfinder-material-theme
Sau đó bạn copy toàn bộ thư mục node_modules/elfinder-material-theme
vào thư mục wwwroot/css.
Đến đây về thư viện client-side đã đủ, trang HTML muốn sử dụng elFinder cần nạp các file css và js gồm
- ~/lib/jqueryui/themes/base/theme.css
- ~/lib/jqueryui/themes/base/jquery-ui.css
- ~/lib/elfinder/css/elfinder.full.css
- ~/lib/elfinder/css/theme.min.css
- ~/css/elfinder-material-theme/Material/css/theme-gray.css
- ~/lib/jquery/dist/jquery.min.js
- ~/lib/jqueryui/jquery-ui.min.js
- ~/lib/elfinder/js/elfinder.min.js
Tích hợp elFinder vào ASP.NET CORE MVC
Bạn có thể clone mã nguồn elFinder.NetCore từ github và tích hợp vào dự án trong trường hợp muốn tùy biến sâu. Tại đây để đơn giản sẽ sử dụng ngày bản build đóng gói đã đưa lên nuget
Trước tiên tích hợp gói elFinder.NetCore vào dự án bằng lệnh
dotnet add package elFinder.NetCore
Thư viện này tạo ra các chức năng về quản lý file chạy ở Backend, nó cung cấp kết nối đến client-side của elFinder.
Nếu chạy trên macOS bạn có thể cần cài thư viện xử lý đồ họa
mono-libgdiplus
brew reinstall mono-libgdiplus
Đầu tiên cần xây dựng ra một Controller - cung cấp sự kết nối giữa backend elFinder.NetCore và
client-side elFinder. Tạo ra controller đặt tên FileSystemController.cs
using System;
using System.IO;
using System.Threading.Tasks;
using elFinder.NetCore.Drivers.FileSystem;
using Microsoft.AspNetCore.Authorization;
using Microsoft.AspNetCore.Hosting;
using Microsoft.AspNetCore.Http.Extensions;
using Microsoft.AspNetCore.Mvc;

namespace elFinder.NetCore.Web.Controllers
{
    // [Authorize] - bỏ comment user phải đăng nhập mới dùng được
    [Route("el-finder-file-system")]
    public class FileSystemController : Controller
    {
        IWebHostEnvironment _env;
        public FileSystemController(IWebHostEnvironment env) => _env = env;

        // Url để client-side kết nối đến backend
        // /el-finder-file-system/connector
        [Route("connector")]
        public async Task<IActionResult> Connector()
        {
            var connector = GetConnector();
            return await connector.ProcessAsync(Request);
        }

        // Địa chỉ để truy vấn thumbnail
        // /el-finder-file-system/thumb
        [Route("thumb/{hash}")]
        public async Task<IActionResult> Thumbs(string hash)
        {
            var connector = GetConnector();
            return await connector.GetThumbnailAsync(HttpContext.Request, HttpContext.Response, hash);
        }

        private Connector GetConnector()
        {
            // Thư mục gốc lưu trữ là wwwwroot/files (đảm bảo có tạo thư mục này)
            string pathroot = "files";

            var driver = new FileSystemDriver();

            string absoluteUrl = UriHelper.BuildAbsolute(Request.Scheme, Request.Host);
            var uri = new Uri(absoluteUrl);

            // .. ... wwww/files
            string rootDirectory = Path.Combine(_env.WebRootPath, pathroot);

            // https://localhost:5001/files/
            string url = $"{uri.Scheme}://{uri.Authority}/{pathroot}/";
            string urlthumb = $"{uri.Scheme}://{uri.Authority}/el-finder-file-system/thumb/";


            var root = new RootVolume( rootDirectory, url, urlthumb)
            {
                //IsReadOnly = !User.IsInRole("Administrators")
                IsReadOnly = false, // Can be readonly according to user's membership permission
                IsLocked = false, // If locked, files and directories cannot be deleted, renamed or moved
                Alias = "Files", // Beautiful name given to the root/home folder
                //MaxUploadSizeInKb = 2048, // Limit imposed to user uploaded file <= 2048 KB
                //LockedFolders = new List<string>(new string[] { "Folder1" }
                ThumbnailSize = 100,
            };


            driver.AddRoot(root);

            return new Connector(driver)
            {
                // This allows support for the "onlyMimes" option on the client.
                MimeDetect = MimeDetectOption.Internal
            };
        }
    }
}
Với controller này, bạn có Url để client side kết nối với backend elFinder.netcore là /el-finder-file-system/connector, bạn dùng nó để cấu hình elFinder client
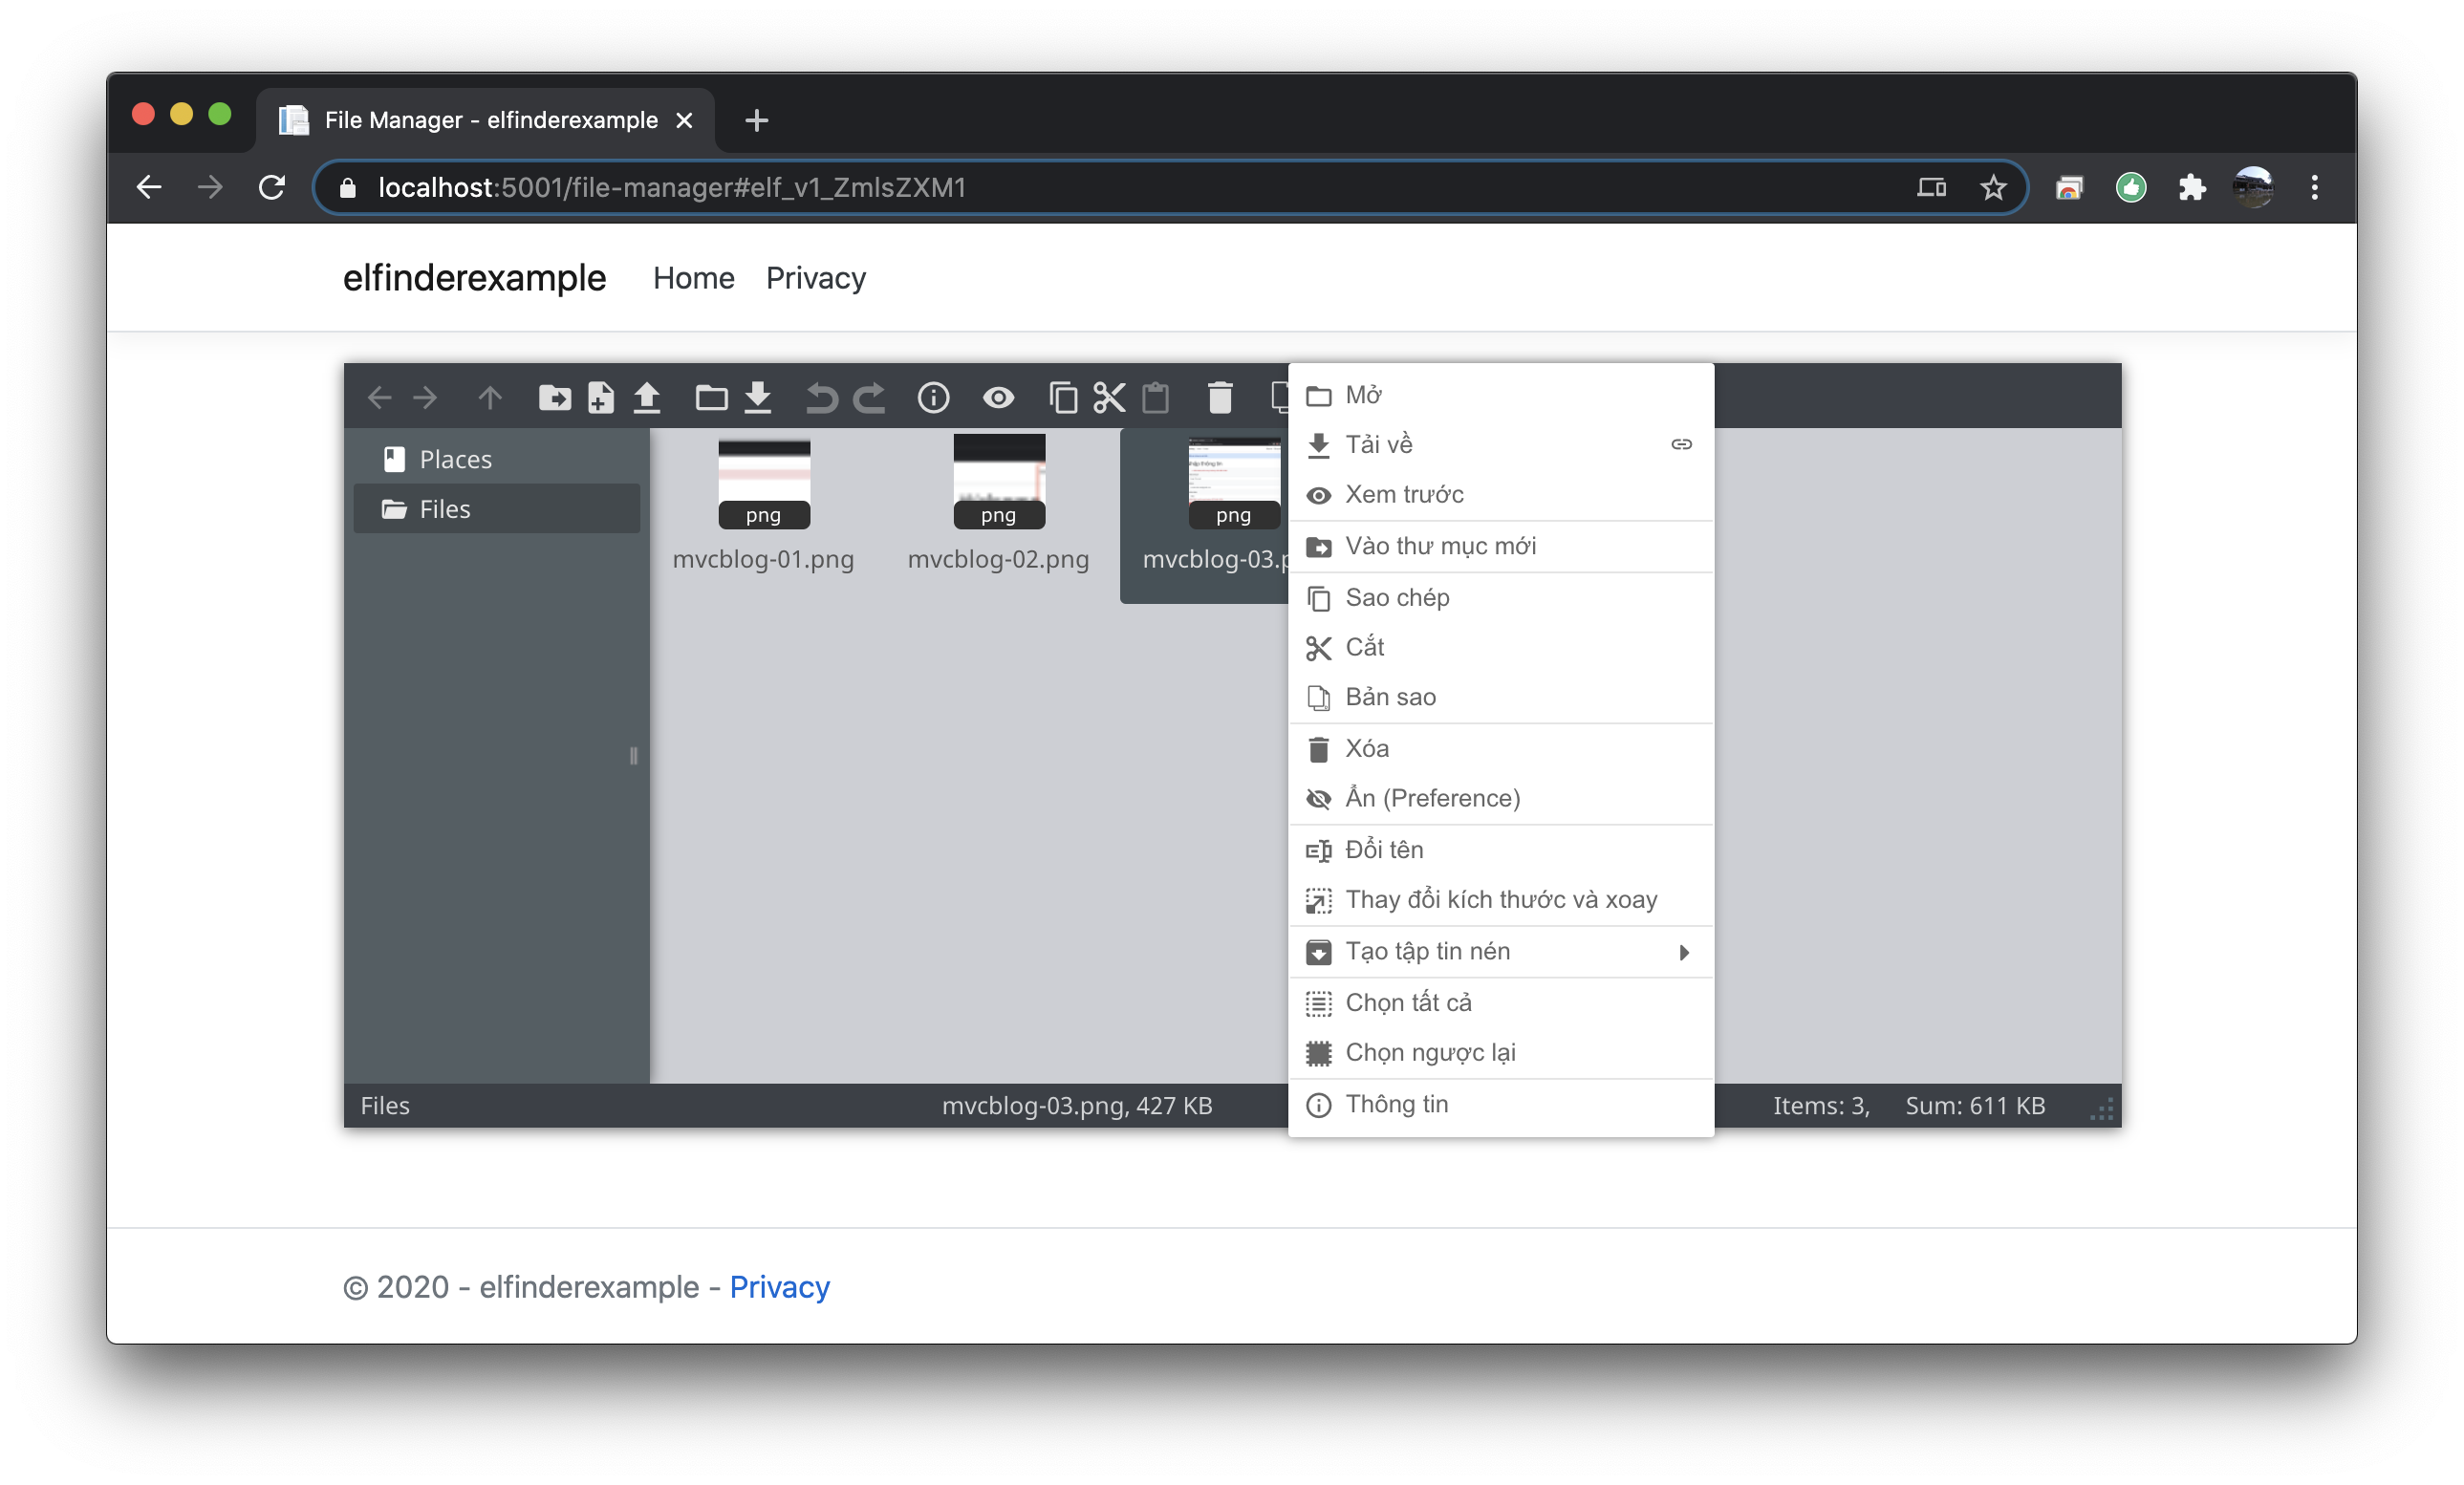
Tạo trang quản lý file
Áp dụng xây dựng một trang quản lý file, trước tiên tạo ra một controller FileManagerController.cs
[Route("/file-manager")]
public class FileManagerController : Controller
{
  public IActionResult Index()
  {
    return View();
  }
}
Trong Index.cshtml tương ứng với Action Index có nội dung như sau:
@{
    ViewBag.Title = "File Manager";
}

<div id="elfinder"></div>

@section Scripts {
    <link rel="stylesheet" href="~/lib/jqueryui/themes/base/theme.css" />
    <link rel="stylesheet" href="~/lib/jqueryui/themes/base/jquery-ui.css" />
    <link rel="stylesheet" href="~/lib/elfinder/css/elfinder.full.css" />
    <link rel="stylesheet" href="~/lib/elfinder/css/theme.min.css" />
    <link rel="stylesheet" href="~/css/elfinder-material-theme/Material/css/theme-gray.css" />

    <script src="~/lib/jquery/dist/jquery.min.js"></script>
    <script src="~/lib/jqueryui/jquery-ui.min.js"></script>
    <script src="~/lib/elfinder/js/elfinder.min.js"></script>

    <script type="text/javascript">
		// Documentation for client options:
		// https://github.com/Studio-42/elFinder/wiki/Client-configuration-options
        $(document).ready(function () {
            var myCommands = elFinder.prototype._options.commands;

            // Not yet implemented commands in elFinder.NetCore
            var disabled = ['callback', 'chmod', 'editor', 'netmount', 'ping', 'search', 'zipdl', 'help'];
            elFinder.prototype.i18.en.messages.TextArea = "Edit";

            $.each(disabled, function (i, cmd) {
                (idx = $.inArray(cmd, myCommands)) !== -1 && myCommands.splice(idx, 1);
            });

            var options = {
                baseUrl: "/lib/elfinder/",
                url: "/el-finder-file-system/connector",
                rememberLastDir: false,
                commands: myCommands,
                lang: 'vi',
                uiOptions: {
                    toolbar: [
                        ['back', 'forward'],
                        ['reload'],
                        ['home', 'up'],
                        ['mkdir', 'mkfile', 'upload'],
                        ['open', 'download'],
                        ['undo', 'redo'],
                        ['info'],
                        ['quicklook'],
                        ['copy', 'cut', 'paste'],
                        ['rm'],
                        ['duplicate', 'rename', 'edit'],
                        ['selectall', 'selectnone', 'selectinvert'],
                        ['view', 'sort']
                    ]
                },
                //onlyMimes: ["image", "text/plain"] // Get files of requested mime types only
                lang: 'vi',
            };
            $('#elfinder').elfinder(options).elfinder('instance');
        });
    </script>
}
Giờ truy cập địa chỉ /file-manager bạn đã có thư viện quản lý file
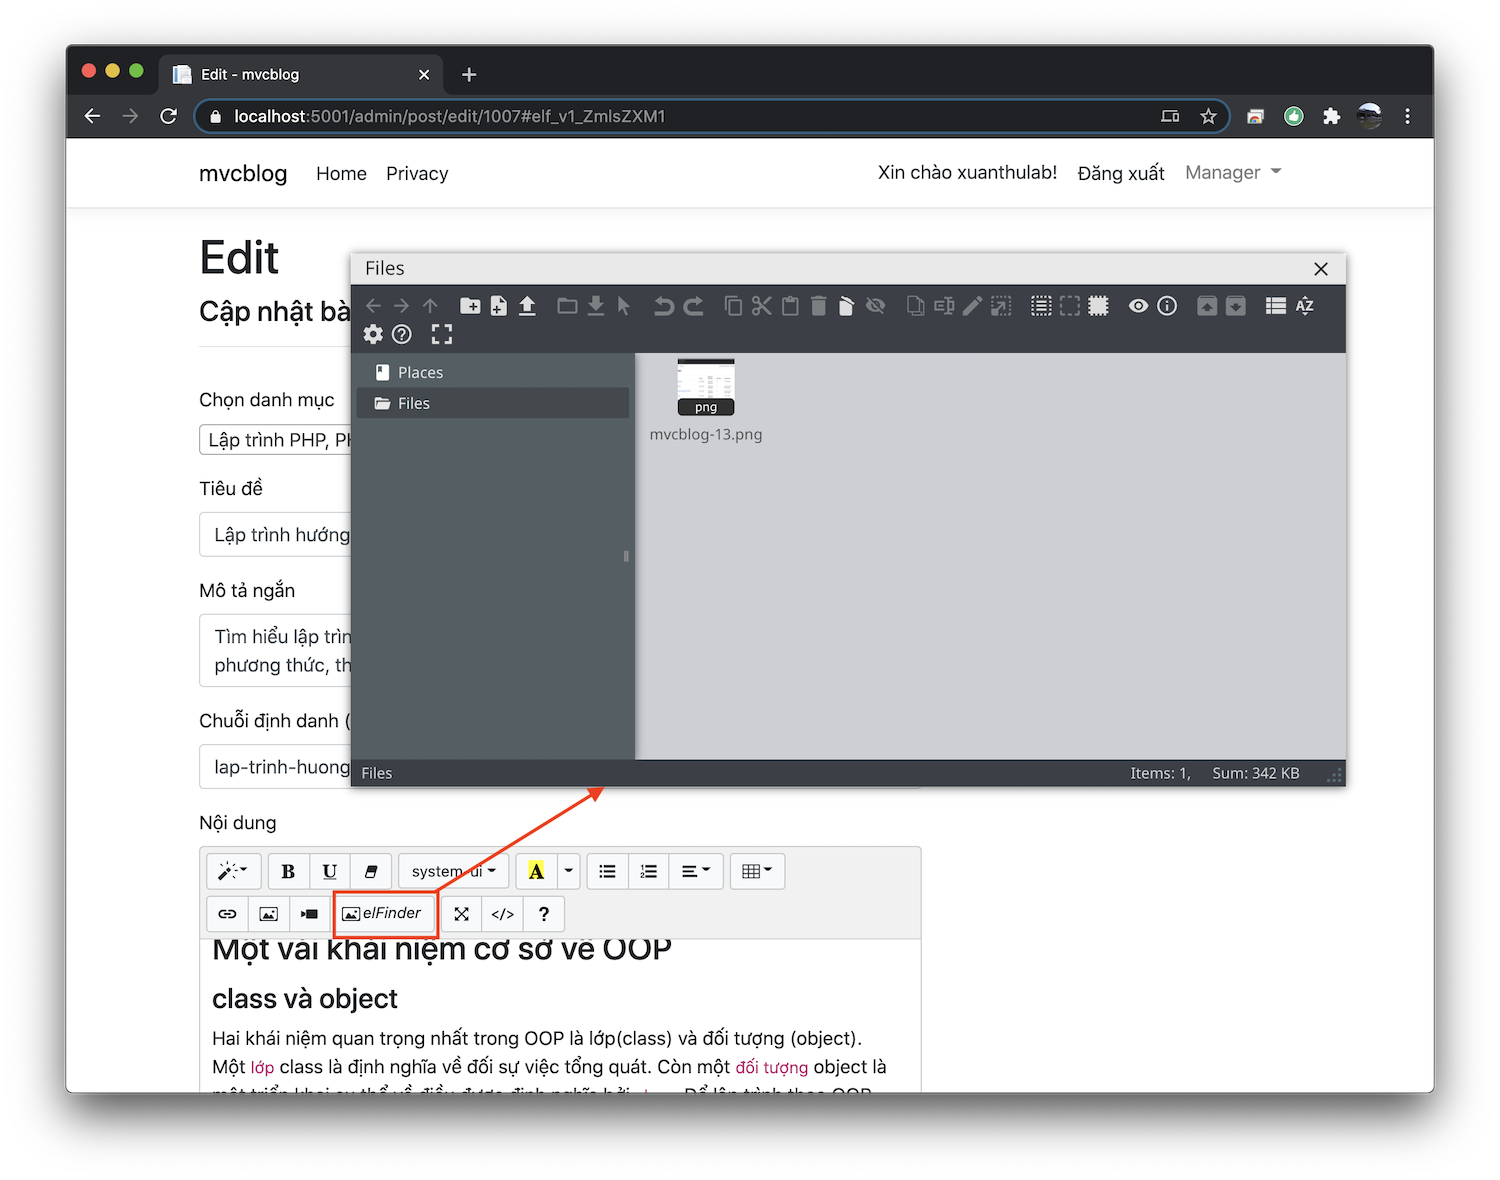
Tích hợp elFinder vào Summernote
Thực hành này phát triển tiếp ví dụ cũ Xây dựng giỏ hàng cart trong ASP.NET , hãy tải mã nguồn ex068-cart để tiếp tục phát triển.
Để tích hợp elFinder vào công cụ soạn thảo HTML WYSIWYG Summernote ta thực hiện các bước như sau:
- Tạo một plugin của Summernote - plugin này tạo ra một nút bấm - khi bấm vào đó sẽ gọi một hàm
- Xây dựng hàm mà nút bấm đó gọi đến, trong hàm này khởi tạo elFinder để chọn ảnh chèn vào Summernote
Các tạo ra một Plugin cho Summernote thực hiện theo hướng dẫn tại creating-plugins
Tạo plugin có tên elfinder như sau:
(function (factory) {
        if (typeof define === 'function' && define.amd) {
            define(['jquery'], factory);
        }
        else if (typeof module === 'object' && module.exports) {
            module.exports = factory(require('jquery'));
        } else {
            factory(window.jQuery);
        }
    }(function ($) {
      $.extend($.summernote.plugins, {
            // Tạo plugin tên elfinder
            'elfinder': function (context) {
                var self = this;
                // ui has renders to build ui elements.
                var ui = $.summernote.ui;
                // Tạo nút bấm
                context.memo('button.elfinder', function () {
                    var button = ui.button({
                        contents: '<i class="note-icon-picture"/> elFinder',
                        tooltip: 'Quản lý file',
                        click: function () {
                            // Bấm vào nút bấm gọi hàm elfinderDialog
                            elfinderDialog(context);
                        }
                    });
                    // create jQuery object from button instance.
                    var $elfinder = button.render();
                    return $elfinder;
                });
                // This methods will be called when editor is destroyed by $('..').summernote('destroy');
                // You should remove elements on `initialize`.
                this.destroy = function () {
                    this.$panel.remove();
                    this.$panel = null;
                };
            }

        });
    }));
Có trên nạp vào trước khi tạo Summernote, thì Summernote sẽ có nút bấm. Cũng nhớ là phải nạp các thư viện css, js của jQuery, elFinder, Summernote trước khi thi hành
'<i class="note-icon-picture"/> elFinder'
Khi bấm vào nút bấm sẽ gọi hàm elfinderDialog, với tham số là đối tượng Summernote. Ta sẽ xây dựng hàm này khi thi hành sẽ mở elFinder, nội dung hàm này như sau
function elfinderDialog(editor) {
  	    var fm = $('<div/>').dialogelfinder({
  		url : '/el-finder-file-system/connector',
                baseUrl: "/lib/elfinder/",
  		lang : 'vi',
  		width : 840,
  		height: 450,
  		destroyOnClose : true,
  		getFileCallback : function(files, fm) {
  			console.log(files);
                        editor.invoke('editor.insertImage', files.url);
  		},
  		commandsOptions : {
  			getfile : {
  			    oncomplete : 'close',
  			    folders : false
  			}
  		}
  	}).dialogelfinder('instance');
}
Trở lại mã nguồn ví dụ trước, bạn có thể cập nhật các code trên vào file _Summernote.cshtml,
nội dung đầy đủ tại:
_Summernote.cshtml partial
Giờ đã có elFinder để bạn upload ảnh, chọn ảnh chèn vào khi soạn thảo bằng Summernote
Mã nguồn tham khảo ASP_NET_CORE/mvcblog, hoặc tải về bản bài này ex068-elfinder