Theme trong ứng dụng Android
Theme giống như style đã trình bày tại: Thuộc tính style trong Android, nó là tập hợp các định nghĩa tài nguyên, thuộc tính để áp dụng vào các phần tử View. Chỉ có điều style có hiệu lực với phần tử áp dụng nó, còn Theme có thể thiết lập ở các phần tử gốc và các phần tử con kế thừa và truy cập vào các thuộc tính từ theme. Theme được định nghĩa trong style.xml và gán vào phần tử bằng thuộc tính android:theme
Theme thường được gán vào các phần tử gốc, qua đó các phần tử con sẽ truy cập thuộc tính theme, các phần tử gốc hay gán theme đó là application hoặc Activity trong manifest. Nếu gán theme cho application, thì các Activity trong ứng dụng mặc định kế thừa theme từ application, tương tự cho đến các View tạo ra từ Activity, bạn cũng có thể gán Theme cho Activity hoặc các View gốc của layout nhằm sử dụng một theme khác với theme kế thừa.
Sau đây sẽ thực hiện từng bước tạo ra và áp dụng một Theme
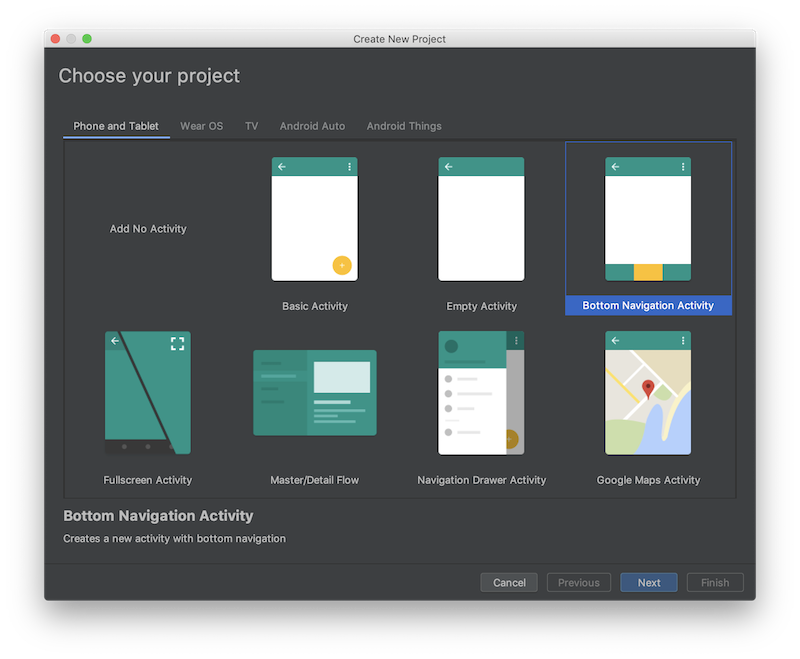
Hãy chạy Android Studio và tạo ra ứng dụng theo mẫu Bottom Navigator Bottom đặt tên ThemeTuorial
AppTheme (xem trong styles.xml), theme này được gán vào application trong manifests (có nghĩa là các Activity nằm trong application sẽ kế thừa theme này). Giờ hãy mở styles.xml xem một theme được tạo ra và có các thành phần nào.Tạo một theme trong styles.xml
Vì một theme chứa rất nhiều thuộc tính (màu sắc, kích thước, vị trí, font chữ ...) sử dụng mặc định bởi nhiều loại View (Button, TextView ...) trong Android nên khi tạo một theme mới thường kế thừa từ một theme thuộc thư viện Android, sau đó tuỳ biến thêm bớt, thay đổi các thành phần (Các tham khảo hãy xem tại CÁC THUỘC TÍNH TRONG THEME).
Quay trở lại ví dụ trên, theme AppTheme kế thừa từ Theme.AppCompat.Light.DarkActionBar, sau đó nó điều chỉnh lại các thuộc tính
colorPrimary, colorPrimaryDark, colorAccent
<resources>

    <!-- Base application theme. -->
    <style name="AppTheme" parent="Theme.AppCompat.Light.DarkActionBar">
        <!-- Customize your theme here. -->
        <item name="colorPrimary">@color/colorPrimary</item>
        <item name="colorPrimaryDark">@color/colorPrimaryDark</item>
        <item name="colorAccent">@color/colorAccent</item>
    </style>

</resources>
Tương tự bạn có thể tạo ra Theme thứ 2, và đặt tên là MyAppTheme theo cách tương tự, ta sẽ định nghĩa lại một số thành phần (theme sẽ có màu sắc loè loẹt để bạn dễ nhận biết):
values/colors.xml (Định nghĩa màu sẽ dùng)
<?xml version="1.0" encoding="utf-8"?>
<resources>
    <color name="colorPrimary">#008577</color>
    <color name="colorPrimaryDark">#00574B</color>
    <color name="colorAccent">#D81B60</color>

    <color name="colorPrimary1">#FF8A80</color>
    <color name="colorPrimaryDark1">#FF80AB</color>
    <color name="myWindowBackground">#82B1FF</color>
    <color name="colorAccent1">#00C853</color>
    <color name="textColorPrimary1">#C51162</color>
    <color name="navigationBarColor1">#0091EA</color>
    <color name="textColorSecondary1">#B3E5FC</color>
</resources>
values/styles.xml
<resources>

    <!-- Base application theme. -->
    <style name="AppTheme" parent="Theme.AppCompat.Light.DarkActionBar">
        <!-- Customize your theme here. -->
        <item name="colorPrimary">@color/colorPrimary</item>
        <item name="colorPrimaryDark">@color/colorPrimaryDark</item>
        <item name="colorAccent">@color/colorAccent</item>
    </style>


    <!--TẠO THEME MỚI-->
    <style name="MyAppTheme" parent="Theme.AppCompat.Light.DarkActionBar">
        <item name="colorPrimary">@color/colorPrimary1</item>                       <!--Màu chính (ví dụ nền AppBar)-->
        <item name="colorPrimaryDark">@color/colorPrimaryDark1</item>               <!--Màu nền thanh trạng thái điện thoại-->
        <item name="android:navigationBarColor">@color/navigationBarColor1</item>   <!--Màu nền điều hướng điện thoại-->
        <item name="colorAccent">@color/colorAccent1</item>                         <!--Màu nhấn mạnh (kiểm trong checkbox, gạch chân TextBox ...)-->
        <item name="android:windowBackground">@color/myWindowBackground</item>      <!--Màu nền Activity-->
        <item name="android:textColorPrimary">@color/textColorPrimary1</item>       <!--Màu chữ trong các control như Button ... -->
        <item name="android:textColorSecondary">@color/textColorSecondary1</item>   <!--Màu chữ ở trạng thái  ... -->

    </style>

</resources>
Activity trong manifests bằng tên của theme này, hoặc thay thuộc tính theme của application trong manifests để tất cả các Activity kế thừa theme này, ví dụ: AndroidManifest.xml
<?xml version="1.0" encoding="utf-8"?>
<manifest xmlns:android="http://schemas.android.com/apk/res/android"
    package="net.xuanthulab.themetuorial">
    <application
        android:allowBackup="true"
        android:icon="@mipmap/ic_launcher"
        android:label="@string/app_name"
        android:roundIcon="@mipmap/ic_launcher_round"
        android:supportsRtl="true"
        android:theme="@style/MyAppTheme">
        <activity
            android:name=".MainActivity"
            android:label="@string/app_name">
            <intent-filter>
                <action android:name="android.intent.action.MAIN" />
                <category android:name="android.intent.category.LAUNCHER" />
            </intent-filter>
        </activity>
    </application>

</manifest>
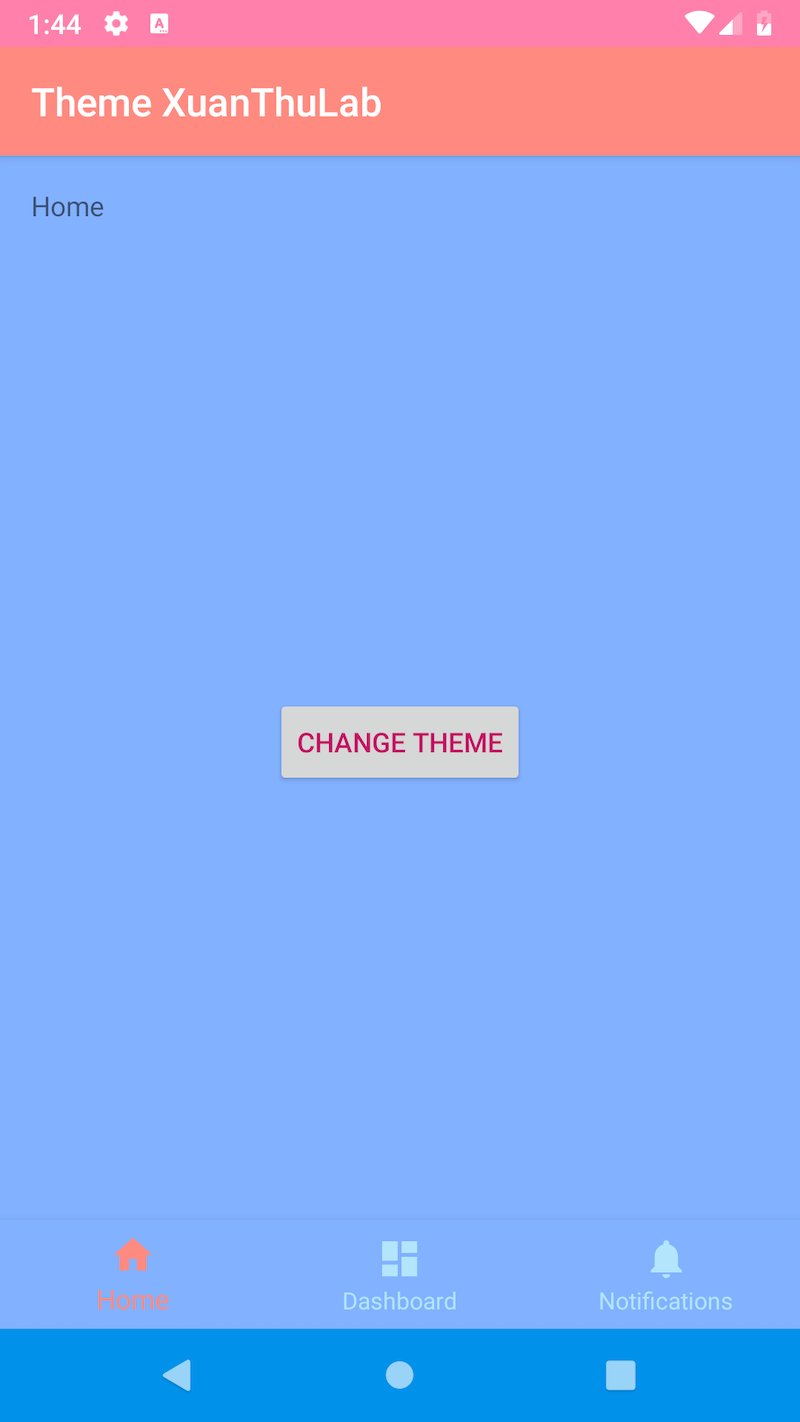
Kết quả chạy với theme mới MyAppTheme
Chuyển đổi qua lại các Theme
Các Activety trước khi nạp layout (trước khi chạy setContentView) có thể gọi phương thức setTheme(themeid), để Activity sử dụng một theme theo ID tài nguyên bạn chỉ ra. Ngoài ra, bạn có thể lưu ID của theme lâu dài trong SharedPreferences để mỗi lần chạy sẽ sử dụng theme mà bạn lưu. Ta sẽ sử dụng cách này để chuyển đổi qua lại giữa 2 theme đang có ở trên là R.style.AppTheme và R.style.MyAppTheme
Toàn bộ code trong onCreate của Activity
//ID của theme mà Activity sử dụng
int themeIdcurrent;

@Override
protected void onCreate(Bundle savedInstanceState) {
    super.onCreate(savedInstanceState);

    //Đọc ID theme đã lưu, nếu chưa lưu thì dùng R.style.MyAppTheme
    SharedPreferences locationpref = getApplicationContext()
            .getSharedPreferences("MainActivity", MODE_PRIVATE);
    themeIdcurrent = locationpref.getInt("themeid",R.style.MyAppTheme);

    //Thiết lập theme cho Activity
    setTheme(themeIdcurrent);

    setContentView(R.layout.activity_main);
    findViewById(R.id.button).setOnClickListener(new View.OnClickListener() {
        @Override
        public void onClick(View v) {

            //Chuyển đổi theme
            themeIdcurrent = themeIdcurrent == R.style.MyAppTheme ? R.style.AppTheme : R.style.MyAppTheme;

            //Lưu lại theme ID
            SharedPreferences locationpref = getApplicationContext()
                    .getSharedPreferences("MainActivity", MODE_PRIVATE);
            SharedPreferences.Editor spedit = locationpref.edit();
            spedit.putInt("themeid", themeIdcurrent);
            spedit.apply();

            //Tạo lại Activity để áp dụng theme mởi đổi
            recreate();

        }
    });

    mTextMessage = (TextView) findViewById(R.id.message);
    BottomNavigationView navigation = (BottomNavigationView) findViewById(R.id.navigation);
    navigation.setOnNavigationItemSelectedListener(mOnNavigationItemSelectedListener);
}
Kết quả chạy ứng dụng:
Thêm giá trị thuộc tính trong theme
Ngoài việc thiết lập giá trị các thuộc tính ảnh hưởng đến các View trong theme (xem các thuộc tính tại CÁC THUỘC TÍNH TRONG THEME), bạn có thể mở rộng theme chứa các thuộc tính chứa giá trị mới sau đó các View truy cập để sử dụng thuộc tính này.
Tạo ra các tên thuộc tính mới trong ứng dụng
Thường sẽ định nghĩa các tên thuộc tính trong file values/attrs.xml, một thuộc tính sẽ có cấu trúc khai báo như sau:
<attr name="tên_thuộc_tính" format="định_dạng_dữ_liệu"/>
format để quy định loại dữ liệu của thuộc tính, có thể nhận các giá trị như: string, boolean, float, dimension (các kích thước px, dp ...), reference (tham chiếu đến icon, image, drawable ...)Ví dụ định nghĩa tên thuộc tính mới là myTextViewSize và myTextColor
values/attrs.xml
<resources>

    <!-- Base application theme. -->
    <style name="AppTheme" parent="Theme.AppCompat.Light.DarkActionBar">
        <!-- Customize your theme here. -->
        <item name="colorPrimary">@color/colorPrimary</item>
        <item name="colorPrimaryDark">@color/colorPrimaryDark</item>
        <item name="colorAccent">@color/colorAccent</item>
    </style>


    <style name="MyAppTheme" parent="Theme.AppCompat.Light.DarkActionBar">
        <item name="colorPrimary">@color/colorPrimary1</item>
        <item name="colorPrimaryDark">@color/colorPrimaryDark1</item>
        <item name="android:navigationBarColor">@color/navigationBarColor1</item>
        <item name="colorAccent">@color/colorAccent1</item>
        <item name="android:windowBackground">@color/myWindowBackground</item>
        <item name="android:textColorPrimary">@color/textColorPrimary1</item>
        <item name="android:textColorSecondary">@color/textColorSecondary1</item>

        <!--Hai thuộc tính tự định nghĩa-->
        <item name="myTextViewSize">80sp</item>
        <item name="myTextColor">@color/textColorPrimary1</item>
    </style>
</resources>
Như vậy theme có thêm 2 thuộc tính với giá trị đi cùng, trong các View nếu muốn sử dụng truy cập đến giá trị thuộc tính này thì sử dụng cú pháp lấy giá trị của thuộc tính Theme hiện tại "?tên_thuộc_tính"
Ví dụ:
<TextView
    android:textSize="?myTextViewSize"
    android:textColor="?myTextColor"

    android:id="@+id/message"
    android:layout_width="wrap_content"
    android:layout_height="wrap_content"
    android:layout_marginStart="@dimen/activity_horizontal_margin"
    android:layout_marginLeft="@dimen/activity_horizontal_margin"
    android:layout_marginTop="@dimen/activity_vertical_margin"
    android:text="@string/title_home"
    app:layout_constraintLeft_toLeftOf="parent"
    app:layout_constraintTop_toTopOf="parent" />
Như vậy giá trị textSize và textColor của TextView trên được xác định từ Theme.
Từ bài viết này, đủ để biết cách tạo và sử dụng Theme một cách hoàn chỉnh, hãy tuỳ biến để mọi thành phần trong View ứng dụng đều các thể thiết lập từ Theme, điều này khiến ứng dụng linh hoạt rất nhiều