Giới thiệu về Floating Action Button (FAB)
FAB là một nút bấm đặc biệt, chúng thường được biểu diễn bởi hình tròn với biểu tượng, nó nổi trên bề mặt các giao diện thiết kế, thường thì tùy ngữ cảnh bấm vào nó để thực hiện các hành động tương ứng.
Nguyên tắc thiết kế giao diện có sử dụng FAB theo triết lý Materail Design được Google đề xuất ở đây: FAB Design
Thường thì bạn sử dụng FAB tùy thuộc ngữ cảnh, và FAB là thao tác chủ đạo đưa ra cho người dùng thực hiện. Ví dụ bạn đang ở màn hình xem danh sách email, có thể xuất hiện FAB để bấm vào đó tạo một Email mới (nếu cho rằng đây là thao tác người dùng hay sử dụng) ...
Kiếm Icon cho FAB
Ngoài cách tự thiết kế vẽ ICON sử dụng cho FAB, có rất nhiều ICON chuẩn của Google phù hợp tại material.io,
bạn chỉ việc tìm Icon phù hợp, tải về và nhét vào res/drawable của dự án và sử dụng.
Bạn có thể tải định dạng svg sau đó dùng SVG -> XML Drawable để dễ dùng hơn.
Thư viện sử dụng
Để sử dụng FAB bạn cần thêm vào build.gradle thư viện: compile 'com.android.support:design:X.X.X'
với X là phiên bản muốn dùng. Ngoài ra cũng nên thêm các thành phần để sử dụng cùng FAB như recyclerview ...
Tóm lại bạn kiểm tra build.gradle và thêm các thư viện như thế này vào:
compile 'com.android.support:appcompat-v7:26.1.0'
compile 'com.android.support.constraint:constraint-layout:1.0.2'
compile 'com.android.support:design:26.1.0'
compile 'com.android.support:recyclerview-v7:26.1.0'
Sử dụng FAB
FAB có thể thêm vào các file layout với cú pháp dạng:
<android.support.design.widget.FloatingActionButton
    android:id="@+id/fab"
    android:src="@drawable/face"
    app:fabSize="normal"
    android:layout_width="wrap_content"
    android:layout_height="wrap_content" />
Với fabSize có thể nhận giá trị normal thì FAB ở cỡ chuẩn, và giá trị mini FAB ở cỡ nhỏ.
Để định vị FAB một cách linh động, chúng ta sẽ sử dụng CoordinatorLayout để trình bày Layout, vì loại View này giúp
cho việc tương tác giữa các phần tử View con của nó được dễ dàng hơn, đặc biệt là các hiệu ứng động khi thực hiện cuốn các phần tử, phần này trình bày sau.
Ngay bây giờ chúng ta sẽ sử dụng ưu điểm của CoordinatorLayout khi cho phép ta điều khiển trượt một .
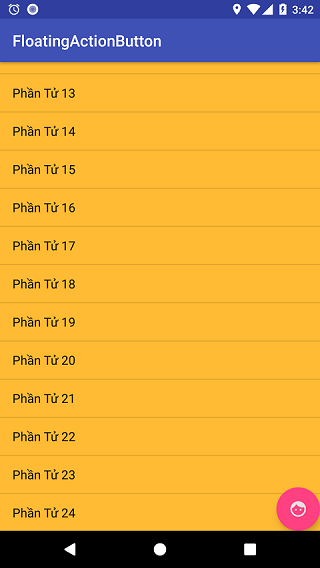
Ví dụ đơn giản, sử dụng ListView, FloatingAcionButton bên trong CoordinatorLayout, lưu ý đến thuộc tính
layout_anchor và layout_anchorGravity
<?xml version="1.0" encoding="utf-8"?>
<android.support.design.widget.CoordinatorLayout
    xmlns:android="http://schemas.android.com/apk/res/android"
    xmlns:app="http://schemas.android.com/apk/res-auto"
    android:layout_width="match_parent"
    android:layout_height="match_parent">

    <ListView
        android:id="@+id/mylistview"
        android:background="@android:color/holo_orange_light"
        android:layout_width="match_parent"
        android:layout_height="match_parent">

    </ListView>


    <android.support.design.widget.FloatingActionButton
        android:id="@+id/fab"
        android:src="@drawable/face"
        app:fabSize="normal"
        android:layout_width="wrap_content"
        android:layout_height="wrap_content"
        app:layout_anchor="@id/mylistview"
        app:layout_anchorGravity="bottom|right|end" />

</android.support.design.widget.CoordinatorLayout>
Code để ListView hiện thị một danh sách dữ liệu
public class FabActivity extends AppCompatActivity {

    @Override
    protected void onCreate(Bundle savedInstanceState) {
        super.onCreate(savedInstanceState);
        setContentView(R.layout.activity_fab);

        ListView listView = findViewById(R.id.mylistview);

        String[] arWords = new String[] {
                "Phần Tử 1", "Phần Tử 2", "Phần Tử 3", "Phần Tử 4",
                "Phần Tử 5", "Phần Tử 6", "Phần Tử 7",
                "Phần Tử 8", "Phần Tử 9", "Phần Tử 10", "Phần Tử 11",
                "Phần Tử 12", "Phần Tử 13", "Phần Tử 14",
                "Phần Tử 15", "Phần Tử 16", "Phần Tử 17", "Phần Tử 18",
                "Phần Tử 19", "Phần Tử 20", "Phần Tử 21",
                "Phần Tử 22", "Phần Tử 23", "Phần Tử 24", "Phần Tử 25"};

        ArrayAdapter adapter =
                new ArrayAdapter(this, android.R.layout.simple_list_item_1, arWords);

        listView.setAdapter(adapter);
    }
}
Lưu ý: Thuộc tính sử dụng trong FAB
- app:layout_anchor chỉ ra vị trí của FAB neo cùng với View nào, ví dụ trên là app:layout_anchor="@id/mylistview", tức là đố tượng hiện thị danh sách
- app:layout_anchorGravity chỉ ra vị trí neo tương đối so với đối tượng vào, có nhiều giá trị có thể nhận như:
top, left, right, buttom, start, end ...tương ứng khi neo vào đỉnh, bên trái, bên phải, phía dưới ...
Hiệu ứng động - Ẩn/Hiện Floating Action Button
Khi cuộn danh sách lên xuống, bạn muốn FAB ẩn đi/hiện ra khi kéo lên, xuống như dạng sau:
Để thực hiện điều này, trước tiên việc hiện thị danh sách dùng ListView cần chuyển sang dùng RecyclerView,
vì RecyclerView có hỗ trợ tương tác với các phần tử khác bên trong CoordinatorLayout
Chi tiết về sử dụng RecyclerView sẽ đề cập chi tiết riêng ở phần sau
Trong layout chuyển sang như sau:
<?xml version="1.0" encoding="utf-8"?>
<android.support.design.widget.CoordinatorLayout
    xmlns:android="http://schemas.android.com/apk/res/android"
    xmlns:app="http://schemas.android.com/apk/res-auto"
    android:layout_width="match_parent"
    android:layout_height="match_parent">

    <android.support.v7.widget.RecyclerView
        android:id="@+id/mylistview"
        android:background="@android:color/holo_orange_light"
        android:layout_width="match_parent"
        android:layout_height="match_parent" />


    <android.support.design.widget.FloatingActionButton
        android:id="@+id/fab"
        android:src="@drawable/face"
        app:fabSize="normal"
        android:layout_width="wrap_content"
        android:layout_height="wrap_content"
        app:layout_anchor="@id/mylistview"
        app:layout_anchorGravity="bottom|right|end" />

</android.support.design.widget.CoordinatorLayout>
Tiếp thay vì dùng ArrayAdapter như ListView, RecyclerView phải dùng lớp kế thừa từ RecyclerView.Adapter,
trong đó bạn phải xây dựng thêm lớp kế thừa từ RecyclerView.ViewHolder để biểu diễn View các phần tử trong danh sách.
Mã chuyển đổi đầy đủ như sau:
public class FabActivity extends AppCompatActivity {


    /**
     * Lớp biểu diễn Holder trong RecycleView
     */
    class ElementViewHolder extends RecyclerView.ViewHolder
    {
        TextView textView;

        public ElementViewHolder(TextView itemView) {
            super(itemView);
            textView = itemView;
        }

        public TextView getTextView() {
            return textView;
        }
    }


    /**
     * Adapter cho danh sách phần tử Text dùng trong RecycleView
     */
    class ElementsAdapter extends RecyclerView.Adapter {

        LayoutInflater inflater = LayoutInflater.from(getBaseContext());
        String[] arWords = new String[] {
                "Phần Tử 1", "Phần Tử 2", "Phần Tử 3", "Phần Tử 4",
                "Phần Tử 5", "Phần Tử 6", "Phần Tử 7",
                "Phần Tử 8", "Phần Tử 9", "Phần Tử 10",
                "Phần Tử 11", "Phần Tử 12", "Phần Tử 13", "Phần Tử 14",
                "Phần Tử 15", "Phần Tử 16", "Phần Tử 17",
                "Phần Tử 18", "Phần Tử 19", "Phần Tử 20", "Phần Tử 21",
                "Phần Tử 22", "Phần Tử 23", "Phần Tử 24", "Phần Tử 25"};
        @Override
        public RecyclerView.ViewHolder
            onCreateViewHolder(ViewGroup parent, int viewType) {
                TextView v = (TextView)inflater
                    .inflate(android.R.layout.simple_list_item_1, parent, false);
            return new ElementViewHolder(v);
        }

        @Override
        public void onBindViewHolder(RecyclerView.ViewHolder holder, int position) {
            ((ElementViewHolder)holder).getTextView().setText(arWords[position]);

        }

        @Override
        public int getItemCount() {
            return arWords.length;
        }

    }


    @Override
    protected void onCreate(Bundle savedInstanceState) {
        super.onCreate(savedInstanceState);
        setContentView(R.layout.activity_fab);


        //Sử dụng RecyclerView
        RecyclerView listView = findViewById(R.id.mylistview);
        RecyclerView.Adapter adapter = new  ElementsAdapter();
        listView.setLayoutManager(new LinearLayoutManager(this));

        listView.setAdapter(adapter);

    }
}
Chạy thử, thấy đã hiện thị và ứng xử tương đương với cách dùng ListView ở trên
Bây giờ đặt giả thiết, FAB sẽ ẩn đi nếu vuốt ngược lên và hiện thị khi kéo danh sách về đầu, với yêu cầu chỉ hiện thị nếu phần tử đầu tiên của danh sách hiện thị (và chỉ ẩn đi nếu phần tử đầu tiên bị ẩn).
Tiến hành làm như sau:
Do FAB trong layout xây dựng bằng CoordinatorLayout nên nó có thể thiết lập thuộc tính app:layout_behavior để trỏ
tới lớp xử lý ứng xử của FAB. Lớp này bạn xây dựng bằng kế thừa FloatingActionButton.Behavior, trong đó quan trọng
bạn sẽ quá tải phương thức onNestedScroll để xử lý FAB mỗi khi RecyclerView cuộn lên xuống.
Giả xử lớp này bạn xây dựng có tên MyFABAnimate thì nội dung code như sau:
package net.xuanthulab.floatactionbuttondemo; //thay bằng package khác của riêng bạn


public class MyFABAnimate extends FloatingActionButton.Behavior {
    private String TAG = "MyFABAnimate";

    //Không có phương thực này sẽ lỗi
    public MyFABAnimate(Context context, AttributeSet attrs) {
        super(context, attrs);

    }

    @Override
    public boolean onStartNestedScroll(@NonNull CoordinatorLayout coordinatorLayout,
                                       @NonNull FloatingActionButton child,
                                       @NonNull View directTargetChild,
                                       @NonNull View target,
                                       int axes,
                                       int type) {
        super.onStartNestedScroll(coordinatorLayout, child, directTargetChild, target, axes, type);
        return axes == ViewCompat.SCROLL_AXIS_VERTICAL;

    }

    /**
     * Xử lý khi RecyclerView cuộn
     * @param target == RecyclerView
     */
    @Override
    public void onNestedScroll(@NonNull CoordinatorLayout coordinatorLayout,
                               @NonNull FloatingActionButton child,
                               @NonNull View target,
                               int dxConsumed,
                               int dyConsumed,
                               int dxUnconsumed,
                               int dyUnconsumed,
                               int type)
    {
        super.onNestedScroll(coordinatorLayout, child, target, dxConsumed, dyConsumed, dxUnconsumed, dyUnconsumed, type);

        LinearLayoutManager linearLayoutManager = (LinearLayoutManager)((RecyclerView)target).getLayoutManager();
        if (dyConsumed > 0
            && child.getVisibility() == View.VISIBLE
            &&  (linearLayoutManager.findFirstVisibleItemPosition() != 0)) {

            //nếu gọi child.hide(); thì sau đó FAB không còn nhận sự kiện cuộn lên xuống nữa
            //nên cần gọi child.hide(listener);
            child.hide(new FloatingActionButton.OnVisibilityChangedListener() {

                @Override
                public void onHidden(FloatingActionButton fab) {
                    super.onShown(fab);
                    fab.setVisibility(View.INVISIBLE);
                }
            });

        } else if (dyConsumed < 0
                    && child.getVisibility() != View.VISIBLE
                    && (linearLayoutManager.findFirstVisibleItemPosition() == 0)) {
            child.show();
        }
    }

    /**
     * Thiết lập RecyclerView là lớp mà ứng xử của FAB dựa vào để thực hiện
     */
    @Override
    public boolean layoutDependsOn(
            CoordinatorLayout parent,
            FloatingActionButton child,
            View dependency) {
        if (dependency instanceof RecyclerView)
            return true;

        return false;
    }

}
Như vậy bạn đã có lớp net.xuanthulab.floatactionbuttondemo.MyFABAnimate quay lại layout, bạn chỉ việc cho thêm vào FAB thuộc tính: app:layout_behavior="net.xuanthulab.floatactionbuttondemo.MyFABAnimate"
<android.support.design.widget.FloatingActionButton
    android:id="@+id/fab"
    android:src="@drawable/face"
    app:fabSize="normal"
    android:layout_width="wrap_content"
    android:layout_height="wrap_content"
    app:layout_anchor="@id/mylistview"
    app:layout_anchorGravity="bottom|right|end"
    app:layout_behavior="net.xuanthulab.floatactionbuttondemo.MyFABAnimate" />
Chạy thử

FAB trên Header
Trong nhiều thiết kế UI, FAB cũng có thể đặt ở phần đầu Header, ví dụ:
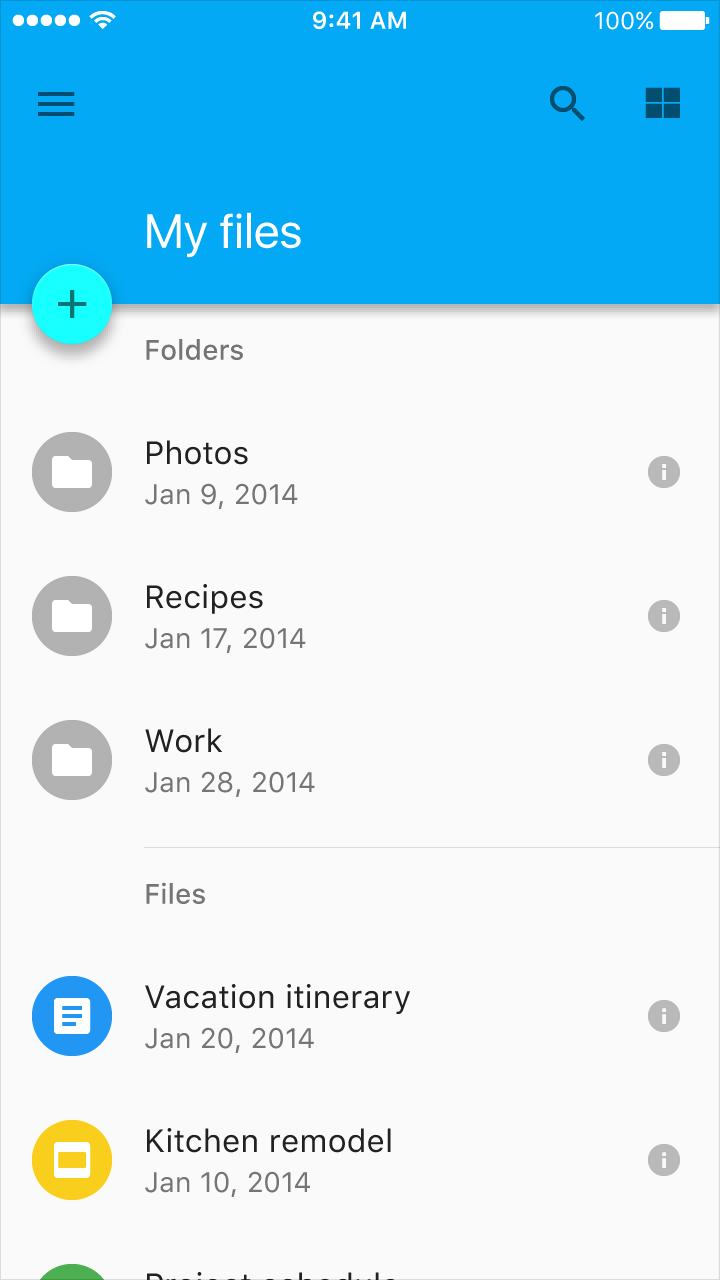
Bạn cũng có thể làm vậy, ở ví dụ trên đơn giản bạn thay cách trình bày Layout, ví dụ:
<?xml version="1.0" encoding="utf-8"?>
<android.support.design.widget.CoordinatorLayout
    xmlns:android="http://schemas.android.com/apk/res/android"
    xmlns:app="http://schemas.android.com/apk/res-auto"
    android:layout_width="match_parent"
    android:layout_height="match_parent">
    <LinearLayout
        android:layout_width="match_parent"
        android:orientation="vertical"
        android:layout_height="match_parent">

        <ImageView
            android:layout_width="match_parent"
            android:layout_height="match_parent"
            android:layout_weight="0.7"
            android:scaleType="centerCrop"
            android:src="@drawable/javaforandroid" />


        <android.support.v7.widget.RecyclerView
            android:id="@+id/mylistview"
            android:background="@android:color/holo_orange_light"
            android:layout_width="match_parent"
            android:layout_weight="0.3"
            android:layout_height="match_parent">
        </android.support.v7.widget.RecyclerView>
    </LinearLayout>


    <android.support.design.widget.FloatingActionButton
        android:id="@+id/fab"
        android:src="@drawable/face"
        app:fabSize="normal"
        android:layout_width="wrap_content"
        android:layout_height="wrap_content"
        app:layout_anchor="@id/mylistview"
        app:layout_anchorGravity="top|right|end"
        app:layout_behavior="net.xuanthulab.floatactionbuttondemo.MyFABAnimate" />

</android.support.design.widget.CoordinatorLayout>
Chú ý khi dùng FAB - Floating Action Button
- Khi ẩn / hiện gọi hide()/show để có luốn hiệu ứng thu nhỏ/phóng to
- Nếu muốn tô màu cho FAB dùng thuộc tính:
app:backgroundTint - Trên một màn hình chỉ nên có 1 FAB