TableLayout trong Android
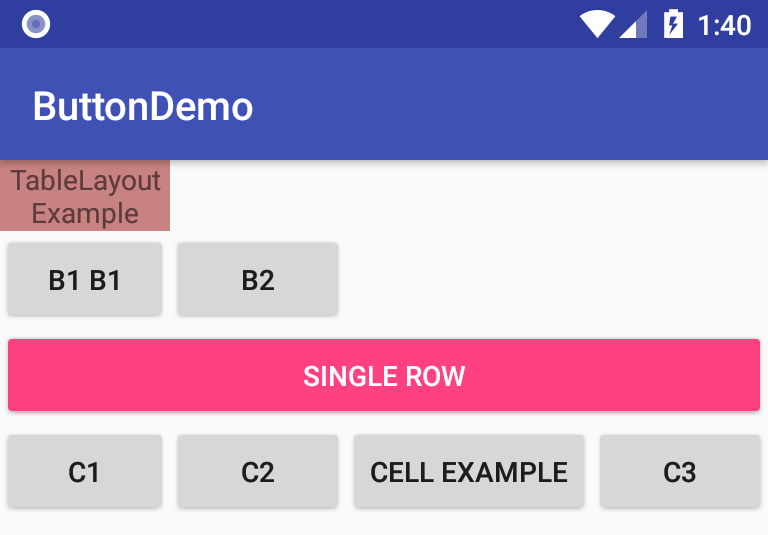
Với TableLayout nó sẽ sắp xếp các View con bên trong thành dạng bảng. Mỗi hàng là một đối tượng view TableRow bên trong TableRow chứa các View con, mỗi View con này nằm ở vị trí một ô bảng (cell). Cột / hàng trong bảng bắt đầu từ số 0. Đầu tiên hãy thực hành một layout với TableLayout và TableRow
<?xml version="1.0" encoding="utf-8"?>
<TableLayout android:layout_height="match_parent"
    android:layout_width="match_parent"
    xmlns:android="http://schemas.android.com/apk/res/android">
    <TableRow>
        <TextView
            android:text="TableLayout Example"
            android:background="#c98282"
            android:gravity="center"/>
    </TableRow>
    <TableRow>
        <Button android:text="B1 B1" />
        <Button android:text="B2"/>
    </TableRow>
    <TableRow>
        <Button android:text="C1" />
        <Button android:text="C2" />
        <Button android:text="Cell example" />
    </TableRow>
</TableLayout>
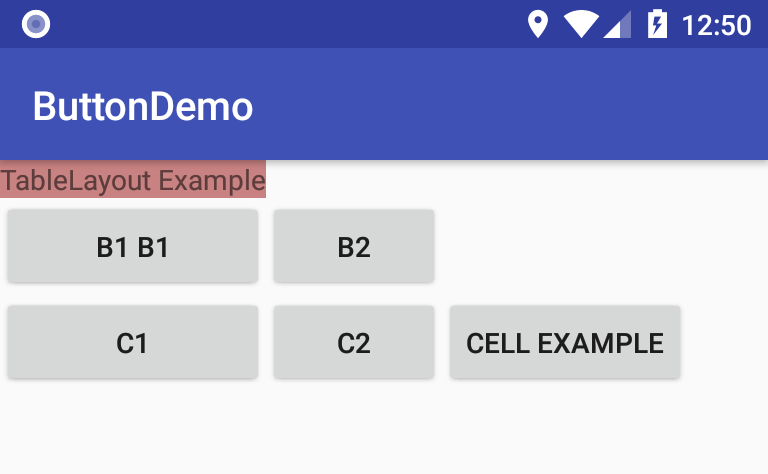
Nhìn vào ví dụ bạn thấy:
- Giao diện có 3 hàng do có 3 TableRow
- Bảng này có 3 cột vì hàng có số phần tử con lớn nhất là 3
- Hàng 1 bỏ trống 2 cột cuối vì bên trong chỉ có 1 phần tử, tương tự hàng 2 bỏ trống cột 3
- Độ rộng của cột rộng bằng phần tử lớn nhất trong cột
- Các View trong TableRow không cần thiết lập chiều cao, chiều rộng vì nó sẽ tự động thiết lập rộng là match_parent, cao là wrap_content
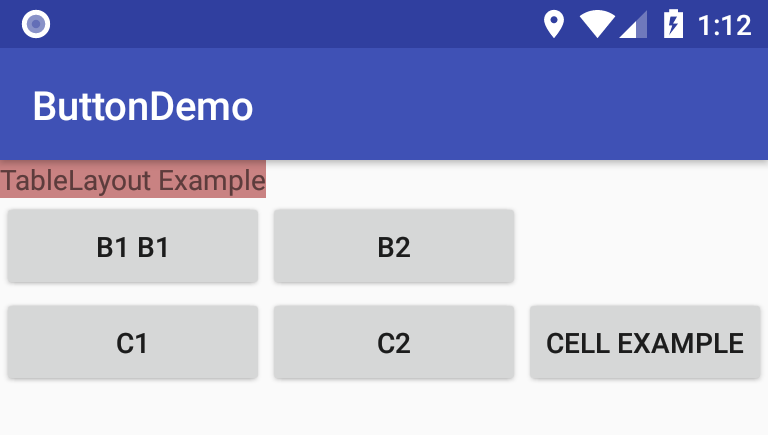
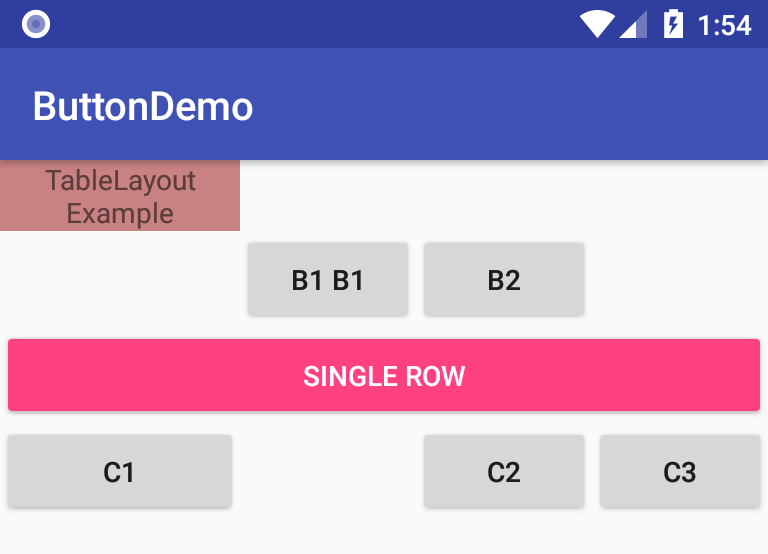
Độ rộng của một cột được xác định bởi ô bảng có độ rộng lớn nhất ở các hàng tương ứng với cột. Tuy nhiên một cột bạn có thể thiết lập nó là stretchable hoặc shrinkable
Thiết lập cột là stretchable
Thiết lập trạng thái stretchable có hiệu lực hay không bằng phương thức: setColumnStretchable(columnIndex, isStretchable). Nếu cột có thiết lập stretchable, thì độ rộng của cột sẽ mở rộng lớn nhất có thể trong các hàng.
Nếu dùng thuộc tính XML thì android:stretchColumns="col1, col2 ..." (ký hiệu * tất cả các cột)
<?xml version="1.0" encoding="utf-8"?>
<TableLayout android:layout_height="match_parent"
    android:layout_width="match_parent"
    android:stretchColumns="1"
    xmlns:android="http://schemas.android.com/apk/res/android">
    <TableRow>
        <TextView
            android:text="TableLayout Example"
            android:background="#c98282"
            android:gravity="center"/>
    </TableRow>
    <TableRow>
        <Button android:text="B1 B1" />
        <Button android:text="B2"/>
    </TableRow>
    <TableRow>
        <Button android:text="C1" />
        <Button android:text="C2" />
        <Button android:text="Cell example" />
    </TableRow>
</TableLayout>
Bạn thấy cột 2 có thiết lập là stretchable (android:stretchColumns="1"), nên độ rộng của nó dãn ra lớn nhất có thể trong giao diện
Thiết lập cột là shrinkable
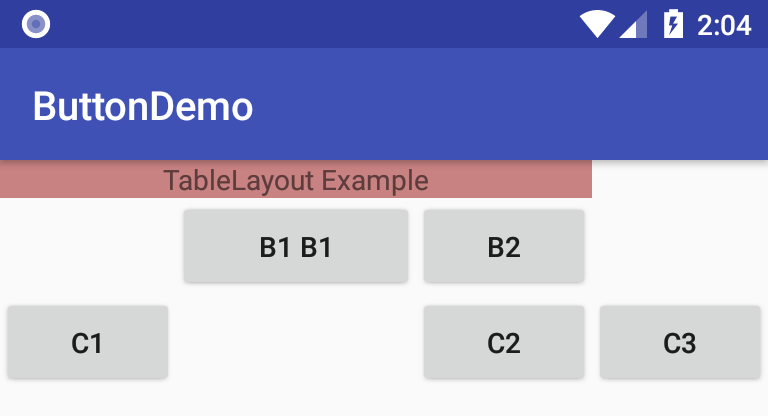
Khi TableLayout dàn các ô trong bảng, nếu cột nào thiết lập là shrinkable thì nó có thể bị co lại để đủ chỗ cho các cột khác. Một cột thiết lập là shrinkable hay không bằng phương thức: setColumnShrinkable (columnIndex, isShrinkable) nếu dùng thuộc tính XML: android:shrinkColumns="0,1,.." (ký hiệu * tất cả các cột)
Ví dụ sau cột 0 bị thiết lập là Shinkable nó sẽ co lai để đủ chỗ cho các cột khác.
Ẩn hiện một cột : dùng phương thức setColumnCollapsed (columnIndex, isCollapsed)
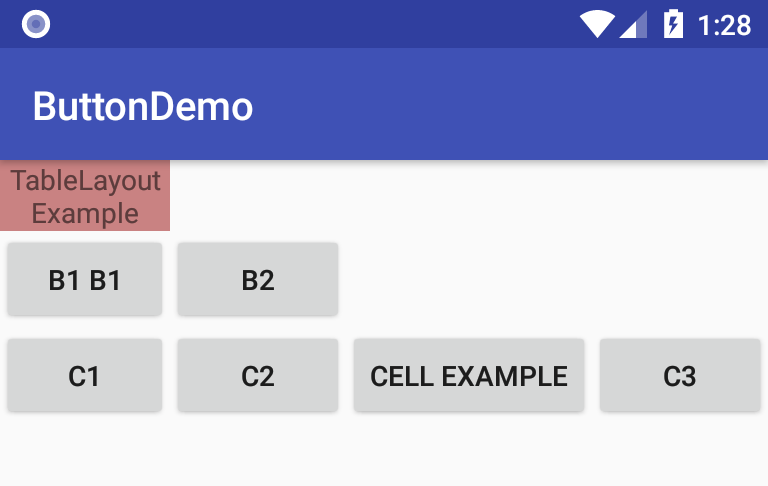
Mặc dù phần tử con trục tiếp của TableLayout thường dùng chỉ là các TableRow, tuy nhiên bạn có thể đặt View con bất kỳ trực tiếp chứ không bên trong TableRow, lúc này View đó coi như một hàng và độ rộng mở rộng hết tất cả các cột.
<?xml version="1.0" encoding="utf-8"?>
<TableLayout android:layout_height="match_parent"
    android:layout_width="match_parent"

    android:stretchColumns="1"
    android:shrinkColumns="0"

    xmlns:android="http://schemas.android.com/apk/res/android">
    <TableRow>
        <TextView
            android:text="TableLayout Example"
            android:background="#c98282"
            android:gravity="center"/>
    </TableRow>
    <TableRow>
        <Button android:text="B1 B1" />
        <Button android:text="B2"/>
    </TableRow>
    <Button android:text="Single Row"
        style="@style/Widget.AppCompat.Button.Colored"/>
    <TableRow>
        <Button android:text="C1" />
        <Button android:text="C2" />
        <Button android:text="Cell example" />
        <Button android:text="C3" />
    </TableRow>
</TableLayout>
Thiết lập cột cho View - android:layout_column
Mặc định mỗi View (Cell) nó nằm ở một cột, nếu không có thiết lập gì thì cột nó định vị theo thứ tự View thêm vào TableRow, nếu muốn chỉ ra một View ở một cột cụ thể thì dùng thuộc tính android:layout_column để gán cột cho View, và cột phía sau nó sẽ đếm tăng 1 cột.
<?xml version="1.0" encoding="utf-8"?>
<TableLayout android:layout_height="match_parent"
    android:layout_width="match_parent"

    android:stretchColumns="1"
    android:shrinkColumns="0"

    xmlns:android="http://schemas.android.com/apk/res/android">
    <TableRow>
        <TextView
            android:text="TableLayout Example"
            android:background="#c98282"
            android:gravity="center"/>
    </TableRow>
    <TableRow>
        <Button android:text="B1 B1" android:layout_column="1" />
        <Button android:text="B2" />
    </TableRow>
    <Button android:text="Single Row"
        style="@style/Widget.AppCompat.Button.Colored"/>
    <TableRow>
        <Button android:text="C1" />
        <Button android:text="C2" android:layout_column="2" />
        <Button android:text="C3" />
    </TableRow>
</TableLayout>
Bạn thấy:
- Dòng 2, phần tử có chữ B1 B1 thiết lập là cột 1, do đó mà phần tử có chữ B2 tự động là cột 2 và dòng đó đã bỏ trống cột 0.
- Hàng 4, phần tử C2 thiết lập cột là 2, nên cột có index là 1 bị bỏ trống và cột C3 tự động là cột 3.
- Số Cell lớn nhất của hàng (kể cả cell bỏ trống) là 4, nên bảng có 4 cột: 0, 1, 2, 3
Mở rộng cột cho Cell - android:layout_span
Mặc định mỗi View (cell) có độ rộng 1 cột, nếu thích thiết lập độ rộng lớn hơn thì dùng thuộc tính android:layout_span ví dụ android:layout_span="2" thì cell có độ rộng mở rộng ra 2 cột
<?xml version="1.0" encoding="utf-8"?>
<TableLayout android:layout_height="match_parent"
    android:layout_width="match_parent"

    android:stretchColumns="1"
    android:shrinkColumns="0"

    xmlns:android="http://schemas.android.com/apk/res/android">
    <TableRow>
        <TextView
            android:text="TableLayout Example"
            android:background="#c98282"
            android:layout_span="3"
            android:gravity="center"/>
    </TableRow>
    <TableRow>
        <Button android:text="B1 B1" android:layout_column="1" />
        <Button android:text="B2" />
    </TableRow>
    <TableRow>
        <Button android:text="C1" />
        <Button android:text="C2" android:layout_column="2" />
        <Button android:text="C3" />
    </TableRow>
</TableLayout>
Phần tử TextView đã thiết lập rộng 3 cột
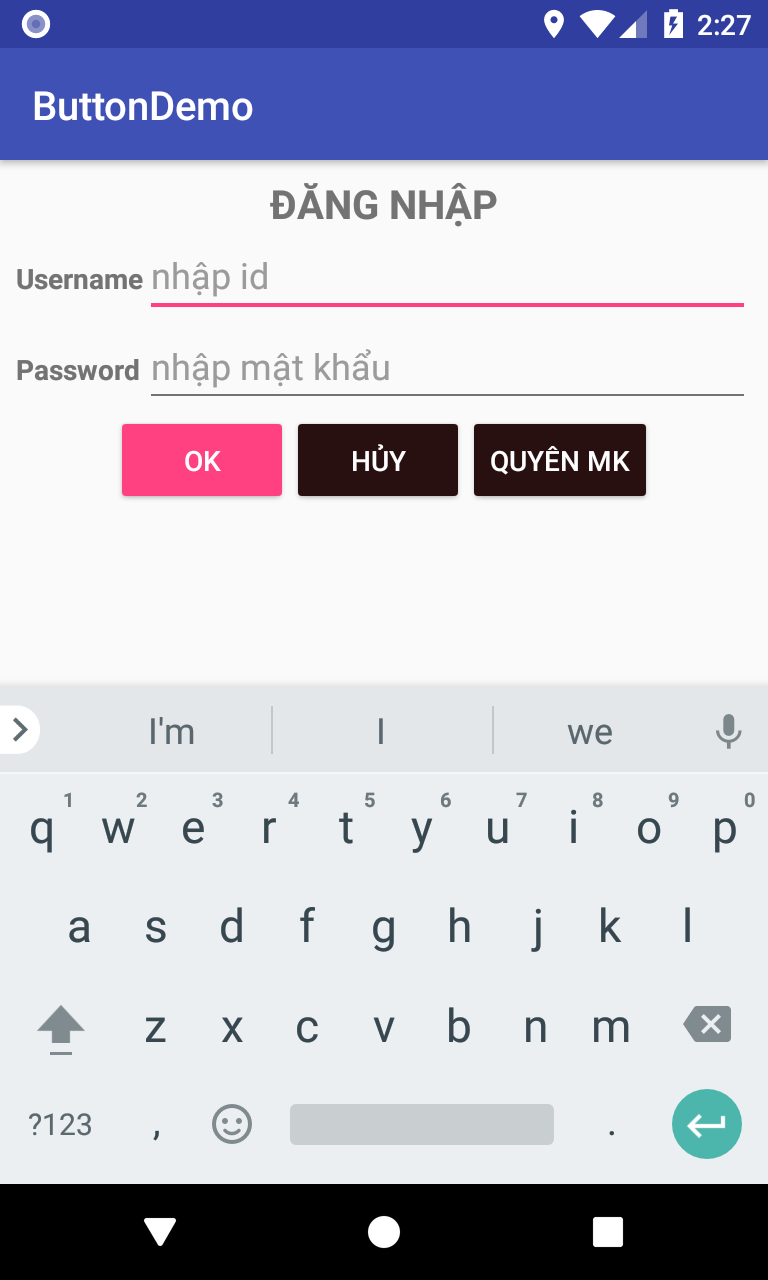
Ví dụ thiết kế giao diện đăng nhập với TableLayout
<?xml version="1.0" encoding="utf-8"?>
<TableLayout android:layout_height="match_parent"
    android:layout_width="match_parent"
    android:stretchColumns="1"
    android:layout_margin="8dp"
    xmlns:android="http://schemas.android.com/apk/res/android">
    <TableRow>
        <TextView
            android:text="ĐĂNG NHẬP"
            android:layout_span="2"
            android:textStyle="bold"
            android:textSize="20sp"
            android:gravity="center"/>
    </TableRow>
    <TableRow>
        <TextView android:text="Username" android:textStyle="bold" />
        <EditText android:hint="nhập id" />
    </TableRow>
    <TableRow>
        <TextView android:text="Password"  android:textStyle="bold" />
        <EditText android:inputType="textPassword"
            android:hint="nhập mật khẩu"
            />
    </TableRow>
    <LinearLayout
        android:gravity="center"
        android:orientation="horizontal">
        <Button
            style="@style/Widget.AppCompat.Button.Colored"
            android:text="Ok"
            android:layout_width="wrap_content"
            android:layout_height="wrap_content" />
        <Button
            style="@style/Widget.AppCompat.Button.Colored"
            android:backgroundTint="#291010"
            android:text="Hủy"
            android:layout_width="wrap_content"
            android:layout_height="wrap_content" />
        <Button
            android:text="Quyên MK"
            style="@style/Widget.AppCompat.Button.Colored"
            android:backgroundTint="#291010"
            android:layout_width="wrap_content"
            android:layout_height="wrap_content" />

    </LinearLayout>

</TableLayout>