RadioButton và RadioGroup
RadioButton cũng là loại control biểu diễn trạng thái checked/unchecked. Có điểm khác với CheckBox, Switch đó là khi người dùng nhấn vào chọn nó, nó sẽ chuyển sang checked nếu đang là unchecked, nhưng chiều ngược lại nếu nó đang là checked thì không thể bấm vào nó để chuyển sang trạng thái unchecked (Tuy nhiên có thể thiết lập bằng code)
Thường RadioButton sẽ sử dụng cùng với RadioGroup, lúc đó sẽ có vài RadioButton bên trong RadioGroup và ở một thời điểm người dùng chỉ có thể chọn một.
Đã sử dụng RadioButton thì nên luôn sử dụng cùng RadioGroup
<RadioGroup
    android:layout_width="wrap_content"
    android:layout_height="wrap_content">
    <RadioButton
        android:id="@+id/radio_a"
        android:text="RadioButton - A"
        android:layout_width="wrap_content"
        android:layout_height="wrap_content" />

    <RadioButton
        android:id="@+id/radio_b"
        android:text="RadioButton - B"
        android:checked="true"
        android:layout_width="wrap_content"
        android:layout_height="wrap_content" />

    <RadioButton
        android:id="@+id/radio_c"
        android:text="RadioButton - C"
        android:layout_width="wrap_content"
        android:layout_height="wrap_content" />
</RadioGroup>

Các thuộc tính, phương thức đã thực hiện với TextView, CheckBox hoàn toàn có thể áp dụng cho RadioButton mà không cần nhắc lại ở đây như:
- Thiết lập màu chữ, màu nền, nền Drawable ...
- Thiết lập hình ảnh trạng thái với thuộc tính: android:button, android:buttonTint
- Lấy trạng thái, thiết lập trạng thái checked/unchecked với: setCheck(), isChecked()
- Lắng nghe sự kiện thay đổi trạng thái với listener gán bằng: setOnCheckedChangeListener()
Thiết lập trạng thái checked true mặc định
Trong một nhóm các RadioButton (bên trong RadioGroup) bạn thiết lập một RadioButton ở trạng thái checked mặc định bằng một trong hai cách
1 phần tử RadioButton nào ở trạng thái checked mặc định thì cho nó thuộc tính: android:checked="true"
2 nếu không sử dụng cách 1 thì trong RadioGroup cho thêm thuộc tính: android:checkedButton="@id/idradio", với idradio là id của RadioButton sẽ checked mặc định
Nên nhớ nguyên tắc sử dụng RadioButton theo đúng mục đích thiết kế của nó: chọn một phương án trong các phương án đưa ra, nếu có nhu cầu chọn nhiều thì chuyển sang sử dụng CheckBox chứ không cố ép sử dụng RadioButton
Ví dụ
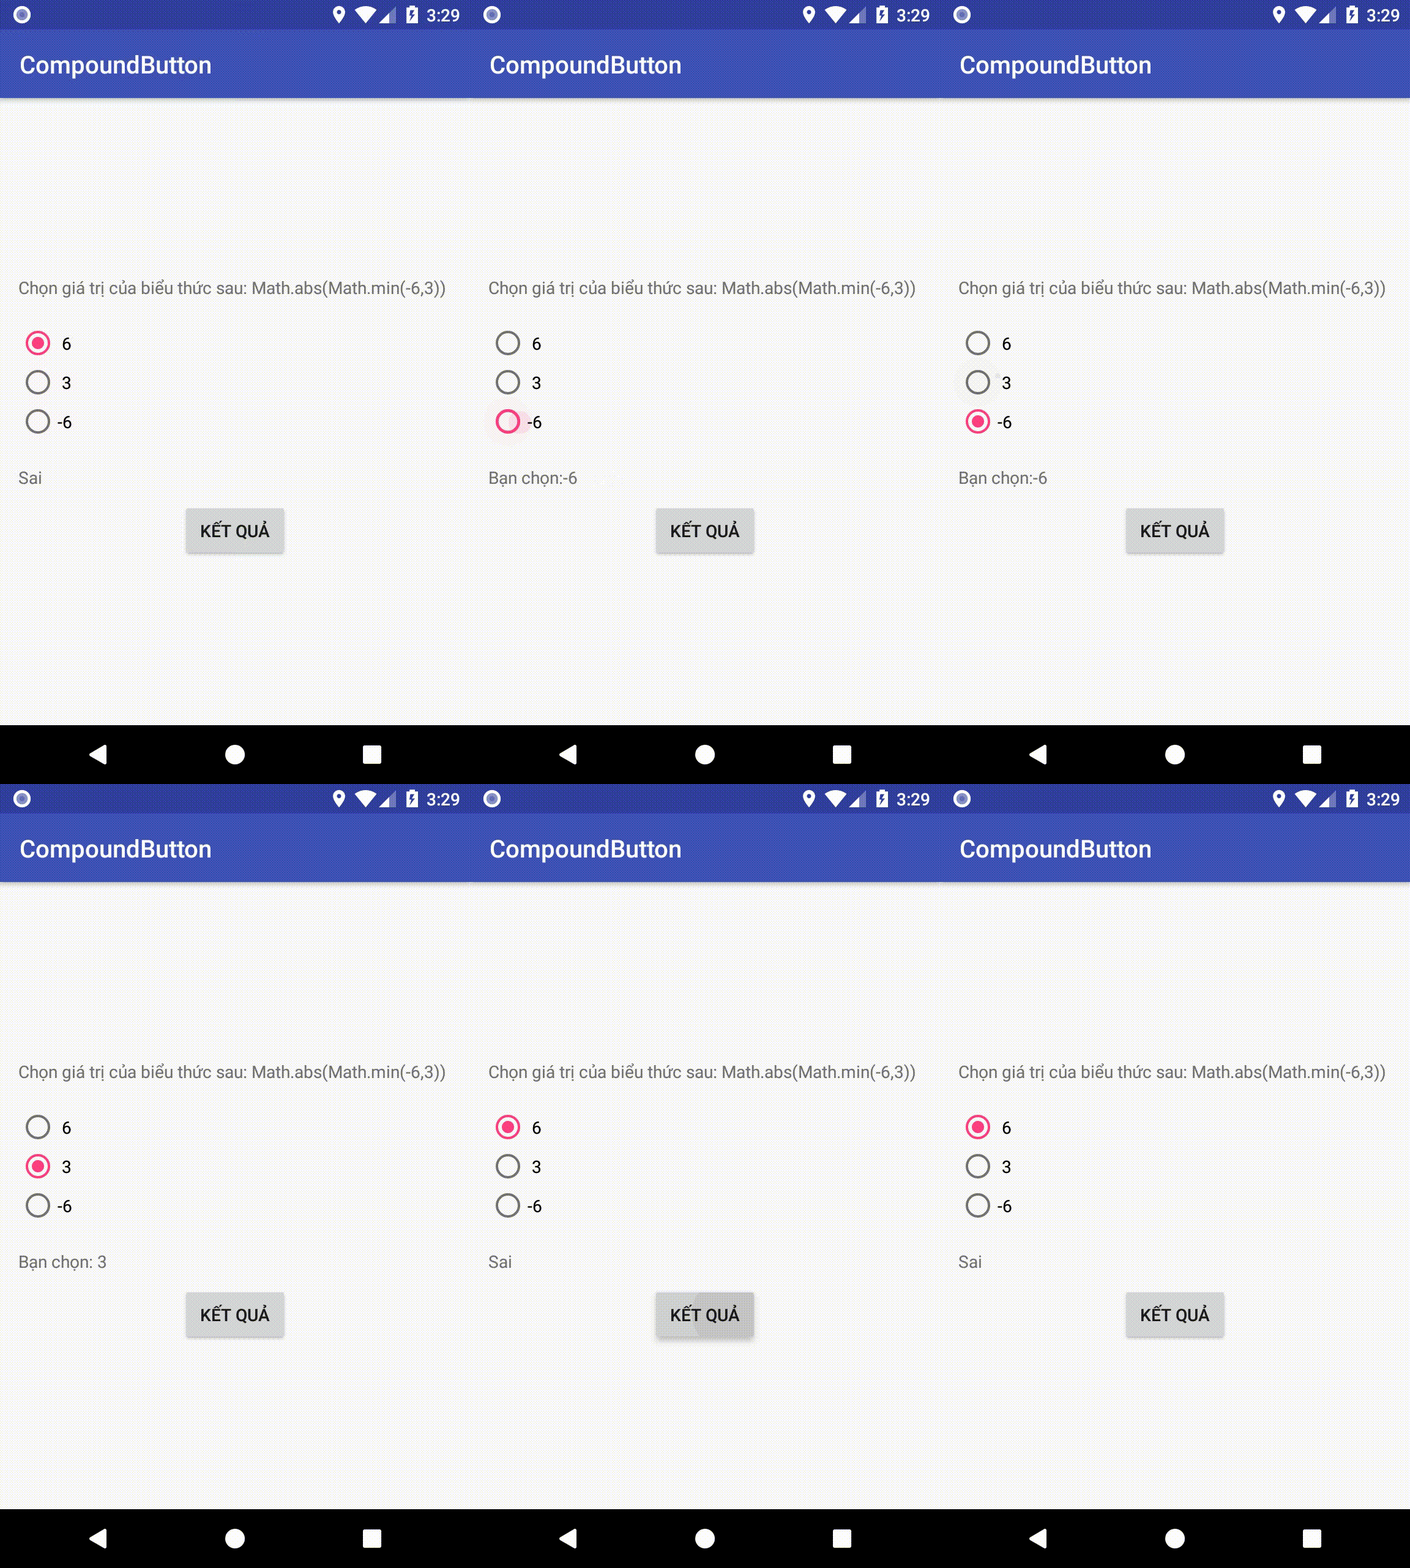
Ví dụ sau thiết kế một câu kiểm tra một lựa chọn, sử dụng RadioButton
activity_main.xml
<?xml version="1.0" encoding="utf-8"?>
<LinearLayout xmlns:android="http://schemas.android.com/apk/res/android"
    xmlns:app="http://schemas.android.com/apk/res-auto"
    android:orientation="vertical"
    android:padding="5dp"
    android:gravity="center"
    android:layout_width="match_parent"
    android:layout_height="match_parent">

    <TextView
        android:text="Chọn giá trị của biểu thức sau:
Math.abs(Math.min(-6,3))"
        android:padding="10dp"
        android:layout_width="match_parent"
        android:layout_height="wrap_content" />
    <RadioGroup
        android:padding="10dp"
        android:layout_width="match_parent"
        android:layout_height="wrap_content">
        <RadioButton
            android:id="@+id/radio_a"
            android:text=" 3"
            android:layout_width="match_parent"
            android:layout_height="wrap_content" />

        <RadioButton
            android:id="@+id/radio_b"
            android:text=" 6"


            android:layout_width="match_parent"
            android:layout_height="wrap_content" />

        <RadioButton
            android:id="@+id/radio_c"
            android:text="-6"
            android:layout_width="match_parent"
            android:layout_height="wrap_content" />
    </RadioGroup>

    <TextView
        android:id="@+id/mgs"
        android:padding="10dp"
        android:hint="bạn hãy chọn một phương án"
        android:layout_width="match_parent"
        android:layout_height="wrap_content" />

    <Button
        android:enabled="false"
        android:id="@+id/test"
        android:text="Kết quả"
        android:layout_width="wrap_content"
        android:layout_height="wrap_content" />

</LinearLayout>
MainActivity.java
public class MainActivity extends AppCompatActivity {


    RadioButton r_a, r_b, r_c;
    Button test;
    TextView mgs;

    @Override
    protected void onCreate(Bundle savedInstanceState) {
        super.onCreate(savedInstanceState);
        setContentView(R.layout.activity_main);

        r_a = findViewById(R.id.radio_a);
        r_b = findViewById(R.id.radio_b);
        r_c = findViewById(R.id.radio_c);

        r_a.setOnCheckedChangeListener(listenerRadio);
        r_b.setOnCheckedChangeListener(listenerRadio);
        r_c.setOnCheckedChangeListener(listenerRadio);


        test = findViewById(R.id.test);
        mgs  = findViewById(R.id.mgs);

        test.setOnClickListener(new View.OnClickListener() {
            @Override
            public void onClick(View view) {
                if (r_b.isChecked())
                {
                    mgs.setText("Đúng rồi");
                }
                else
                {
                    mgs.setText("Sai");

                }
            }
        });

    }

    CompoundButton.OnCheckedChangeListener listenerRadio
        = new CompoundButton.OnCheckedChangeListener() {
        @Override
        public void onCheckedChanged(CompoundButton compoundButton, boolean b) {
            test.setEnabled(true);
            if (b) {
                mgs.setText("Bạn chọn:" + compoundButton.getText());
            }
        }
    };


}

Các tùy chọn khác như:
- Để thay đổi đổi layout RadioGroup theo hướng ngang hay đứng dùng thuộc tính android:orientation gán bằng vertical (đứng) hay horizontal(ngang)
- Màu sắc icon trạng thái của RadioButton thay đổi bằng thuộc tính android:buttonTint

