Phần này là tiếp theo của bài viết CoordinatorLayout (1) xây dựng bố cục, Behavior và Nested Scroll, trình bày thêm một số đối tượng View trong CoordinatorLayout như FAB, ActionBar, AppBarLayout, CollapsingToolbarLayout và đặc biệt là BottomSheet
FAB và Snackbar trong CoordinatorLayout
Về FAB (Floating Action Buttuon) và Snackbar đã trình bày chi tiết cách sử dụng tại: FAB
vả Snackbar.
Phần này nói thêm về hai thành phần này khi nằm trong CooordinatorLayout
FAB khi đặt trong CoordinatorLayout nó có sẵn Behavior là FloatingActionButton.Behavior,
tương tự khi tạo Snackbar nó có Behavior là BottomSheetBehavior. Khi Snackbar hiện thị, ứng xử của 2 đối tượng này phối hợp với nhau là:
Nếu Snackbar chiếm chỗ của FAB, FAB sẽ dịch chuyển lên và ngược lại khi Snackbar ẩn đi FAB sẽ quay lại vị trí cũ.
Trở lại code ví dụ phần 1, thêm FAB vào res\layout\activity_coordinator.xml
<android.support.design.widget.FloatingActionButton
    android:layout_width="wrap_content"
    android:layout_height="wrap_content"
    android:layout_gravity="bottom|right"
    android:layout_margin="16dp"
    android:src="@drawable/iconfab"
    android:tint="#d6bed1"
    app:layout_anchor="@id/mylistview_2"
    app:layout_anchorGravity="bottom|right|end"/>
Trong OnCreate thêm đoạn mã để chi bấm vào TextView có ID textTest thị tạo một Snackbar
findViewById(R.id.txtTest).setOnClickListener(new View.OnClickListener() {
    @Override
    public void onClick(View view) {
        Snackbar snackbar = Snackbar.make(view,
            ((TextView)view).getText(), Snackbar.LENGTH_SHORT);
        snackbar.show();
    }
});
Kết quả:

Khi Snackbar xuất hiện thì FAB đã dịch chuyển lên trên
Cuộn Toolbar / ActionBar trong CoordinatorLayout
Trước tiên bạn đọc về: Sử dụng Toolbar, ActionBar trong lập trình Android, phân này giải thích thêm một số chi tiết.
Ở đây ta tiến hành thay đổi ứng dụng trên để khi cuộn trong các RecylerView hoặc NestedScrollView thì tương ứng Toolbar/ActionBar cuộn lên xuống.
res\layout\activity_coordinator.xml
<?xml version="1.0" encoding="utf-8"?>
<android.support.design.widget.CoordinatorLayout
    xmlns:android="http://schemas.android.com/apk/res/android"
    xmlns:app="http://schemas.android.com/apk/res-auto"
    xmlns:tools="http://schemas.android.com/tools"
    android:layout_width="match_parent"
    android:layout_height="match_parent"
    android:fitsSystemWindows="true"
    tools:context="net.xuanthulba.coordinator.CoordinatorActivity">

    <android.support.design.widget.AppBarLayout
        android:id="@+id/appbar"
        android:layout_width="match_parent"
        android:layout_height="wrap_content">

        <android.support.v7.widget.Toolbar
            android:id="@+id/toolbar"
            android:layout_width="match_parent"
            android:layout_height="?attr/actionBarSize"
            app:titleTextColor="@android:color/white"
            app:layout_scrollFlags="scroll|enterAlways" />
    </android.support.design.widget.AppBarLayout>


    <LinearLayout
        android:id="@+id/mainlayout"
        android:layout_width="match_parent"
        android:layout_height="match_parent"
        android:orientation="vertical"
        android:background="#1db182"
        app:layout_behavior="@string/appbar_scrolling_view_behavior"
        app:layout_anchorGravity="bottom">

        <android.support.v7.widget.RecyclerView
            android:layout_margin="10dp"
            android:padding="5dp"
            android:id="@+id/mylistview"
            android:layout_width="match_parent"
            android:layout_height="0dp"
            android:layout_weight="1"
            android:background="@android:color/holo_orange_light" />

        <android.support.v7.widget.RecyclerView
            android:layout_margin="10dp"
            android:padding="5dp"
            android:id="@+id/mylistview_2"
            android:layout_width="match_parent"
            android:layout_height="0dp"
            android:layout_weight="1"
            android:background="@android:color/holo_red_dark" />
    </LinearLayout>

    <TextView
        android:id="@+id/txtTest"
        android:layout_width="100dp"
        android:layout_height="100dp"
        android:layout_margin="25dp"
        android:background="@android:color/holo_green_dark"
        android:padding="10dp"
        android:text="This is a TextView in CoordinatorLayout"
        app:layout_anchor="@+id/mainlayout"
        app:layout_anchorGravity="right|top"
        app:layout_behavior="net.xuanthulba.coordinator.FirstBehavior" />


    <android.support.design.widget.FloatingActionButton
        android:layout_width="wrap_content"
        android:layout_height="wrap_content"
        android:layout_gravity="bottom|right"
        android:layout_margin="16dp"
        android:src="@drawable/iconfab"
        android:tint="#d6bed1"
        app:layout_anchor="@id/mylistview_2"
        app:layout_anchorGravity="bottom|right|end"/>


</android.support.design.widget.CoordinatorLayout>
Giải thích code XML trên
Sử dụng một AppBarLayout để chứa ActionBar (Toolbar) vì AppBarLayout hỗ trợ tính năng cuộn.
Khi sử dụng AppBarLayout như code XML trên, ta cần thiết lập không sử dụng Toolbar mặc định bằng cách thiết lập
theme mà Activity sử dụng
Ví dụ, tạo theme có thiết lập không sử dụng ActionBar hệ thống mặc đinh trong styles.xml
 <resources>
    <-- --- -->
    <style name="AppTheme.NoActionBar">
        <item name="windowActionBar">false</item>
        <item name="windowNoTitle">true</item>
    </style>
    <-- --- -->

</resources>
Sau đó trong manifests áp theme đó cho Activity, ví dụ như:
<activity
    android:name=".CoordinatorActivity"
    android:theme="@style/AppTheme.NoActionBar">
    <!-- --- -->
</activity>
Do đã loại bỏ ActionBar mặc định, trong onCreate bạn cần có mã thiết lập Toolbar chữa trong XML sẽ là Toolbar của Activity
Toolbar toolbar = findViewById(R.id.toolbar);
setSupportActionBar(toolbar);
phần tử LinearLayout với ID là mainlayout được gán Behavior có giá trị: @string/appbar_scrolling_view_behavior
hay chính là: android.support.design.widget.AppBarLayout$ScrollingViewBehavior, đây là Behavior điều khiển phần tử chứa
nó bám theo AppBarLayout trong CoordinatorLayout. Vì thế bạn sẽ thấy, mainlayout luôn bám mép dưới
của AppBarLayout khi cuộn
Bằng cách sử dụng như trên, khi có hành động cuộn trên các phần tử như RecylerView, NestedScrollView ... (tức những phần tử có phát
sự kiện Nested Scroll) thì Toolbar sẽ cuộn lên.
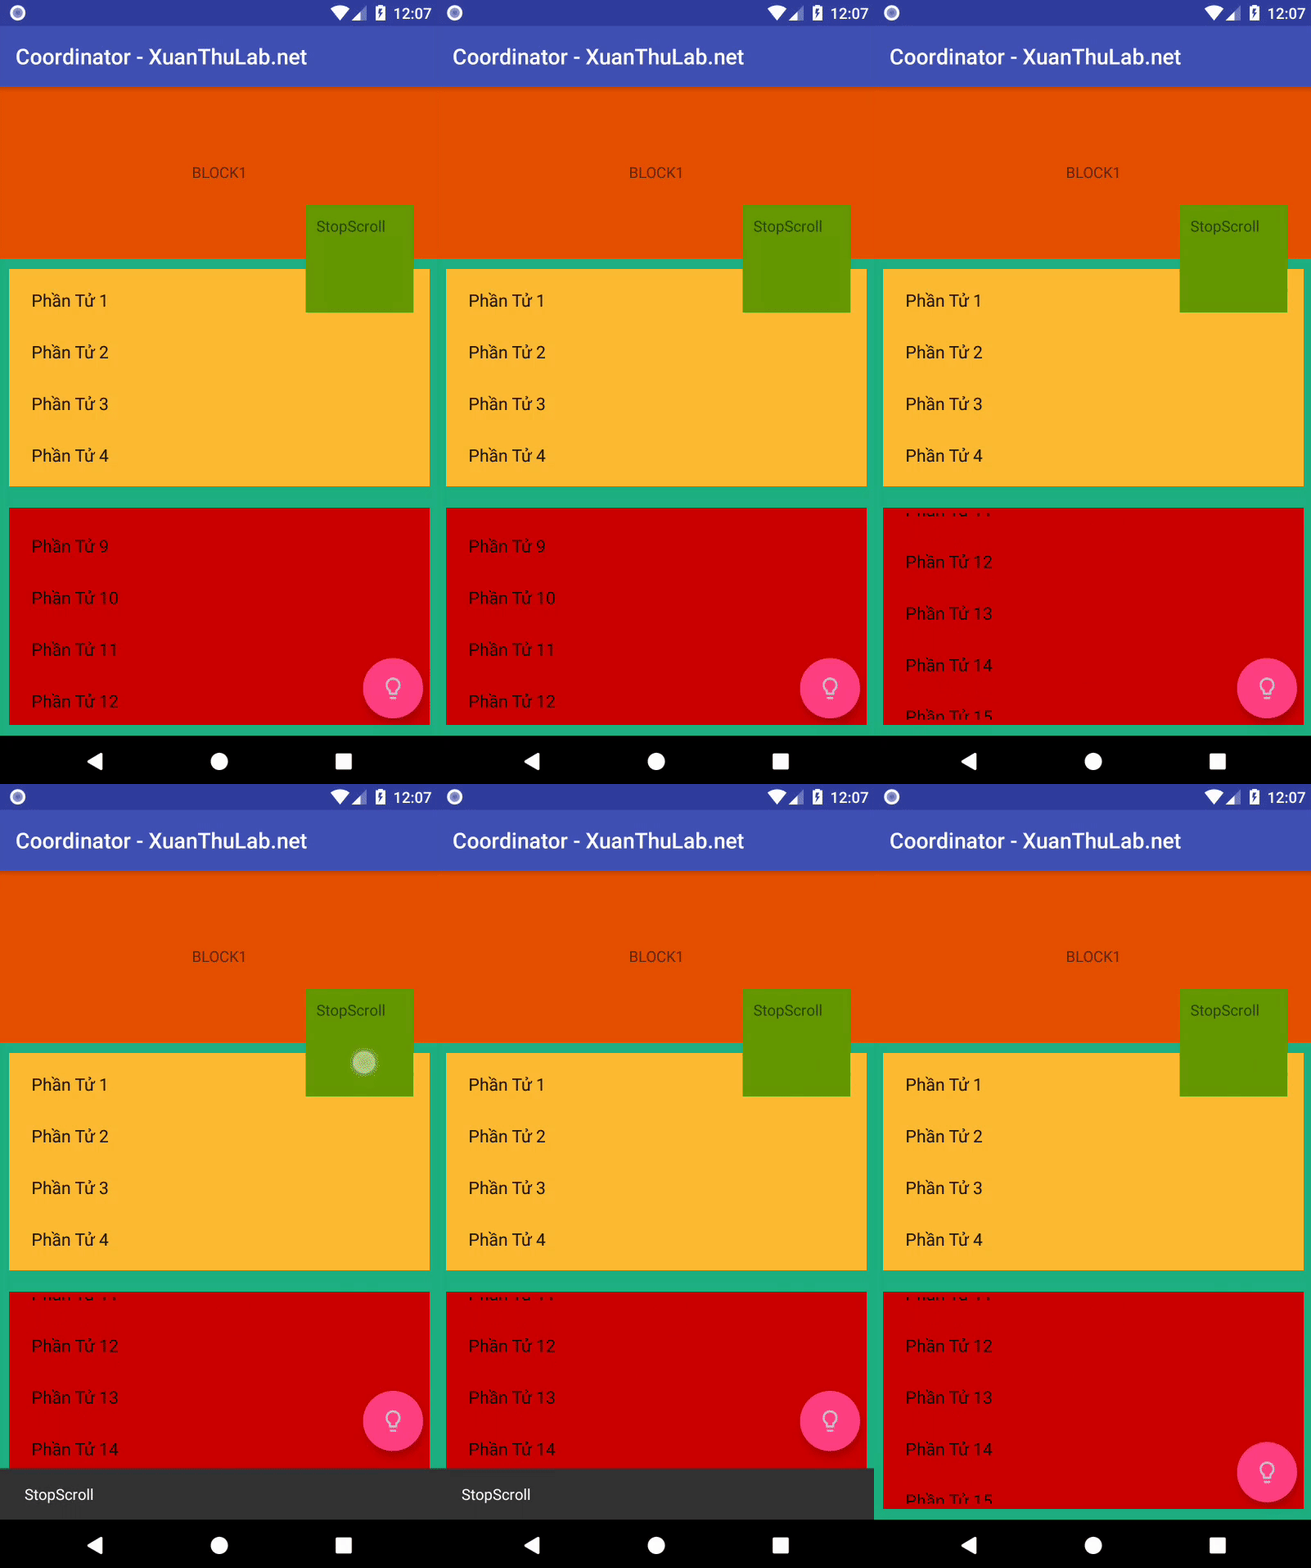
Xem kết quả - thấy ActionBar (toolbar) và mainlayout đã trượt lên, xuống khi cuộn phần tử trong danh sách.

Bạn cần lưu ý về tham số XML: app:layout_scrollFlags (xem phần tử Toolbar). Tham số này bắt buộc phải thiết lập để có được hiệu ứng cuộn. Các giá trị nó có thể nhận
scroll: cuộn khi có sự kiện cuộn trong các View, tham số này phải luôn thiết lập, sau đó mới thêm các thiết lập khác như sauenterAlways: sẽ cuộn cho bất kỳ sự kiện cuộn nào của View (cuộn ngay xuống kể cả cuộn xuống của View chưa đến đầu phần tử)enterAlwaysCollapsed: bao giờ cũng phải sử dụng cùngenterAlways.exitUntilCollapsed: View sẽ thu gọn khi vuốt ngược lên, quá trình diễn ra cho tới giá trị minHeight
CollapsingToolbarLayout trong CoordinatorLayout
Áp dụng thêm CollapsingToolbarLayout, để có các hiệu ứng Expand/Collapse khi thao tác cuộn diễn ra trong Coordinator.
res\layout\activity_coordinator.xml
<?xml version="1.0" encoding="utf-8"?>
<android.support.design.widget.CoordinatorLayout
    xmlns:android="http://schemas.android.com/apk/res/android"
    xmlns:app="http://schemas.android.com/apk/res-auto"
    xmlns:tools="http://schemas.android.com/tools"
    android:layout_width="match_parent"
    android:layout_height="match_parent"
    android:fitsSystemWindows="false"
    tools:context="net.xuanthulba.coordinator.CoordinatorActivity">


    <android.support.design.widget.AppBarLayout
        android:id="@+id/appbar"
        android:layout_width="match_parent"
        android:minHeight="?attr/actionBarSize"
        android:theme="@style/AppTheme.AppBarOverlay"

        android:layout_height="wrap_content">

        <android.support.design.widget.CollapsingToolbarLayout
            android:id="@+id/collapsing_toolbar"
            android:layout_width="match_parent"
            android:layout_height="match_parent"
            app:contentScrim="?attr/colorPrimary"
            app:expandedTitleMarginEnd="64dp"
            app:expandedTitleMarginStart="48dp"
            app:toolbarId="@+id/toolbar"
            app:layout_scrollFlags="scroll|exitUntilCollapsed">

            <ImageView
                android:id="@+id/image"
                android:layout_width="match_parent"
                android:layout_height="180dp"
                android:scaleType="centerCrop"
                android:src="@drawable/forest"
                app:layout_collapseMode="parallax"/>


            <android.support.v7.widget.Toolbar
                android:id="@+id/toolbar"
                android:layout_width="match_parent"
                android:layout_height="?attr/actionBarSize"
                app:layout_collapseMode="pin"
                app:layout_scrollFlags="scroll|enterAlways"
                app:titleTextColor="@android:color/white" />


        </android.support.design.widget.CollapsingToolbarLayout>

    </android.support.design.widget.AppBarLayout>


    <LinearLayout
        android:id="@+id/mainlayout"
        android:layout_width="match_parent"
        android:layout_height="match_parent"
        android:orientation="vertical"
        android:background="#1db182"
        app:layout_behavior="@string/appbar_scrolling_view_behavior"
        app:layout_anchorGravity="bottom">

        <android.support.v7.widget.RecyclerView
            android:layout_margin="10dp"
            android:padding="5dp"
            android:id="@+id/mylistview"
            android:layout_width="match_parent"
            android:layout_height="0dp"
            android:layout_weight="1"
            android:background="@android:color/holo_orange_light" />

        <android.support.v7.widget.RecyclerView
            android:layout_margin="10dp"
            android:padding="5dp"
            android:id="@+id/mylistview_2"
            android:layout_width="match_parent"
            android:layout_height="0dp"
            android:layout_weight="1"
            android:background="@android:color/holo_red_dark" />
    </LinearLayout>

    <TextView
        android:id="@+id/txtTest"
        android:layout_width="100dp"
        android:layout_height="100dp"
        android:layout_margin="25dp"
        android:background="@android:color/holo_green_dark"
        android:padding="10dp"
        android:text="This is a TextView in CoordinatorLayout"
        app:layout_anchor="@+id/mainlayout"
        app:layout_anchorGravity="right|top"
        app:layout_behavior="net.xuanthulba.coordinator.FirstBehavior" />


    <android.support.design.widget.FloatingActionButton
        android:layout_width="wrap_content"
        android:layout_height="wrap_content"
        android:layout_gravity="bottom|right"
        android:layout_margin="16dp"
        android:src="@drawable/iconfab"
        android:tint="#d6bed1"
        app:layout_anchor="@id/mylistview_2"
        app:layout_anchorGravity="bottom|right|end"/>


    </android.support.design.widget.CoordinatorLayout>

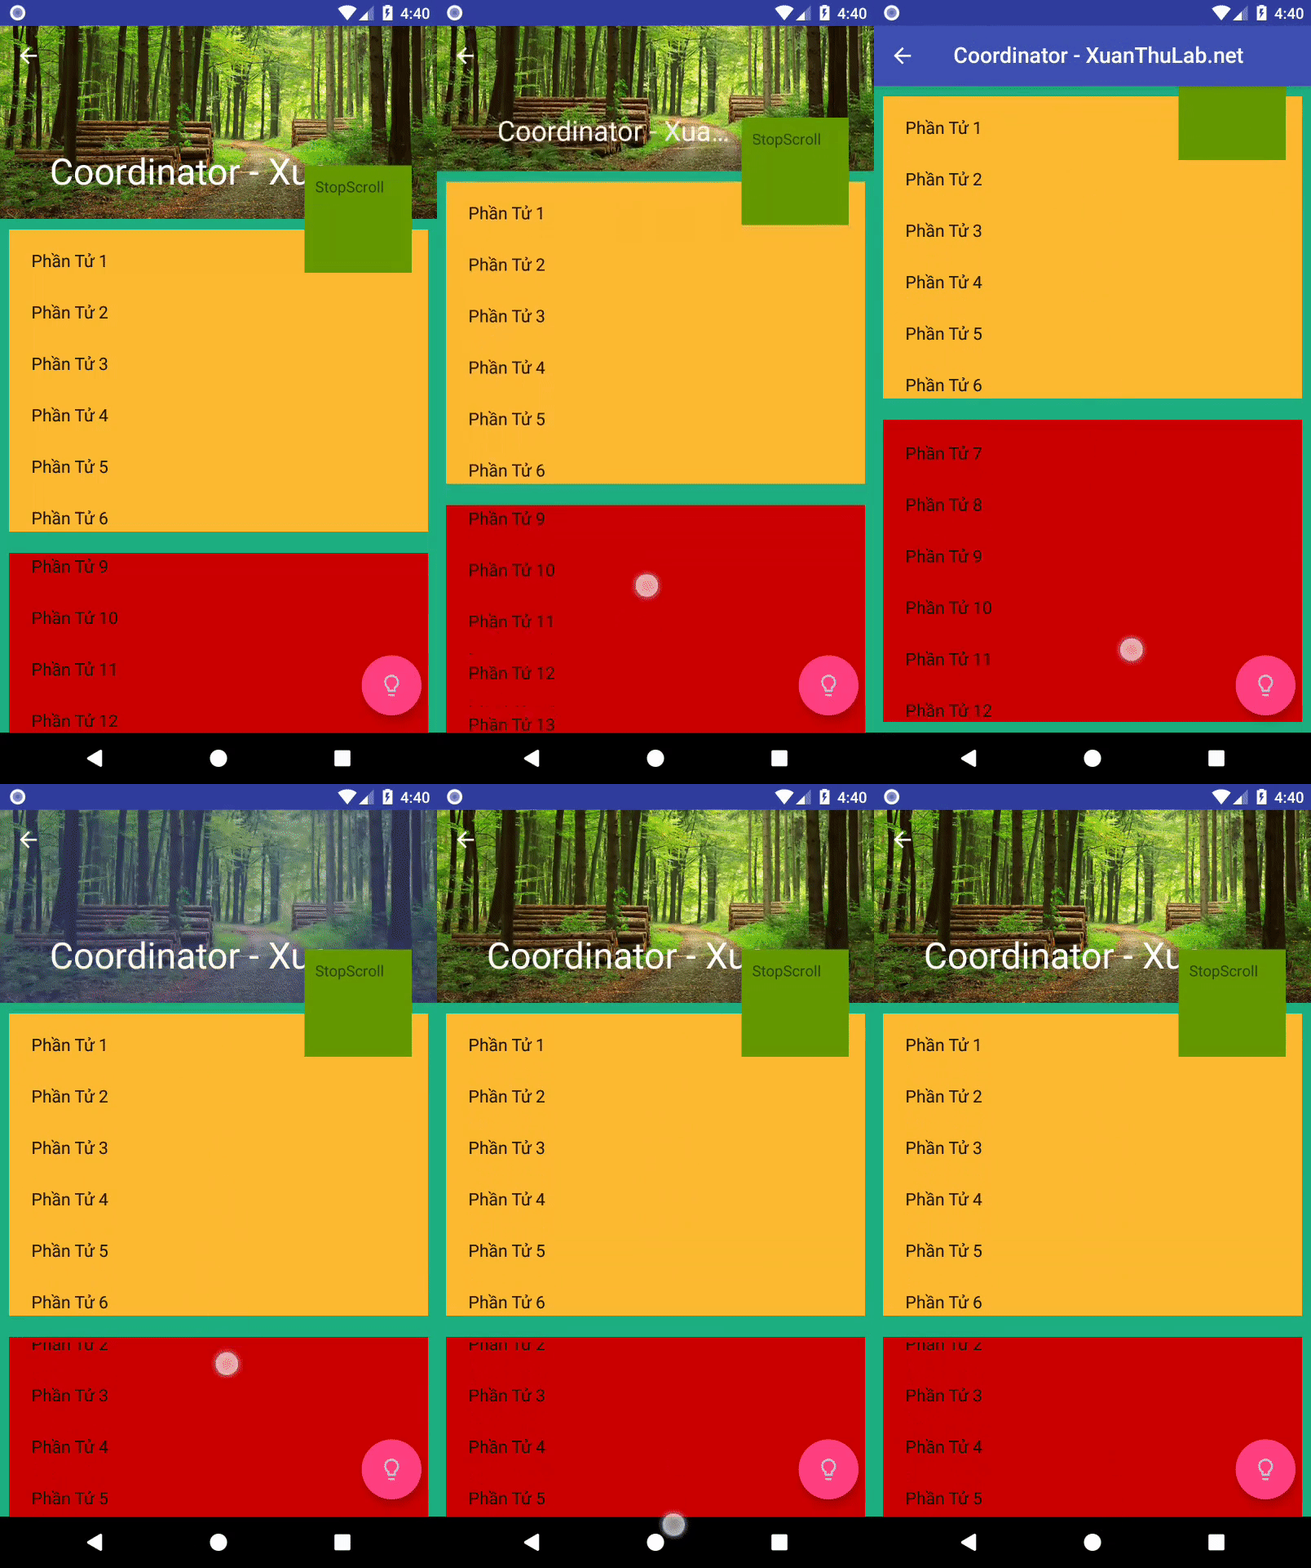
Bạn để ý khi cuộn, ActionBar và Hình ảnh xảy ra các hiệu ứng như cấu hình. Với ảnh có thuộc tính app:layout_collapseMode="parallax", tạo ra hiệu ứng
thay đổi điểm nhìn khi vuốt. Với ActionBar thì có app:layout_collapseMode="pin" nó sẽ không mất đi sau khi vuốt ngược lên.
BottomSheet trong CoordinatorLayout
Một View có thể vuốt từ dưới lên để xuất hiện và vuốt xuống để ẩn đi gọi là BottomSheet

Có 2 kiểu BottomSheet, một loại cố định trong Layout, có thể bị ẩn hay hiện thị, nghĩa là luôn tồn tại (Persistent Modal Sheet), một loại gọi là được chèn vào bằng Dialog Fragments, sử dụng BottomSheetDialogFragment
Tạo Persistent Modal Sheet
Khá đơn giản, thường cho thêm vào Layout một NestedScrollView để chứa nội dung của BottomSheet, rồi gán cho nó Behavior xây dựng
săn của thư viện có tên là: BottomSheetBehavior (android.support.design.widget.BottomSheetBehavior). Lúc nó dưới sự tác động
của CoordinatorLayout và ứng xử của BottomSheetBehavior thì NestedScrollView sẽ hoạt động là một BottomView.
Trở lại ví dụ trên, ta sẽ thêm một NestedScrollView, res\layout\activity_coordinator.xml nội dung như sau:
<?xml version="1.0" encoding="utf-8"?>
<android.support.design.widget.CoordinatorLayout
    xmlns:android="http://schemas.android.com/apk/res/android"
    xmlns:app="http://schemas.android.com/apk/res-auto"
    xmlns:tools="http://schemas.android.com/tools"
    android:layout_width="match_parent"
    android:layout_height="match_parent"
    android:fitsSystemWindows="false"
    tools:context="net.xuanthulba.coordinator.CoordinatorActivity">


    <android.support.design.widget.AppBarLayout
        android:id="@+id/appbar"
        android:layout_width="match_parent"
        android:minHeight="?attr/actionBarSize"
        android:theme="@style/AppTheme.AppBarOverlay"

        android:layout_height="wrap_content">

        <android.support.design.widget.CollapsingToolbarLayout
            android:id="@+id/collapsing_toolbar"
            android:layout_width="match_parent"
            android:layout_height="match_parent"
            app:contentScrim="?attr/colorPrimary"
            app:expandedTitleMarginEnd="64dp"
            app:expandedTitleMarginStart="48dp"
            app:toolbarId="@+id/toolbar"
            app:layout_scrollFlags="scroll|exitUntilCollapsed">

            <ImageView
                android:id="@+id/image"
                android:layout_width="match_parent"
                android:layout_height="180dp"
                android:scaleType="centerCrop"
                android:src="@drawable/forest"
                app:layout_collapseMode="parallax"/>


            <android.support.v7.widget.Toolbar
                android:id="@+id/toolbar"
                android:layout_width="match_parent"
                android:layout_height="?attr/actionBarSize"
                app:layout_collapseMode="pin"
                app:layout_scrollFlags="scroll|enterAlways"
                app:titleTextColor="@android:color/white" />


        </android.support.design.widget.CollapsingToolbarLayout>

    </android.support.design.widget.AppBarLayout>


    <LinearLayout
        android:id="@+id/mainlayout"
        android:layout_width="match_parent"
        android:layout_height="match_parent"
        android:orientation="vertical"
        android:background="#1db182"
        app:layout_behavior="@string/appbar_scrolling_view_behavior"
        app:layout_anchorGravity="bottom">

        <android.support.v7.widget.RecyclerView
            android:layout_margin="10dp"
            android:padding="5dp"
            android:id="@+id/mylistview"
            android:layout_width="match_parent"
            android:layout_height="0dp"
            android:layout_weight="1"
            android:background="@android:color/holo_orange_light" />

        <android.support.v7.widget.RecyclerView
            android:layout_margin="10dp"
            android:padding="5dp"
            android:id="@+id/mylistview_2"
            android:layout_width="match_parent"
            android:layout_height="0dp"
            android:layout_weight="1"
            android:background="@android:color/holo_red_dark" />
    </LinearLayout>

    <TextView
        android:id="@+id/txtTest"
        android:layout_width="100dp"
        android:layout_height="100dp"
        android:layout_margin="25dp"
        android:background="@android:color/holo_green_dark"
        android:padding="10dp"
        android:text="This is a TextView in CoordinatorLayout"
        app:layout_anchor="@+id/mainlayout"
        app:layout_anchorGravity="right|top"
        app:layout_behavior="net.xuanthulba.coordinator.FirstBehavior" />


    <android.support.design.widget.FloatingActionButton
        android:layout_width="wrap_content"
        android:layout_height="wrap_content"
        android:layout_gravity="bottom|right"
        android:layout_margin="16dp"
        android:src="@drawable/iconfab"
        android:tint="#d6bed1"
        app:layout_anchor="@id/mylistview_2"
        app:layout_anchorGravity="bottom|right|end"/>
<--Phần mới thêm -->
    <android.support.v4.widget.NestedScrollView
        android:id="@+id/bottom_sheet"
        android:layout_width="match_parent"
        android:layout_height="200dp"
        android:clipToPadding="true"
        app:behavior_hideable="false"
        app:behavior_peekHeight="30dp"
        android:background="@android:color/holo_purple"
        app:layout_behavior="android.support.design.widget.BottomSheetBehavior">
        <LinearLayout
            android:layout_width="match_parent"
            android:orientation="vertical"
            android:layout_height="wrap_content">
            <TextView
                android:text="BottomSheet"
                android:layout_width="match_parent"
                android:background="#e66f00"
                android:layout_height="30dp" />
            <TextView
                android:layout_width="match_parent"
                android:layout_height="match_parent"
                android:text="
Bottom sheets can be dismissed by swiping
the bottom sheet down, by touching an
explicit control such as an X in the
app bar, or by touching the system back
button (Android). Modal bottom sheets
can also be dismissed by touching outside
of the bottom sheet.
Dismiss by swiping
the bottom sheet down"
                android:padding="16dp"
                android:textSize="16sp"/>
        </LinearLayout>
    </android.support.v4.widget.NestedScrollView>

</android.support.design.widget.CoordinatorLayout>
Giải thích các tham số thiết lập cho NestedScrollView:
app:behavior_hideable="false"nếu là true thì cho phép kéo xuống sẽ ẩn hoàn toàn View, ở đây chọn false thì khi kéo xuống nó sẽ giữ lại phần nhô lên (peek).app:behavior_peekHeight="30dp"thiết lập chiều cao phần nhô lênapp:layout_behavior="android.support.design.widget.BottomSheetBehavior"thiết lập Behavior cho NestedScrollView thành BottomSheetBehavior
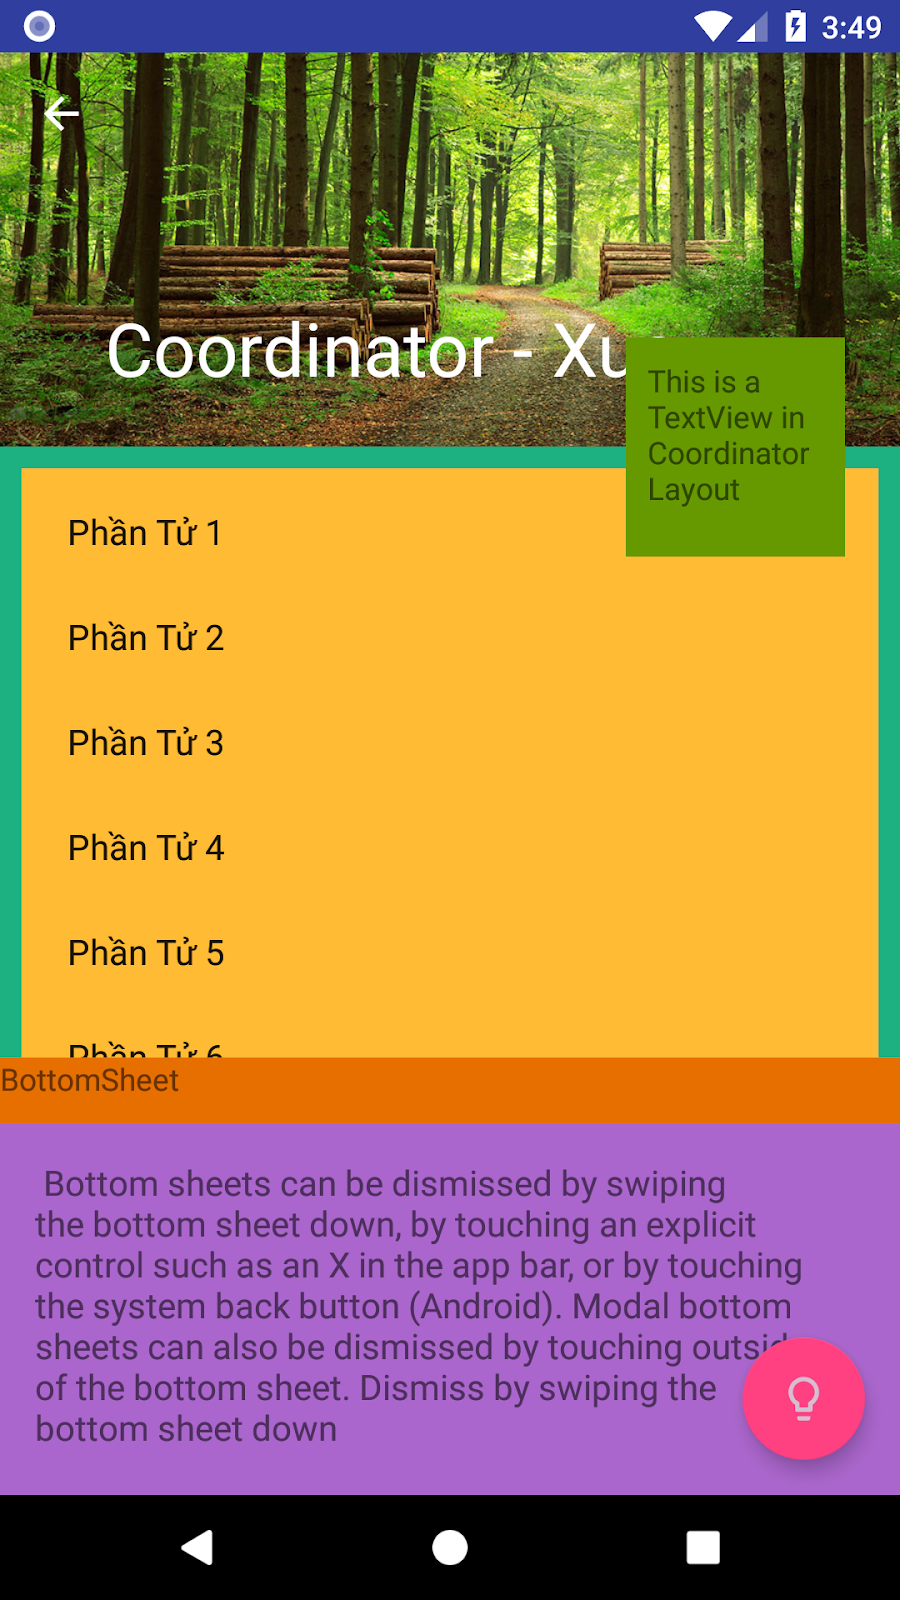
Chạy thử Code trên

setBottomSheetCallback
Giờ nếu muốn bắt các sự kiện như: khi BottomSheet mở rộng lên, thu hẹp xuống, khi đang cuộn ... thì trong code bạn sẽ lấy đối tượng
BottomSheetBehavior gán cho NestedScrollView, rồi thiết lập lập một CallBack có tên là BottomSheetCallback cho
nó bằng phương thức setBottomSheetCallback
Lấy BottomSheetCallback đã gán cho NestedScrollView ở trên
final BottomSheetBehavior bottomSheetBehavior
    = BottomSheetBehavior.from(findViewById(R.id.bottom_sheet));
Tạo đối tượng BottomSheetCallback và gán nó cho bottomSheetBehavior, ví dụ trong onCreate
final View mainlayout = findViewById(R.id.mainlayout);
final BottomSheetBehavior bottomSheetBehavior = BottomSheetBehavior.from(findViewById(R.id.bottom_sheet));
BottomSheetBehavior.BottomSheetCallback bottomSheetCallback =  new BottomSheetBehavior.BottomSheetCallback() {
    @Override
    public void onStateChanged(@NonNull View bottomSheet, int newState) {
        switch (newState) {
            case BottomSheetBehavior.STATE_HIDDEN:
                //View bị ẩn
                break;
            case BottomSheetBehavior.STATE_EXPANDED:
                //View mở rộng lên
                Toast.makeText(bottomSheet.getContext(), "Mở rộng", Toast.LENGTH_SHORT).show();
                break;

            case BottomSheetBehavior.STATE_DRAGGING:
                //Bắt đầu kéo View
                break;
            case BottomSheetBehavior.STATE_COLLAPSED:
                //View thu gọn lại
                Toast.makeText(bottomSheet.getContext(), "Thu gọn", Toast.LENGTH_SHORT).show();
                break;

            default:

                break;
        }

    }

    @Override
    public void onSlide(@NonNull View bottomSheet, float slideOffset) {
        //Vị trí tương đối của View khi trượt, slideOffset = -1 đến 1
        //Khi nhận từ 0 -> 1 thì sheet đang chuyển từ thu hẹp sang
        //mở rộng.

        //Code sau sẽ làm mờ mainlayout khi kéo sheet lên và
        //ngược lại
        float alpha = 1 - slideOffset;
        if (alpha >= 0.5)
            mainlayout.animate().alpha(alpha).start();
    }
};

bottomSheetBehavior.setBottomSheetCallback(bottomSheetCallback);
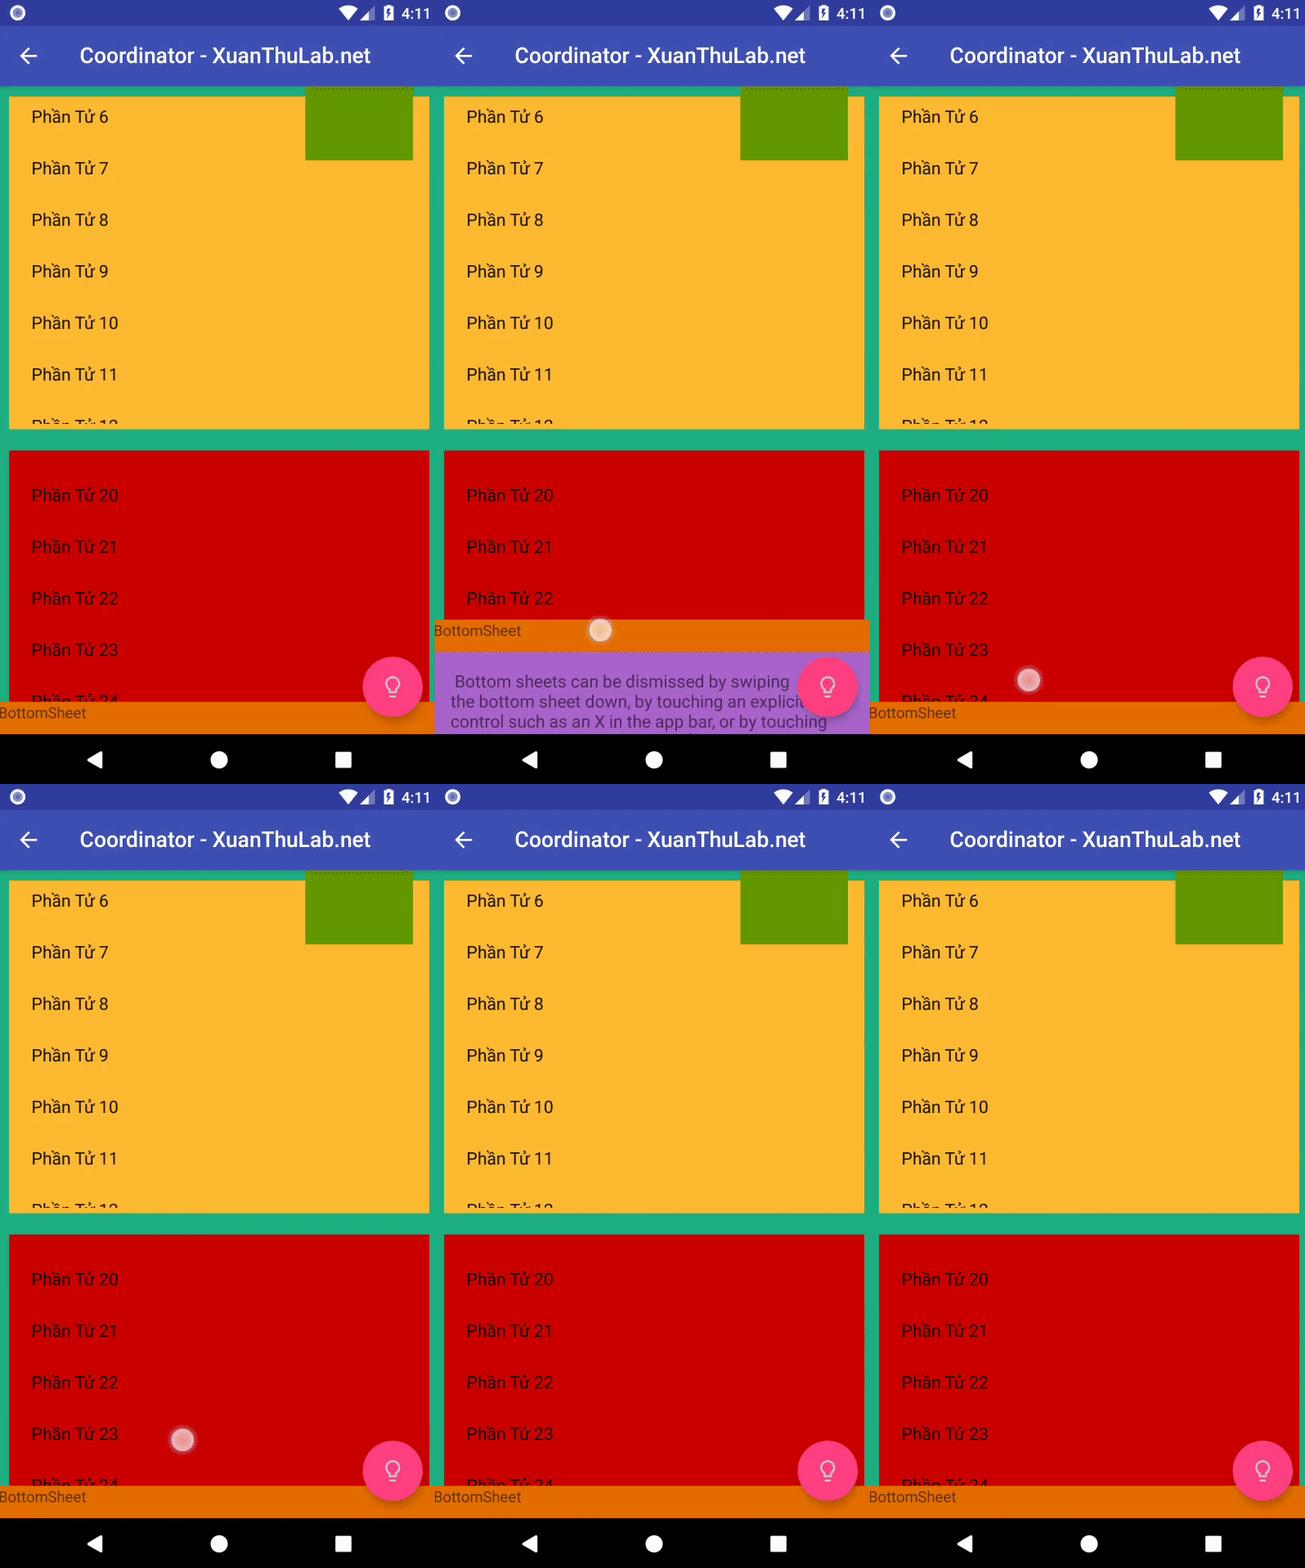
Chạy thử code trên

Sử dụng BottomSheetDialogFragment tạo BottomSheet
Bạn tạo ra một Fragment kế thừa từ BottomSheetDialogFragment (sau đó sử dụng kỹ thuật đưa Fragment vào để hiện thị BottomSheet).
Đầu tiên tạo layout/fragment_bottom_sheet.xml để chứa nội dung
<?xml version="1.0" encoding="utf-8"?>
<LinearLayout
    xmlns:android="http://schemas.android.com/apk/res/android"
    android:orientation="vertical"
    android:layout_width="match_parent"
    android:layout_height="match_parent">
    <TextView
        android:text="BottomSheet - Dialog"
        android:layout_width="match_parent"
        android:gravity="center"
        android:background="#00ba28"
        android:layout_height="30dp" />
    <TextView
        android:layout_width="match_parent"
        android:layout_height="match_parent"
        android:text="
Bottom sheets can be dismissed by swiping
the bottom sheet down, by touching an
explicit control such as an X in the
app bar, or by touching the system back
button (Android). Modal bottom sheets
can also be dismissed by touching outside
of the bottom sheet.
Dismiss by swiping
the bottom sheet down"
        android:padding="16dp"
        android:textSize="16sp"/>
</LinearLayout>
Tạo Fragment kế thừa từ BottomSheetDialogFragment, ví dụ đặt tên là FirstBottomSheetDialogFragment
public class FirstBottomSheetDialogFragment extends BottomSheetDialogFragment {
    @Nullable
    @Override
    public View onCreateView(LayoutInflater inflater,
                            @Nullable ViewGroup container,
                            @Nullable Bundle savedInstanceState) {
        //Tạo View của Fragment
        return inflater.inflate(R.layout.fragment_bottom_sheet, container);
    }
}
Code sử dụng FirstBottomSheetDialogFragment, trường hợp này ví dụ bấm vào txtTest thì chèn Fragment trên
Trong onCreate:
findViewById(R.id.txtTest).setOnClickListener(new View.OnClickListener() {
    @Override
    public void onClick(View view) {
        FirstBottomSheetDialogFragment myDialog
            = new FirstBottomSheetDialogFragment();

        FragmentManager fm = getSupportFragmentManager();
        myDialog.show(fm, "FirstBottomSheetDialogFragment");
    }
});
Chạy thử code trên


