Giới thiệu về CoordinatorLayout trong Android
CoordinatorLayout là một lớp mở rộng từ ViewGroup nó khá giống với FrameLayout được sử
dụng trong thiết kế UI. Thường sử dụng CoordinatorLayout để thiết kế layout chính của ứng dụng, nó như là
phần tử chứa các View con, cung cấp khả năng tương tác mềm dẻo giữa các View con trong nó.
Sử dụng CoordinatorLayout bạn có thể thiết lập nhiều sự tương tác khác nhau giữa phần tử View cha và các View con, hay giữa các View con với nhau.
Để sử dụng CoordinatorLayout đảm bảo tích hợp thự viện vào build.gradle với dòng mã:
compile 'com.android.support:design:26.1.0' //hoặc phiên bản nào bạn thích
Chèn CoordinatorLayout vào XML cú pháp dạng sau:
<?xml version="1.0" encoding="utf-8"?>
<android.support.design.widget.CoordinatorLayout
    android:layout_width="match_parent"
    android:layout_height="match_parent">
    //...
     />
Khi các View con nằm trong CoordinatorLayout thì nó có thể thiết lập các thuộc tính
| Thuộc tính | Giá trị | Mô tả |
|---|---|---|
app:layout_anchor
|
ID của một phần tử neo vào | Chỉ ra phần tử mà phần tử sẽ neo vào để xác định vị trí, ví dụ: app:layout_anchor="@android:id/toolbar" |
app:layout_anchorGravity
|
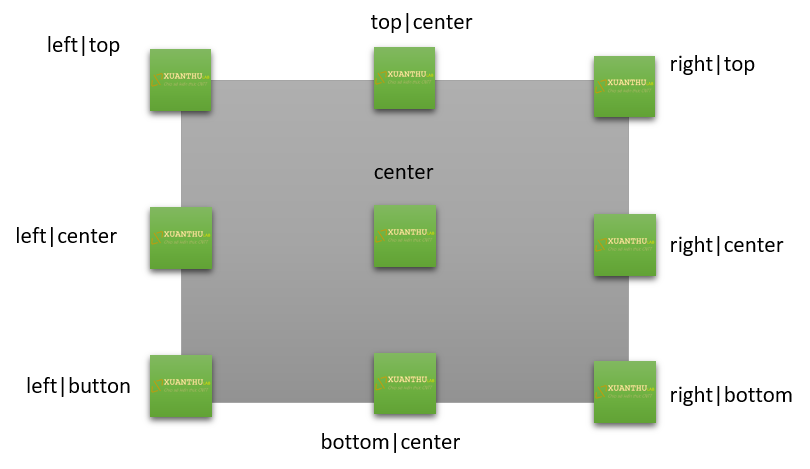
Kết hợp các giá trị hằng số của lớp Gravity: top, bottom, left, right, start, end ...
|
Chỉ ra cách thức mà phần tử neo theo phần tử khác (dịch trên trên phần tử khác). Ví dụ: app:layout_anchorGravity="bottom|left", neo vào
biên phía dưới, bên trái của phần tử chỉ ra bởi app:layout_anchor

|
app:layout_behavior |
Một String | String này tham chiếu lớp lớp mở rộng từ lớp CoordinatorLayout.Behavior, nó sẽ định nghĩa ứng xử của
View bên trong CoordinatorLayout, Ví dụ:app:layout_behavior="FloatingActionButton.Behavior",
app:layout_behavior="com.mydomain.MyBehavior" |
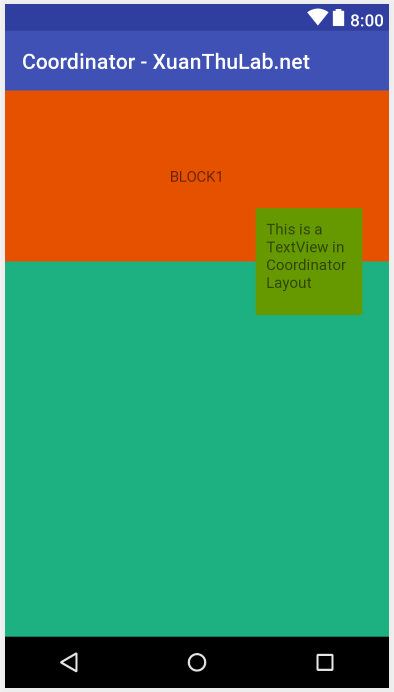
Ví dụ trình bày layout sử dụng CoordinatorLayout trong file: res\layout\activity_coordinator.xml
<?xml version="1.0" encoding="utf-8"?>
<android.support.design.widget.CoordinatorLayout xmlns:android="http://schemas.android.com/apk/res/android"
    xmlns:app="http://schemas.android.com/apk/res-auto"
    xmlns:tools="http://schemas.android.com/tools"
    android:layout_width="match_parent"
    android:layout_height="match_parent"

    android:fitsSystemWindows="true"
    tools:context="net.xuanthulba.coordinator.CoordinatorActivity">


    <TextView
        android:id="@+id/frID"
        android:layout_width="match_parent"
        android:layout_height="160dp"
        android:text="BLOCK1"
        android:gravity="center"

        android:background="#e65100" />


    <LinearLayout
        android:layout_width="match_parent"
        android:layout_height="match_parent"
        android:orientation="vertical"
        android:layout_marginTop="160dp"
        android:background="#1db182"
        app:layout_anchorGravity="bottom">

    </LinearLayout>

    <TextView
        android:id="@+id/txtTest"
        android:layout_width="100dp"
        android:layout_height="100dp"
        android:layout_margin="25dp"
        android:background="@android:color/holo_green_dark"
        android:padding="10dp"
        android:text="This is a TextView in CoordinatorLayout"
        app:layout_anchor="@+id/frID"
        app:layout_anchorGravity="right|bottom"
        app:layout_behavior="net.xuanthulba.coordinator.FirstBehavior" />


</android.support.design.widget.CoordinatorLayout>

Bạn cũng có thể thiết lập app:layout_anchorGravity bằng code (kể các thuộc tính khác)
public class CoordinatorActivity extends AppCompatActivity {

    TextView txtTest;
    CoordinatorLayout.LayoutParams txtTestLayout;
    @Override
    protected void onCreate(Bundle savedInstanceState) {
        super.onCreate(savedInstanceState);
        setContentView(R.layout.activity_coordinator);

        txtTest = findViewById(R.id.txtTest);
        txtTestLayout = (CoordinatorLayout.LayoutParams)txtTest.getLayoutParams();
        txtTestLayout.anchorGravity = Gravity.TOP | Gravity.CENTER;

    }
}
Tạo Behavior để điều khiển ứng xử của các phần tử trong CoordinatorLayout
Như trên đã nói, các phần tử View bên trong CoordinatorLayout có thể thiết lập thuộc tính app:layout_behavior trỏ đến một lớp Behavior, để điều khiển cách ứng xử của View con. Nói cách khác nếu thiết lập Behavior cho View con, thì nó sẽ nhận được các thông tin như các sự kiện chạm, vuốt, chèn cửa sổ, cuộn ... được gửi tới bởi View con khác.
Cách tạo một Behavior là tạo ra một lớp theo dạng như sau (đây mục đích tạo ra Behavior dùng cho TextView)
package net.xuanthulba.coordinator; //... public class FirstBehavior extends CoordinatorLayout.Behavior{ public FirstBehavior() { } public FirstBehavior(Context context, AttributeSet attrs) { super(context, attrs); } }
Như vậy đã có Behavior là net.xuanthulba.coordinator.FirstBehavior, ví dụ này chỉ khai báo nó chưa làm gì, để thực hiện được chức năng nào đó bạn sẽ cần quá tải (overrided) một số phương thức khác nhau tùy mục đích (xem mục dưới)
Giờ ta có thể gán Behavior tự xây dựng cho phần tử TextView, thực hiện bằng một số cách như:
Gắn Behavior vào View bằng code
TextView txtTest = findViewById(R.id.txtTest);
CoordinatorLayout.LayoutParams = txtTestLayout =
    (CoordinatorLayout.LayoutParams)txtTest.getLayoutParams();
FirstBehavior behavior = new FirstBehavior();
txtTestLayout.setBehavior(behavior);
Gắn Behavior vào View bằng XML (layout)
<TextView
    android:id="@+id/txtTest"
    android:layout_width="100dp"
    android:layout_height="100dp"
    android:layout_margin="10dp"
    android:background="@android:color/holo_orange_light"
    android:padding="10dp"
    android:text="This is a TextView in CoordinatorLayout"
    app:layout_anchor="@+id/frID"
    app:layout_anchorGravity="right|bottom"
    app:layout_behavior="net.xuanthulba.coordinator.FirstBehavior" />
Tự động gắn Behavior vào View
Cách này bạn phải khai báo lớp View, sau đó tử dụng trong Layout thì nó tự động gắn Behavior. Để làm điều này sử dụng Annotation trong Android, ví dụ
@CoordinatorLayout.DefaultBehavior(FirstBehavior.class)
class MyTextView extends TextView {
  //..
}
Giờ trong Layout XML, nếu sử dụng MyTextView nó sẽ tự động có Behavior trên
<MyTextView
    android:id="@+id/txtTest"
    android:layout_width="100dp"
    android:layout_height="100dp"
    android:layout_margin="10dp"
    android:background="@android:color/holo_orange_light"
    android:padding="10dp"
    android:text="This is a TextView in CoordinatorLayout"
    app:layout_anchor="@+id/frID"
    app:layout_anchorGravity="right|bottom"
Tiếp sau đây, triển khai chi tiết Behavior theo từng mục đích
Bắt sự kiện Touch trong Behavior
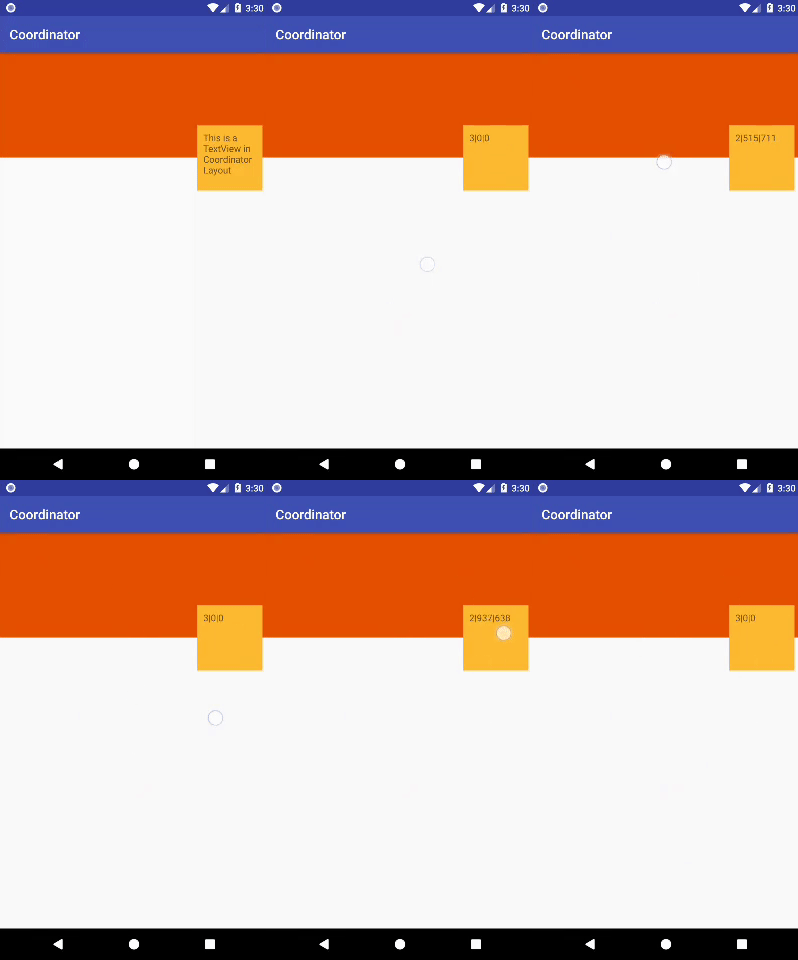
Với CoordinatorLayout phương thức onInterceptTouchEvent() của nó sẽ bỏ qua, thay vào đó
nó sẽ gọi onInterceptTouchEvent() của Behavior, và điều này giúp cho Behavior (cách khác chính là các View con) chặn
được sự kiện Touch. Bằng cách trả về true thì Behavior sau đó sẽ nhận các sự kiện thông qua onTouchEvent()
Ngoài ra còn có phương thức, blocksInteractionBelow để cho CoordinatorLayout biết các View phía sau
có bị khóa tương tác Touch không
Trở lại lớp FirstBehavior ta sẽ quá tải các phương thức: onInterceptTouchEvent, onTouchEvent
public class FirstBehavior extends CoordinatorLayout.Behavior<TextView> {
    public FirstBehavior() {

    }

    public FirstBehavior(Context context, AttributeSet attrs) {
        super(context, attrs);
    }


    @Override
    public boolean onInterceptTouchEvent(CoordinatorLayout parent,
                                        TextView child, MotionEvent ev) {
        //Hàm này nhận sự kiện Touch (down) ban đầu nếu nhấn trong CoordinatorLayout
        //Nếu thiết lập trả về true thì onToucheEvent sẽ nhận các sự kiện
        //Tiếp theo và các View con khác không nhận được Touch

        child.setText(ev.getAction()+"|"+(int)ev.getX()+"|"+(int)ev.getY());
        return true;

    }

    @Override
    public boolean onTouchEvent(CoordinatorLayout parent,
                                TextView child, MotionEvent ev) {
        child.setText(ev.getAction()+"|"+(int)ev.getX()+"|"+(int)ev.getY());
        return true;
    }


}
Chạy thử, bạn có thể chạm vuốt bên bất ký đâu trên màn hình

Bắt sự kiện Measurement, Layout
Measurement, Layout là thành phần cần thiết để Android vẽ các View. Khi CoordinatorLayout xác định kích thước các View con, bạn có thể chặn lại để can thiệp bằng cách quá tải hàm onMeasureChild(), onLayoutChild()
Đoạn mã sau, thêm maxWidth nếu kích thước lớn hơn chiều rộng
public class FirstBehavior extends CoordinatorLayout.Behavior<TextView> {
    //...
    @Override
    public boolean onMeasureChild(CoordinatorLayout parent, V child,
            int parentWidthMeasureSpec, int widthUsed,
            int parentHeightMeasureSpec, int heightUsed) {
        if (mMaxWidth <= 0) {
            // No max width means this Behavior is a no-op
            return false;
        }
        int widthMode = MeasureSpec.getMode(parentWidthMeasureSpec);
        int width = MeasureSpec.getSize(parentWidthMeasureSpec);

        if (widthMode == MeasureSpec.UNSPECIFIED || width > mMaxWidth) {
            // Sorry to impose here, but max width is kind of a big deal
            width = mMaxWidth;
            widthMode = MeasureSpec.AT_MOST;
            parent.onMeasureChild(child,
                    MeasureSpec.makeMeasureSpec(width, widthMode), widthUsed,
                    parentHeightMeasureSpec, heightUsed);
            // We've measured the View, so CoordinatorLayout doesn't have to
            return true;
        }

        // Looks like the default measurement will work great
        return false;
    }
}
Sự phụ thuộc nhau của View trong CoordinatorLayout
Behavior của View này bạn có thể nhận thông tin khi một View khác nó phụ thuộc vào thay đổi vị trí, kích thước ...
Khi View nó phụ thuộc thay đổi vị trí CoordinatorLayout sẽ gọi phương thức onDependentViewChanged() của Behavior. Phương thức
này xây dựng như sau
public class FirstBehavior extends CoordinatorLayout.Behavior<TextView> {
    //Mỗi khi View nó dựa vào thay đổi vị trí, dịch chuyển, kích cỡ ... sẽ gọi hàm này
    @Override
    public boolean onDependentViewChanged(CoordinatorLayout parent,
                                          TextView child, View dependency) {
        //...Code của bạn
        return super.onDependentViewChanged(parent, child, dependency);
    }
    //..
}
Tuy nhiên để onDependentViewChanged được CoordinatorLayout gọi bạn cần thiết lập View nào nó phụ thuộc vào, trong Layout
có thể làm điều này chính là thuộc tính:
app:layout_anchor="@+id/frID"
Hoặc bạn quá tải phương thức layoutDependsOn trả về true View nào cần phù thuộc
public class FirstBehavior extends CoordinatorLayout.Behavior<TextView> {
//..
    @Override
    public boolean layoutDependsOn(CoordinatorLayout parent,
                                   TextView child, View dependency) {
     //Kiểm tra nếu dựa vào dependency thì trả về true, nếu không dựa vào dependency
     //trả về false
     //Trả về true thì onDependentViewChanged sẽ được gọi mỗi khi dependency thay đổi
    }
//...
}
Ví dụ áp dụng, bạn có thể neo FloatingActionBar vào AppBarLayout,
FloatingActionButton.Behavior sẽ nhận được thông tin mỗi khi AppBarLayout cuộn khỏi mà hình
thì ẩn đi FAB. Xem mã nguồn FloatingActionButton.Behavior
Nested Scrolling
Một số loại View như RecyclerView, NestedScrollView ... bên trong CoordinatorLayout khi nó cuộn nội dung trong nó
thì nó phát sinh sự kiện cuộn đó tạm gọi là Nested Scrolling, bất kỳ View con nào trong CoordinatorLayout
đều có cơ hội nhận được sự kiện này thông qua Behavior
Các phương thức có thể overried để xử lý nhận sự kiện Nested Scrolling
onStartNestedScrollgọi khi View con khởi tạo quá trình Nested Scroll trong CoordinatorLayoutonNestedFlinggọi khi View con fling (cử chỉ vuốt nhanh)onNestedPreFlinggọi khi View con bắt đầu flingonNestedPreScrollgọi khi tiến trình Nested scroll chuẩn bị cập nhật mớionNestedScrollgọi khi nested scrollonNestedScrollAcceptedgọi khi nested scroll đã chấp nhận trong CoordinatorLayoutonStopNestedScrollgọi khi quá trình Nested scroll kết thúc
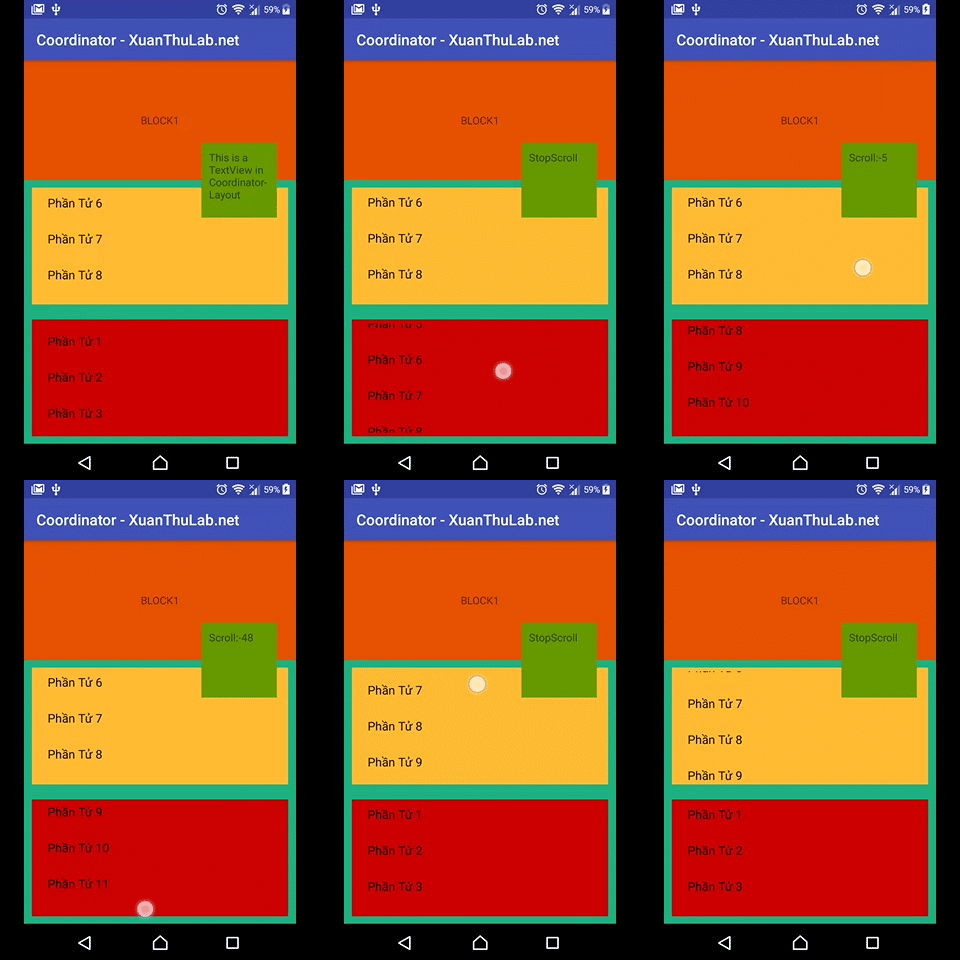
Để thực hiện ví dụ trường hợp trên, cập nhật lại res\layout\activity_coordinator.xml sử dụng thêm RecyclerView
<?xml version="1.0" encoding="utf-8"?>
<android.support.design.widget.CoordinatorLayout xmlns:android="http://schemas.android.com/apk/res/android"
    xmlns:app="http://schemas.android.com/apk/res-auto"
    xmlns:tools="http://schemas.android.com/tools"
    android:layout_width="match_parent"
    android:layout_height="match_parent"

    android:fitsSystemWindows="true"
    tools:context="net.xuanthulba.coordinator.CoordinatorActivity">


    <TextView
        android:id="@+id/frID"
        android:layout_width="match_parent"
        android:layout_height="160dp"
        android:text="BLOCK1"
        android:gravity="center"

        android:background="#e65100" />


    <LinearLayout
        android:layout_width="match_parent"
        android:layout_height="match_parent"
        android:orientation="vertical"
        android:layout_marginTop="160dp"
        android:background="#1db182"
        app:layout_anchorGravity="bottom">

        <android.support.v7.widget.RecyclerView
            android:layout_margin="10dp"
            android:padding="5dp"
            android:id="@+id/mylistview"
            android:layout_width="match_parent"
            android:layout_height="0dp"
            android:layout_weight="1"
            android:background="@android:color/holo_orange_light" />

        <android.support.v7.widget.RecyclerView
            android:layout_margin="10dp"
            android:padding="5dp"
            android:id="@+id/mylistview_2"
            android:layout_width="match_parent"
            android:layout_height="0dp"
            android:layout_weight="1"
            android:background="@android:color/holo_red_dark" />
    </LinearLayout>

    <TextView
        android:id="@+id/txtTest"
        android:layout_width="100dp"
        android:layout_height="100dp"
        android:layout_margin="25dp"
        android:background="@android:color/holo_green_dark"
        android:padding="10dp"
        android:text="This is a TextView in CoordinatorLayout"
        app:layout_anchor="@+id/frID"
        app:layout_anchorGravity="right|bottom"
        app:layout_behavior="net.xuanthulba.coordinator.FirstBehavior" />


</android.support.design.widget.CoordinatorLayout>
Tiến hành thêm vào FirstBehavior các phương thức overrided ở trên:
public class FirstBehavior extends CoordinatorLayout.Behavior<TextView> {
//..
    //CoordinatorLayout gọi bất kỳ View nào có khả năng Nested Scrolll bắt đầu đăng ký quá trình
    //Nested Scroll trong CoordinatorLayout, ví dụ này chỉ nhận Nested Scrolll từ
    //RecylerView có ID :  R.id.mylistview_2
    @Override
    public boolean onStartNestedScroll(@NonNull CoordinatorLayout coordinatorLayout,
                                       @NonNull TextView child, @NonNull View directTargetChild, @NonNull View target, int axes, int type) {
        Log.i(TAG, "onStartNestedScroll:"+target.getId());
        if (target.getId() == R.id.mylistview_2)
            return true;
        return false;
    }


    //Gọi khi View con scroll
    @Override
    public void onNestedScroll(@NonNull CoordinatorLayout coordinatorLayout, @NonNull TextView child, @NonNull View target, int dxConsumed, int dyConsumed, int dxUnconsumed, int dyUnconsumed, int type) {
        Log.i(TAG, "onNestedScroll:"+target.getId());
        ((TextView)coordinatorLayout.findViewById(R.id.txtTest)).setText("Scroll:"+dyConsumed);
        super.onNestedScroll(coordinatorLayout, child, target, dxConsumed, dyConsumed, dxUnconsumed, dyUnconsumed, type);
    }


    @Override
    public void onStopNestedScroll(@NonNull CoordinatorLayout coordinatorLayout, @NonNull TextView child, @NonNull View target, int type) {
        Log.i(TAG, "onStopNestedScroll:"+target.getId());
        ((TextView)coordinatorLayout.findViewById(R.id.txtTest)).setText("StopScroll");
        super.onStopNestedScroll(coordinatorLayout, child, target, type);
    }

    @Override
    public void onNestedPreScroll(@NonNull CoordinatorLayout coordinatorLayout, @NonNull TextView child, @NonNull View target, int dx, int dy, @NonNull int[] consumed, int type) {
        Log.i(TAG, "onNestedPreScroll");
        super.onNestedPreScroll(coordinatorLayout, child, target, dx, dy, consumed, type);
    }

    //onNestedPreFling: Được View con gọi khi chuẩn bị fling, nó gọi hàm này để kiểm tra điều kiện thực hiện fling
    //nếu Behavior trả về true, nghĩa là nó dùng fling và dẫn tới View con không fling nữa
    @Override
    public boolean onNestedPreFling(@NonNull CoordinatorLayout coordinatorLayout, @NonNull TextView child, @NonNull View target, float velocityX, float velocityY) {
        Log.i("XXX", "onNestedPreFling");
        return super.onNestedPreFling(coordinatorLayout, child, target, velocityX, velocityY);
    }
    //onNestedFling gọi khi View con thực hiện fling
    @Override
    public boolean onNestedFling(@NonNull CoordinatorLayout coordinatorLayout, @NonNull TextView child, @NonNull View target, float velocityX, float velocityY, boolean consumed) {
        Log.i("XXX", "onNestedFling");
        return super.onNestedFling(coordinatorLayout, child, target, velocityX, velocityY, consumed);
    }
//..
Để đưa một danh sách ví dụ trong RecylerView bạn sử dụng code như sau (Đọc thêm riêng về RecylerView để giải thích chi tiết)
/**
 * Lớp biểu diễn Holder trong RecycleView
 */
class ElementViewHolder extends RecyclerView.ViewHolder
{
    TextView textView;

    public ElementViewHolder(TextView itemView) {
        super(itemView);
        textView = itemView;
    }

    public TextView getTextView() {
        return textView;
    }
}

/**
 * Adapter cho danh sách phần tử Text dùng trong RecycleView
 */
class ElementsAdapter extends RecyclerView.Adapter {

    LayoutInflater inflater = LayoutInflater.from(getBaseContext());
    String[] arWords = new String[] {
            "Phần Tử 1", "Phần Tử 2",
            "Phần Tử 3", "Phần Tử 4",
            "Phần Tử 5", "Phần Tử 6",
            "Phần Tử 7", "Phần Tử 8", "Phần Tử 9", "Phần Tử 10",
            "Phần Tử 11", "Phần Tử 12", "Phần Tử 13", "Phần Tử 14",
            "Phần Tử 15", "Phần Tử 16", "Phần Tử 17",
            "Phần Tử 18", "Phần Tử 19", "Phần Tử 20", "Phần Tử 21",
            "Phần Tử 22", "Phần Tử 23", "Phần Tử 24", "Phần Tử 25"};
    @Override
    public RecyclerView.ViewHolder
    onCreateViewHolder(ViewGroup parent, int viewType) {
        TextView v = (TextView)inflater
                .inflate(android.R.layout.simple_list_item_1, parent, false);
        return new ElementViewHolder(v);
    }

    @Override
    public void onBindViewHolder(RecyclerView.ViewHolder holder, int position) {
        ((ElementViewHolder)holder).getTextView().setText(arWords[position]);
    }

    @Override
    public int getItemCount() {
        return arWords.length;
    }
}
Trong onCreate của Activity thêm vào
//Sử dụng RecyclerView
RecyclerView listView = findViewById(R.id.mylistview);
RecyclerView.Adapter adapter = new  ElementsAdapter();
listView.setLayoutManager(new LinearLayoutManager(this));

listView.setAdapter(adapter);

RecyclerView listView2 = findViewById(R.id.mylistview_2);
RecyclerView.Adapter adapter2 = new  ElementsAdapter();
listView2.setLayoutManager(new LinearLayoutManager(this));

listView2.setAdapter(adapter);
Chạy thử và xem LogCat để biết cách ứng xử của nó như thế nào

Các View có phát sinh Nested Scroll tham khảo: NestedScrollView, RecylerView, SwipeRefreshLayout, AppBarLayout

