Trong phần này sẽ tìm hiểu về cấu trúc cơ bản của một thư mục dự án viết Script Ruby, Extension cho SketchUp, cấu hình để nạp Extension từ thư mục bên ngoài vào SketchUp, cấu hình để Debugger làm việc với Sketchup trong môi trường IDE Visual Studio Code, thông qua đó để gỡ rối các script ruby viết cho Sketchup
Ví dụ cấu trúc một dự án ruby cho Sketchup
Ví dụ đầu tiên này, tạo ra một Extension có chức năng vẽ một khối lập phương (cube).
Trong Code có khai báo tạo ra một Module chính tên là XuanThuLab, bên trong nó có
module MyCube chứa hàm create_cube để vẽ hình lập phương.
Tổ chức, thư mục và các file như sau:
─ 01-first-cube
  ├── first-cube.rb
  └── src
      └── main.rb
Trong đó thư mục 01-first-cube là thư mục gốc của dự án, các file code sẽ lưu vào thư
mục con src
# Dùng để Sketchup nạp src/main
require 'sketchup.rb'
require 'extensions.rb'

module XuanThuLab
  module MyCube
     unless file_loaded?(__FILE__)
      ex = SketchupExtension.new('My Cube', 'src/main')
      ex.description = 'Tạo khối Cube'
      ex.version     = '1.0.0'
      ex.copyright   = 'XuanThuLab 2016'
      ex.creator     = 'xuanthulab.net'

      Sketchup.register_extension(ex, true)
      file_loaded(__FILE__)
    end

    # Nạp lại File extension (main.rb)
    # Để gõ vào Console: XuanThuLab::MyCube.reload thì nạp lại Extension này mà không cần
    # khởi động lại Sketchup
    def self.reload
      original_verbose = $VERBOSE
      $VERBOSE = nil
      pattern = File.join(__dir__, '**/*.rb')

      Dir.glob(pattern).each { |file|
        load file
      }.size
    ensure
      $VERBOSE = original_verbose
    end

  end # module XuanThuLab
end # module MyCube
01-first-cube/src/main.rb
require 'sketchup.rb'
module XuanThuLab
module MyCube
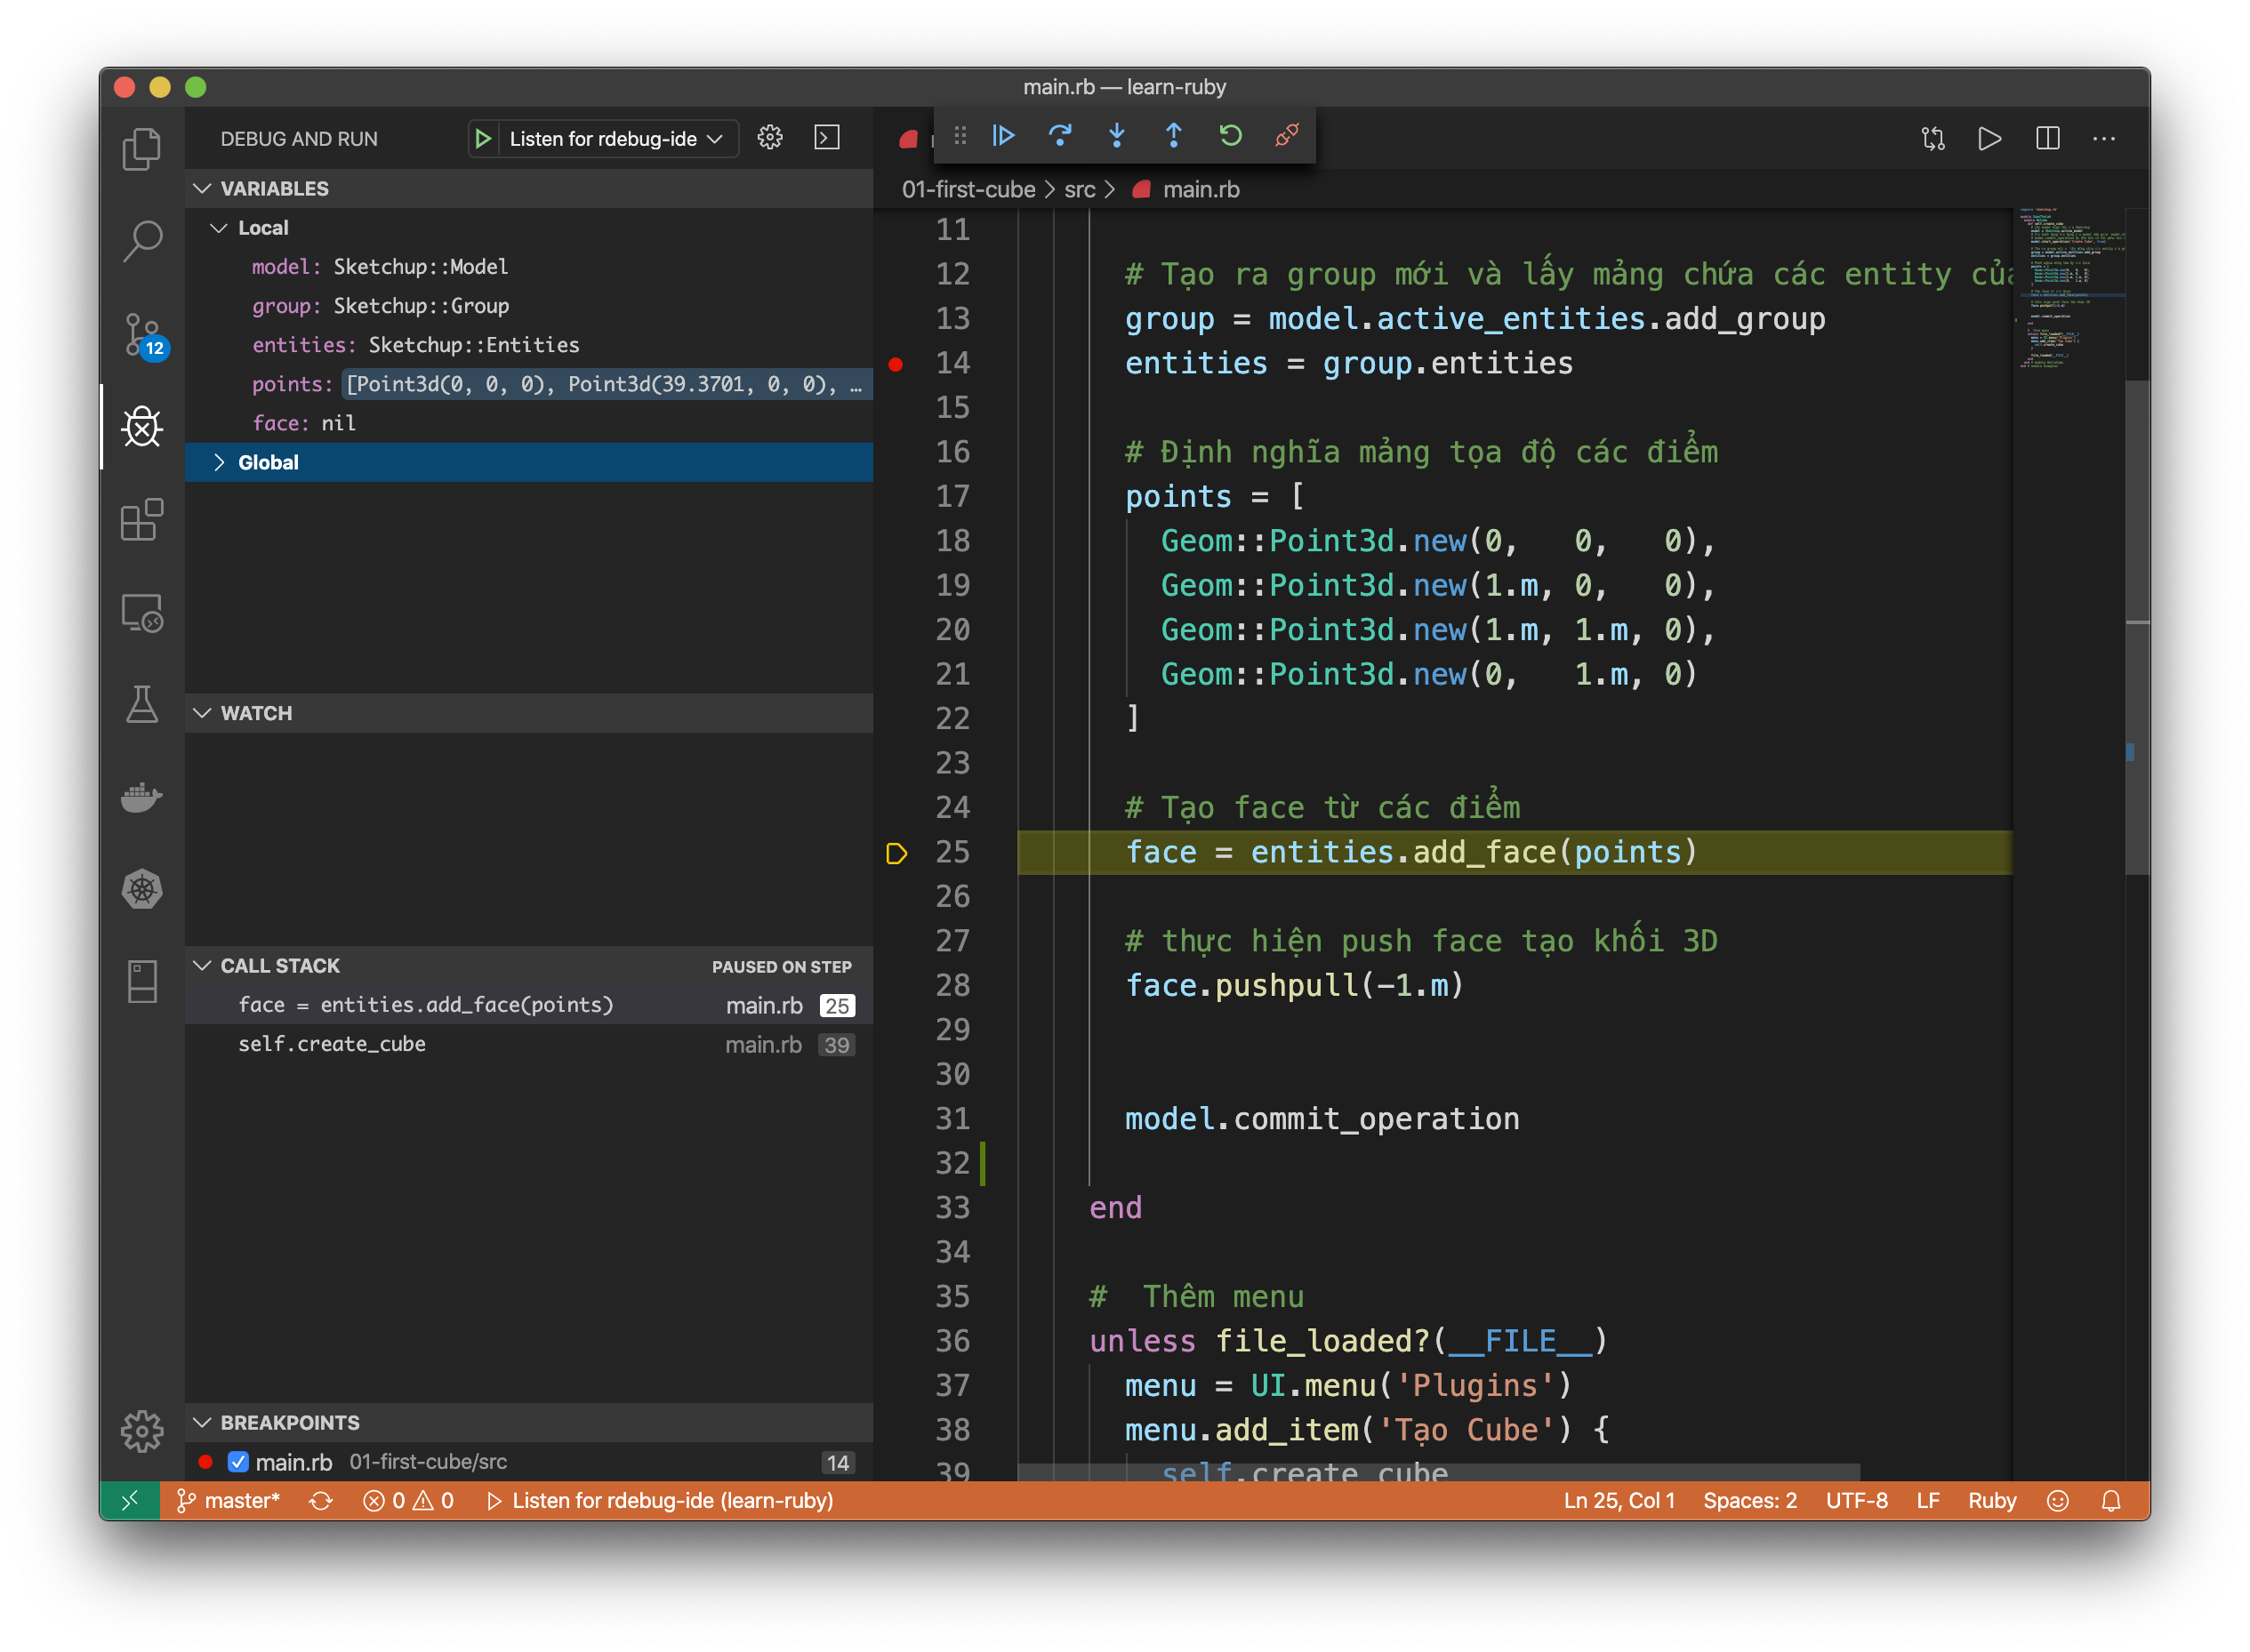
def self.create_cube
# Lấy model hiện tại của Sketchup
model = Sketchup.active_model
# Các hoạt động tác động vào model nằm giữa model.start_operation và
# model.commit_operation để đảm bảo có thể phục hồi (undo)
model.start_operation('Create Cube', true)
# Tạo ra group mới và lấy mảng chứa các entity của group
group = model.active_entities.add_group
entities = group.entities
# Định nghĩa mảng tọa độ các điểm
points = [
Geom::Point3d.new(0, 0, 0),
Geom::Point3d.new(1.m, 0, 0),
Geom::Point3d.new(1.m, 1.m, 0),
Geom::Point3d.new(0, 1.m, 0)
]
# Tạo face từ các điểm
face = entities.add_face(points)
# thực hiện push face tạo khối 3D
face.pushpull(-1.m)
model.commit_operation
end
# Thêm menu
unless file_loaded?(__FILE__)
menu = UI.menu('Plugins')
menu.add_item('Tạo Cube') {
self.create_cube
}
file_loaded(__FILE__)
end
end # module HelloCube
end # module Examples
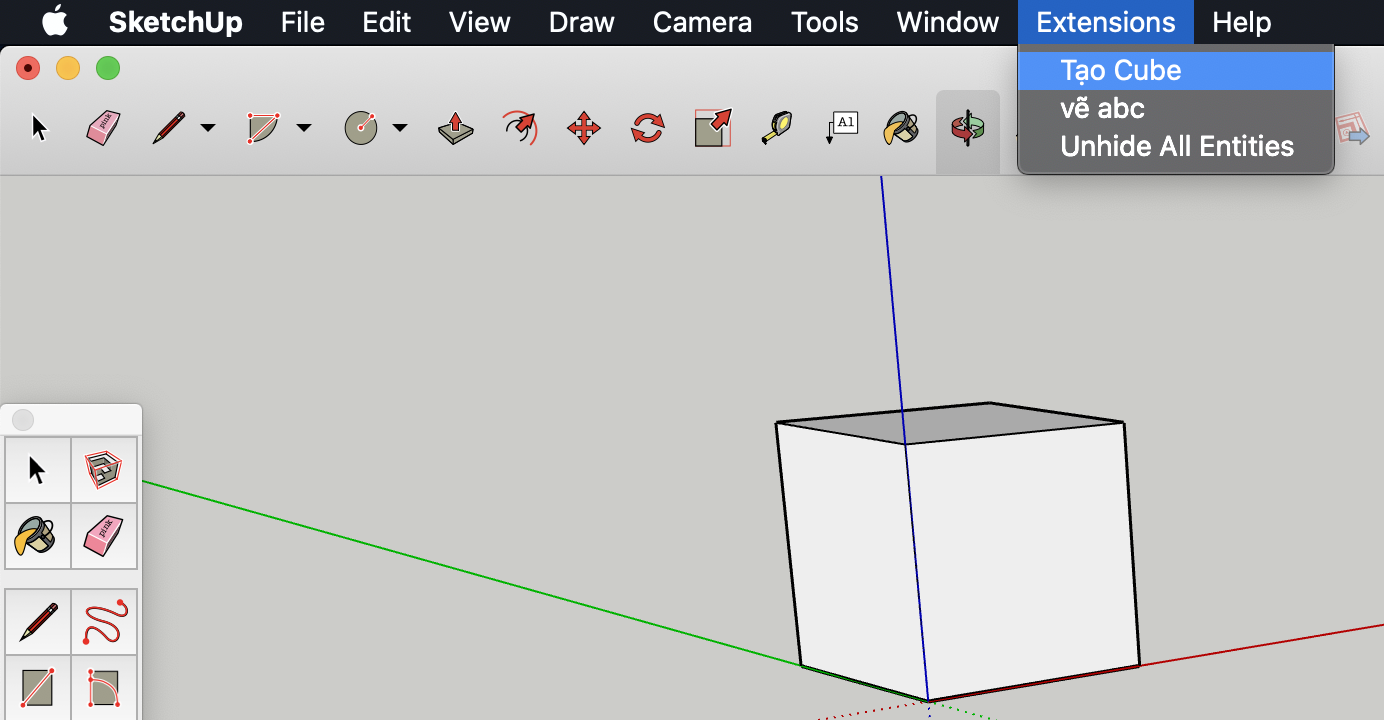
Như vậy đã có một Extension, nếu copy toàn bộ nội dung trong thư mục 01-first-cube
vào thư mục Plugin của Sketchup thì Extension sẽ nạp khi khởi động Sketchup, lúc đó tại menu
Extensions có mục chọn Tạo Cube, khi bấm chọn vào đó thì mã vẽ hình lập phương sẽ thực hiện.
Trong Extension trên khi cập nhật code cần nạp lại thay vì khởi động lại SketchUp bạn chỉ cần gõ
XuanThuLab::MyCube.reload vào cửa sổ Console Ruby
Nạp Extension vào SketchUp từ thư mục ngoài
Thay vì phải copy các Extension vào thư mục Plugins của SketchUp bạn có thể cấu hình để nó nạp extensions từ các thư mục bên ngoài nữa (tiện dụng khi nó nạp trực tiếp từ các thư mục bạn đang soạn thảo script ruby).
Thãy tạo một file đặt tên là loadexternal.rb trong thư mục Plugins của Sketchup
Sau đó biên tập nó với nội dung:
paths = [
  "/Users/xuanthulab/Desktop/learn-ruby/01-first-cube",
  # Thêm các thư mục khác nếu muốn,
]


# Un-comment if you want to see any potential loading errors in the Ruby
# Console:
# SKETCHUP_CONSOLE.show

paths.each { |path|
  $LOAD_PATH << path
  Dir.glob("#{path}/*.{rb,rbs,rbe}") { |file|
    Sketchup.require(file)
  }
}
File trên cấu hình nạp các file ruby ở thư mục /Users/xuanthulab/Desktop/learn-ruby/01-first-cube, ngoài ra cũng có thể cấu hình nạp nhiều thư mục nếu muốn.
Như vậy mã tại thư mục 01-first-cube được nạp mà không cần copy vào Plugins, bạn có thể vẫn soạn thảo
code Ruby
Thiết lập Debugger với Visual Studio Code
Đảm bảo Visual Studio Code có cài đặt Ruby extension (Ruby)
Cài đặt SketchUp Ruby API Debugger
Đối với Windows
Tải file DLL bản cuối cùng tại
Release
, sau đó copy vào thư mục cài đặt SketchUp (C:\Program Files\SketchUp\SketchUp 2019\)
Chạy SketchUp từ dòng lệnh (Cmd): SketchUp.exe -rdebug "ide port=7000"
Đối với macOs
Tải file SURubyDebugger.dylib vào thư mục ứng dụng SketchUp bằng lệnh:
curl -L https://github.com/SketchUp/sketchup-ruby-debugger/releases/download/1.2.0.0/SURubyDebugger.dylib -o /Applications/SketchUp\ 2019/SketchUp.app/Contents/Frameworks/SURubyDebugger.dylib
Chạy SketchUp với lệnh:
open -a /Applications/SketchUp\ 2019/SketchUp.app --args -rdebug "ide port=7000"
Thiết lập Ruby API Debugger trong Visual Studio Code
Mở dự án đang phát triển với VSC, chọn menu: Terminal > Configure Tasks (chọn tạo
tasks.json), nếu có hỏi thì chọn tiếp Others. Lúc này nó tạo ra file tasks.json
ở thư mục .vscode
Mở file tasks.json và thay nội dung bằng:
{

    "version": "2.0.0",
    "tasks": [
      {
        "label": "Debug SketchUp 2017",
        "type": "shell",
        "command": "open -a '/Applications/SketchUp 2919/SketchUp.app' --args -rdebug 'ide port=7000'",
        "windows": {
          "command": "&'C:/Program Files/SketchUp/SketchUp 2019/SketchUp.exe' -rdebug 'ide port=7000'"
        }
      }
    ]
}
Tiếp tục, chọn menu Debug > Add Configution, chọn Ruby, chọn
Listen for rdebug-ide
Mở file lauch.json và cập nhật thành
{
    "version": "0.2.0",
    "configurations": [
      {
        "name": "Listen for rdebug-ide",
        "type": "Ruby",
        "request": "attach",
        "cwd": "${workspaceRoot}",
        "remoteHost": "127.0.0.1",
        "remotePort": "7000",
        "remoteWorkspaceRoot": "${workspaceRoot}"
      }
    ]
}
Lúc này, nếu SketchUp đang chạy ở chế độ Debug bằng dòng lệnh ở trên thì từ VSC có thể Debug các script bạn đang soạn thảo từ thư mục của dự án.
Bạn nhấn F5 để bắt đầu Debug
Thiết lập API Stubs
Phần này thiết lập API Stubs để có gợi ý code khi viết script. Trước tiên cần đảm bảo cài đặt Standalone Ruby :
Đối với Windows cài đặt từ rubyinstaller.org
Đối với macOS sử dụng RMV bằng các lệnh:
brew install gnupg
Tham khảo: rvm.io/rvm/install
gpg --keyserver hkp://pool.sks-keyservers.net --recv-keys 409B6B1796C275462A1703113804BB82D39DC0E3 7D2BAF1CF37B13E2069D6956105BD0E739499BDB
#hoặc gpg --keyserver hkp://keys.gnupg.net --recv-keys 409B6B1796C275462A1703113804BB82D39DC0E3 7D2BAF1CF37B13E2069D6956105BD0E739499BDB
curl -sSL https://get.rvm.io | bash -s stable --ruby
source ~/.rvm/scripts/rvm
Tiếp theo đảm bảo Visual Studio Code đã cài đặt extension: Ruby và Ruby Solargraph
Tiếp tục chạy các lệnh sau:
gem install yard
gem install solargraph
gem install sketchup-api-stubs
yard gems sketchup-api-stubs
Trong thư mục dự án VSC tạo các file với nội dung sau:
.vscode/settings.json
{
  "solargraph.diagnostics": true
}
.solargraph.yml
# To allow solargraph to resolve the require paths correctly, add the path
# to the Tools directory of one of your SketchUp installations.
# You also want to add the path to where you have the extension's sources.
# (In this example it would be in a `src` directory relative to .solargraph.yml)
require_paths:
- "C:/Program Files/SketchUp/SketchUp 2018/Tools"
- src

# This will load the stubs for the SketchUp API.
require:
- sketchup-api-stubs

# Exclude files that doesn't need to be parsed. Avoids noise and improve performance.
exclude:
- /build/**/*
- /ThirdParty/**/*
Lúc này viết code sẽ có gợi ý về cú pháp