HtmlDialog là lớp cho tạo và tương tác với hộp thoại HTML bằng ruby.
Tạo hộp thoại HtmlDialog
Ví dụ tạo hộp thoại đơn giản:
dialog = UI::HtmlDialog.new(
  {
    :dialog_title => "Ví dụ HTML Dialog",   # tiêu đề hộp thoại
    :preferences_key => "xuanthulab.net",   #
    :scrollable => true,                    # cho phép cuộn
    :resizable => true,                     # cho phép thay đổi cỡ
    :width => 600,                          # chiều rộng, cao
    :height => 400,
    :left => 100,                           # vị trí, tọa độ góc trên trái
    :top => 100,
    :min_width => 50,
    :min_height => 50,
    :max_width =>1000,                      # chiều rộng, cao lớn nhất
    :max_height => 1000,
    # kiểu hộp thoại UI::HtmlDialog::STYLE_UTILITY, UI::HtmlDialog::STYLE_WINDOW
    :style => UI::HtmlDialog::STYLE_DIALOG
  })
  # thiết lập Url
  dialog.set_url("https://xuanthulab.net")
  # thiết lập HTML của hộp thoại nếu muốn
  # dialog.set_html("<h1>xuanthulab.net</h1>")
dialog.show
Sửa đổi HtmlDialog
Sau khi có đối tượng HtmlDialog được tạo, có các phương thức để chỉnh sửa đổi tượng được tạo ra:
set_html(html_string) |
Phương thức để nạp nội dung HTML vào hộp thoại
|
set_position(left, top) ⇒ true |
Thiết lập vị trí
|
set_size(width, height) ⇒ true |
Thiết lập cỡ hộp thoại
|
set_url(url) ⇒ nil |
Nạp HTML từ URL
|
#set_file(filename) ⇒ nil |
Nạp HTML từ file
|
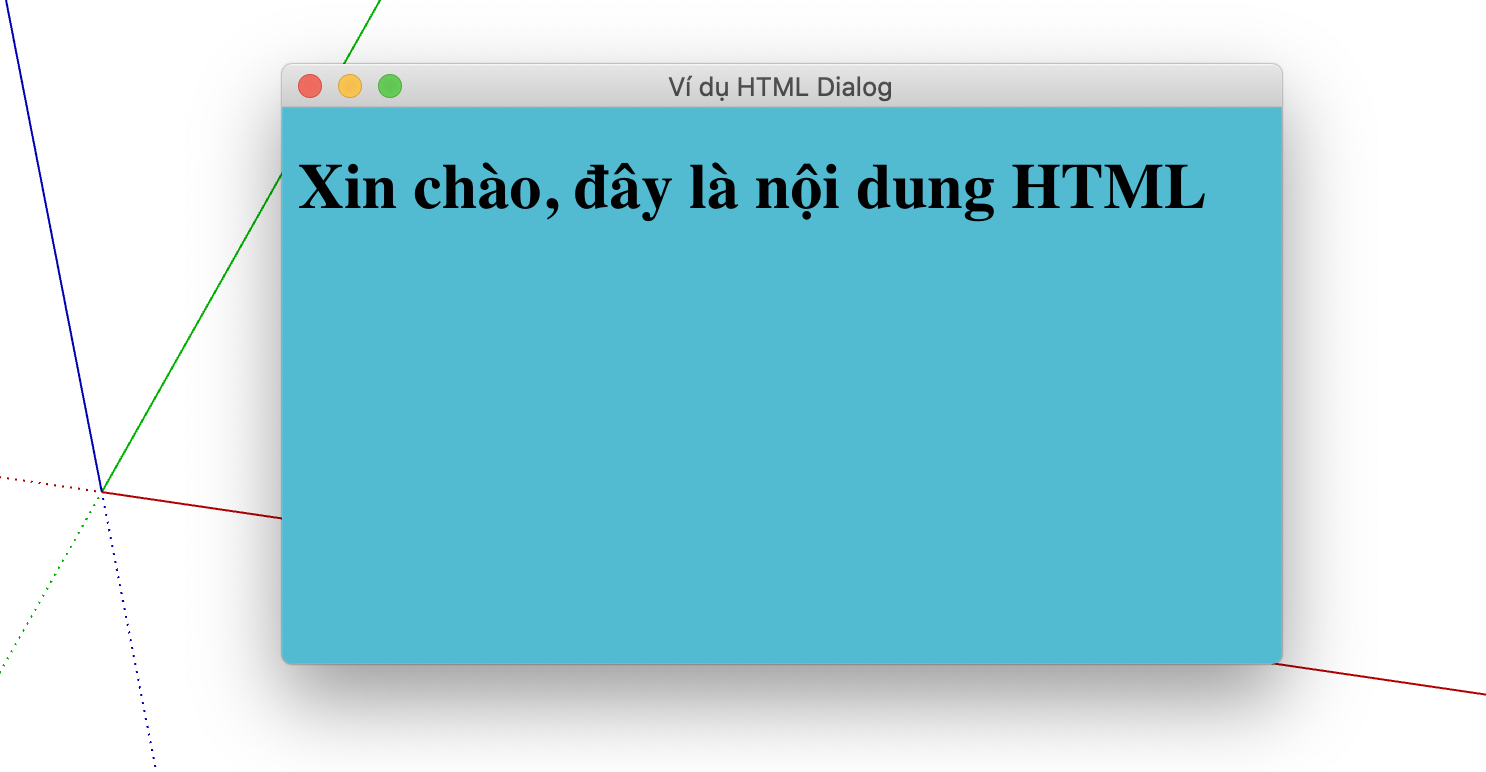
Ví dụ có nội dung html lưu trong file file1.html
<!DOCTYPE html>
<html lang="en">
<head>
  <meta charset="UTF-8">
  <meta name="viewport" content="width=device-width, initial-scale=1.0">
  <title>Ví dụ HTML</title>
</head>
<body style="background-color: #00bcd4;">
    <h1>Xin chào, đây là nội dung HTML</h1>
</body>
</html>
Sử dụng nạp vào hộp thoại
dialog = UI::HtmlDialog.new(
{
  :dialog_title => "Ví dụ HTML Dialog",
  :preferences_key => "xuanthulab.net",
  :scrollable => true,
  :resizable => true,
  :width => 300,
  :height => 200,
  :left => 100,
  :top => 100,
  :min_width => 50,
  :min_height => 50,
  :max_width =>500,
  :max_height => 300,
  :style => UI::HtmlDialog::STYLE_DIALOG
})

dialog.set_file(__dir__ + '/file1.html')
dialog.show
JavaScript, CSS trong HtmlDialog
Các nội dung HTMl trong HtmlDialog có thể tích hợp CSS, JavaScript. Học về CSS tại CSS, học JavaScript tại JavaScript
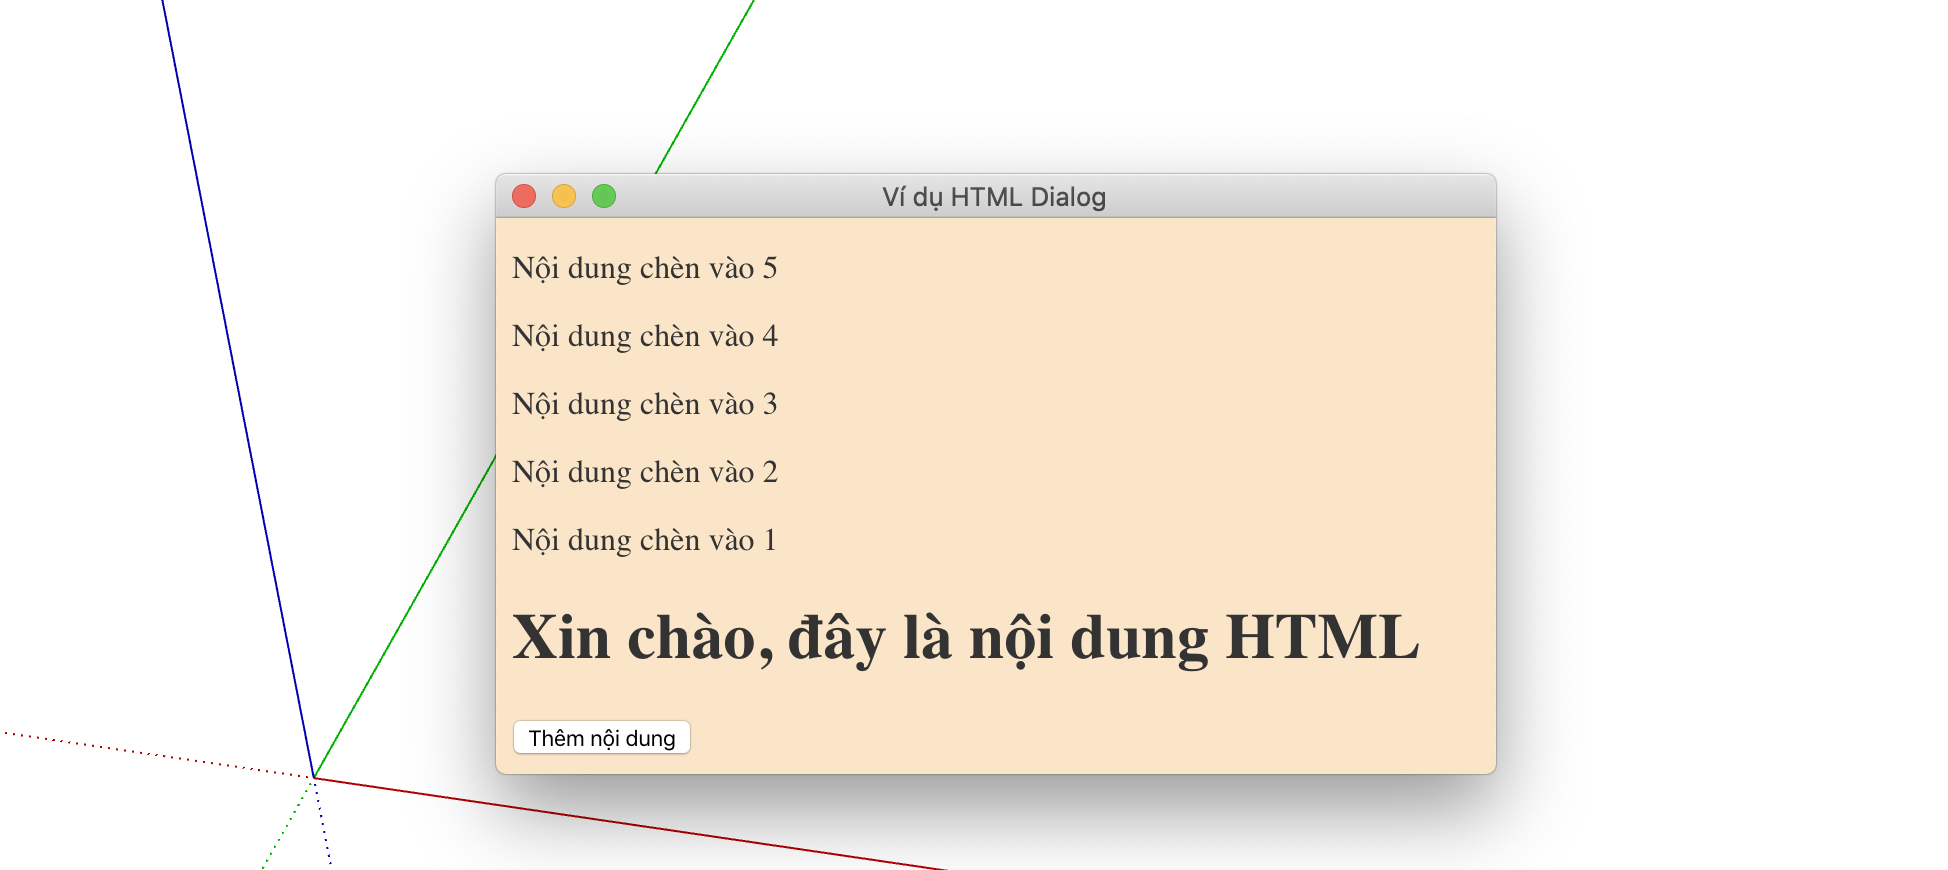
Ví dụ có HTML có tích hợp CSS, JavaScript trong file2.html
<!DOCTYPE html>
<html lang="en">
<head>
  <meta charset="UTF-8">
  <meta name="viewport" content="width=device-width, initial-scale=1.0">
  <title>Ví dụ HTML</title>
  <style>
      #body {
        background-color:bisque;
        color: #333;
      }

  </style>
  <script>
       var i = 0;
       function addcontent()
       {
           i++;
           alert("Sẽ thêm nội dung HTML");
           let bd = document.getElementById('body');
           var n = document.createElement("p");
           n.textContent = "Nội dung chèn vào " + i;
           bd.prepend(n);
       }
  </script>
</head>
<body id="body">
    <h1>Xin chào, đây là nội dung HTML</h1>
    <input type="button" value="Thêm nội dung" onclick="addcontent();" />
</body>
</html>
Sau đó nạp nội dung này vào HtmlDialog
Tương tác qua lại JavaScript và SketchUp Ruby
Chạy JavaScript từ Ruby
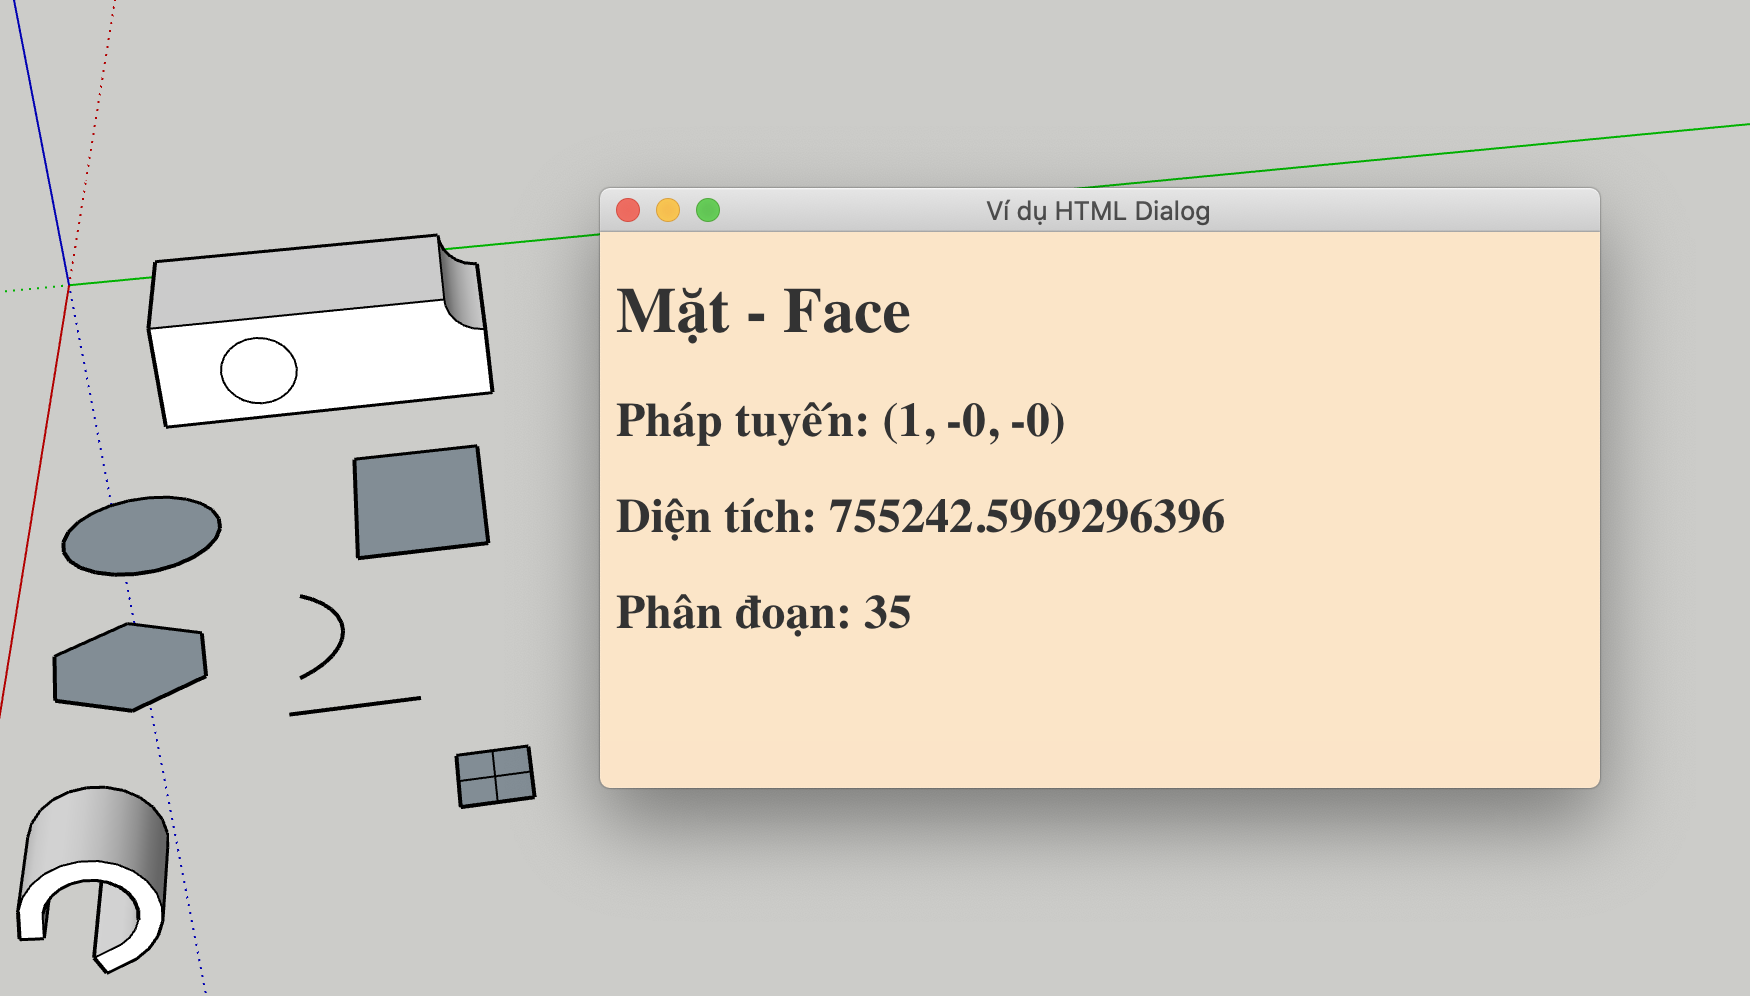
Có thể thi hành một đoạn JavaScript lưu trong một chuỗi (không thẻ script) bằng cách gọi execute_script(script),
ví dụ sau, khi nhấn chọn face hoặc cung tròn thì nó sẽ thi hành một script để thiết lập nội dung hộp thoại
# 28.ruby-call-js.rb
# load "/Users/xuanthulab/Desktop/learn-ruby/sketchup/28.ruby-call-js.rb"
require 'sketchup.rb'
require 'extensions.rb'


class SelObserver < Sketchup::SelectionObserver
  @entityselect = nil
  # @param [Sketchup::Entity] e
  def showinfomation(e)
    @entityselect = e
    puts e.class.to_s
    s = ''
    # @type [Sketchup::ArcCurve]
    curve = nil
    curve = e.curve if e.class.to_s == 'Sketchup::Edge'
    if curve
      #  curve.edges.each {|x| puts x}
      puts curve.class
      if curve.class.to_s == 'Sketchup::ArcCurve'
         if  (curve.end_angle - curve.start_angle).abs  == 2 * Math::PI
            s += "<h1>Hinh tròn</h1>"
         else
            s += "<h1>Cung tròn</h1>"
         end
      end
      s += "<h2>Phân đoạn: #{curve.edges.length}</h2>"
      s += "<h2>Chiều dài: #{curve.length.to_mm}</h2>"
    else
      # Face
      if e.class.to_s == 'Sketchup::Face'
        # @type [Sketchup::Face]
        face = e
        s += "<h1>Mặt - Face</h1>"
        s += "<h2>Pháp tuyến: #{face.normal.to_s}</h2>"
        s += "<h2>Diện tích: #{face.area.to_mm.to_mm}</h2>"
        s += "<h2>Phân đoạn: #{face.edges.length}</h2>"
      end

    end
    s = 'Chọn cung tròn hoặc mặt!' if s == ''

    # Đưa vào Hộp thoại
    $dialoginfo.execute_script("setBodyContent('#{s}')")
  end

  def onSelectionBulkChange(selection)
      first_ent = selection[0]
      if ! (first_ent.equal? @entityselect)
        showinfomation first_ent
      end

  end
end

sel = Sketchup.active_model.selection
if defined?($selob)
  puts "Remove Observer"
  sel.remove_observer $selob
end
$selob = SelObserver.new
sel.add_observer $selob

$dialoginfo = UI::HtmlDialog.new(
  {
    :dialog_title => "Ví dụ HTML Dialog",
    :preferences_key => "xuanthulab.net",
    :scrollable => true,
    :resizable => true,
    :width => 300,
    :height => 200,
    :left => 100,
    :top => 100,
    :min_width => 50,
    :min_height => 50,
    :max_width =>500,
    :max_height => 300,
    :style => UI::HtmlDialog::STYLE_DIALOG
  })


  $dialoginfo.set_file(__dir__ + '/28.ruby-call-js.html')
  $dialoginfo.show
28.ruby-call-js.html
<!DOCTYPE html>
<html lang="en">
<head>
  <meta charset="UTF-8">
  <meta name="viewport" content="width=device-width, initial-scale=1.0">
  <style>
      #body {
        background-color:bisque;
        color: #333;
      }

  </style>
  <script>

       function setBodyContent(s)
       {
          bd = document.getElementById('body');
          bd.innerHTML = s;

       }
  </script>
</head>
<body id="body">
    <h1>Xin chào, đây là nội dung HTML</h1>
</body>
</html>
Chạy Ruby từ JavaScript
Cú pháp để khai báo một callback (phương thức) Ruby - mà có thể gọi được từ JavaScript thì sử dụng add_action_callback của HtmlDialog như sau:
add_action_callback(callback_name) {|action_context, param1, param2, pram3 ... }
Lúc này trong Js có thể gọi callback_name(param1, param2, pram3, ...),
chú ý phần khai báo có action_context hiện không được dùng đến, với cú pháp cụ thể:
sketchup.callback_name(param1, param2, pram3, {
  onCompleted: function() {
    console.log('Ruby side done.');
  }
});
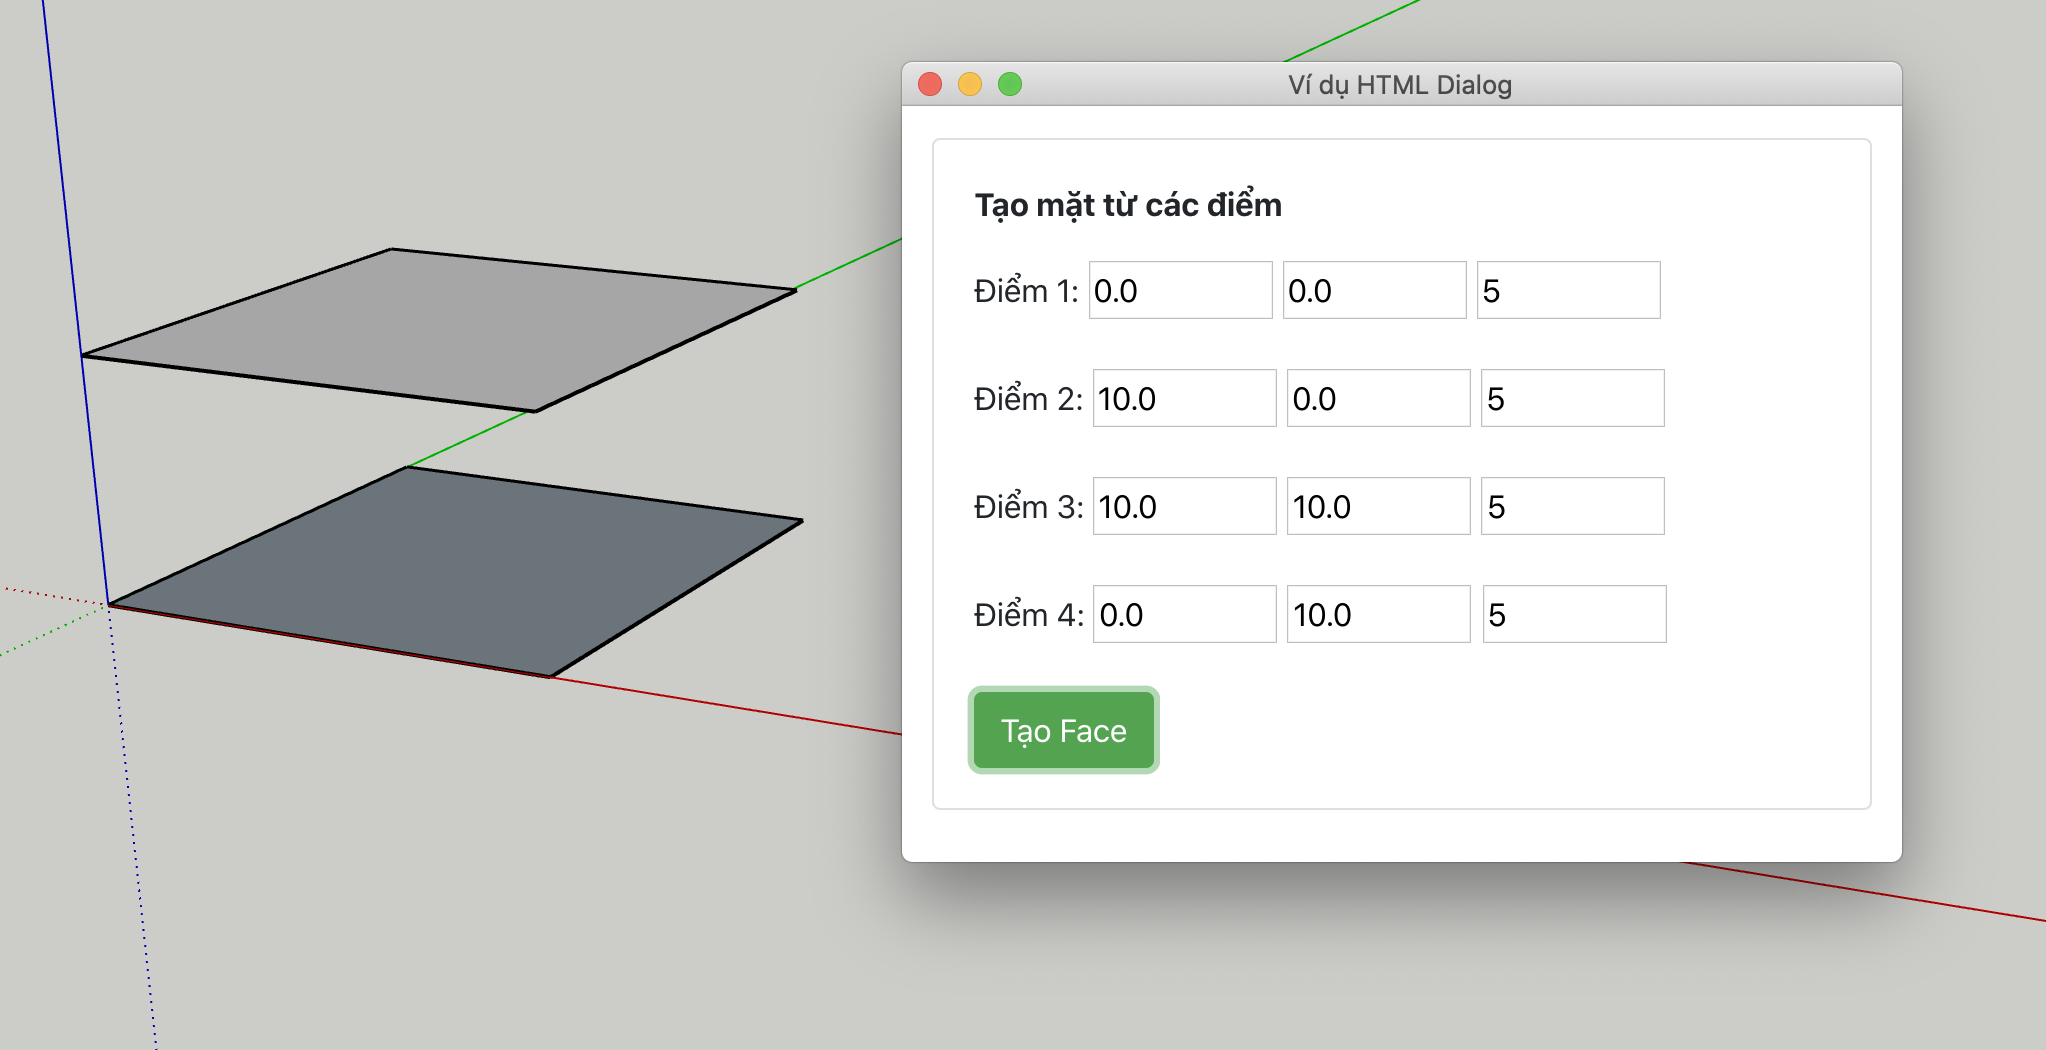
Ví dụ khai báo phương thức callback create_face tạo mặt từ bốn điểm nhập vào:
# 29.js_call_ruby.rb
# load "/Users/xuanthulab/Desktop/learn-ruby/sketchup/29.js_call_ruby.rb"
require 'sketchup.rb'
require 'extensions.rb'

 if defined? $dialoginfo
    $dialoginfo.close
 end
$dialoginfo = UI::HtmlDialog.new(
  {
    :dialog_title => "Ví dụ HTML Dialog",
    :preferences_key => "xuanthulab.net",
    :scrollable => true,
    :resizable => true,
    :width => 300,
    :height => 400,
    :left => 100,
    :top => 100,
    :min_width => 50,
    :min_height => 50,
    :max_width =>500,
    :max_height => 400,
    :style => UI::HtmlDialog::STYLE_DIALOG
  })


  $dialoginfo.set_file(__dir__ + '/29.js_call_ruby.html')


  $dialoginfo.add_action_callback("create_face") {|action_context, points|
    # @type [Array] points
    # points.each {
    #    |e|
    #    # @type [Hash] e
    #  }


    pt1 = Geom::Point3d.new(Float(points[0]['x'].strip).mm, Float(points[0]['y'].strip).mm, Float(points[0]['z'].strip).mm)
    pt2 = Geom::Point3d.new(Float(points[1]['x'].strip).mm, Float(points[1]['y'].strip).mm, Float(points[1]['z'].strip).mm)
    pt3 = Geom::Point3d.new(Float(points[2]['x'].strip).mm, Float(points[2]['y'].strip).mm, Float(points[2]['z'].strip).mm)
    pt4 = Geom::Point3d.new(Float(points[3]['x'].strip).mm, Float(points[3]['y'].strip).mm, Float(points[3]['z'].strip).mm)

    vec1 = pt2 - pt1
    vec2 = pt2 - pt3
    plane = [pt1, vec1 * vec2]

    if pt4.on_plane? plane
      Sketchup.active_model.entities.add_face pt1, pt2, pt3, pt4
    else
      puts "Invalid input. Points must lie on the same plane."
    end

  }


  $dialoginfo.show
Nội dung file HTML
<!DOCTYPE html>
<html lang="en">
<head>
  <meta charset="UTF-8">
  <meta name="viewport" content="width=device-width, initial-scale=1.0">
  <link rel="stylesheet" href="https://stackpath.bootstrapcdn.com/bootstrap/4.3.1/css/bootstrap.min.css" integrity="sha384-ggOyR0iXCbMQv3Xipma34MD+dH/1fQ784/j6cY/iJTQUOhcWr7x9JvoRxT2MZw1T" crossorigin="anonymous">

  <script>

       function send()
       {

        let points = Array();
        for (let index = 1; index <= 4; index++) {
            let point = {}
            point["x"] = document.getElementById('x' + index).value
            point["y"] = document.getElementById('y' + index).value
            point["z"] = document.getElementById('z' + index).value
            points.push(point)
        }
        sketchup.create_face(points, {
            onCompleted: function(ob) {
            }
          });

       }
  </script>
</head>
<body>
    <div class="container pt-3">
       <div class="card w-100">
          <div class="card-body">
            <p><strong>Tạo mặt từ các điểm</strong></p>
            <!-- Location of the first vertex -->
                Điểm 1:
                <input type="text" id="x1" value="0.0" size="10" maxlength="6"/> <input type="text" id="y1" value="0.0" size="10" maxlength="6"/> <input type="text" id="z1" value="0.0" size="10" maxlength="6"/> <br /><br />
                <!-- Location of the second vertex -->
                Điểm 2:
                <input type="text" id="x2" value="10.0" size="10" maxlength="6"/> <input type="text" id="y2" value="0.0" size="10" maxlength="6"/> <input type="text" id="z2" value="0.0" size="10" maxlength="6"/> <br /><br />
                <!-- Location of the third vertex -->
                Điểm 3:
                <input type="text" id="x3" value="10.0" size="10" maxlength="6"/> <input type="text" id="y3" value="10.0" size="10" maxlength="6"/> <input type="text" id="z3" value="0.0" size="10" maxlength="6"/> <br /><br />
                <!-- Location of the fourth vertex -->
                Điểm 4:
                <input type="text" id="x4" value="0.0" size="10" maxlength="6"/> <input type="text" id="y4" value="10.0" size="10" maxlength="6"/> <input type="text" id="z4" value="0.0" size="10" maxlength="6"/> <br /><br />
            <input class="btn btn-success" type="button" onclick="send()" value="Tạo Face">
          </div>
       </div>
    </div>
</body>
</html>